


35
OPERATION
1. Connect all cables as described above.
2. Connect the appropriate power supply to Sonar Processor unit and turn on the
power switch. If the Scanning Head is receiving power from an ROV, turn on
power to the ROV.
3. Turn on the GPS and obtain a position fix. See “Installing hardware and software
section of this manual for instructions on connecting and configuring your GPS.
4. Turn on the PC. If the SCAN-650 is being operated for the first time, the Interface
board must be installed into the computer and the SCAN-650 software loaded
onto the hard disk. See “Installing Hardware and Software” section of this manual.
NOTE: The minimum recommended resolution setting for the PC is 1024 x 768.
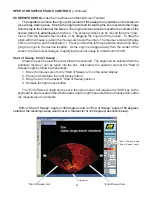
5. Open the SCAN-650 program on the PC.
6. Select the operating parameters from the Right Hand Toolbar (range, step, de-
grees, sector, zoom, etc.). See “Operator Switches and Controls” and “sample
Recording” section of this manual for a complete description of each of these
functions.
7. Choose the proper selections in the Settings menu for your system - see “Set-
tings” section of this manual for complete information on settings. This step is
primarily for first time setup of the system.
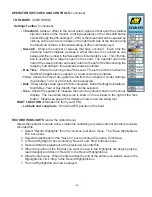
8. Choose the operating mode, either Monitor or Record. In the Monitor mode the
sonar image is displayed on the monitor, but is not saved. In the Record mode the
sonar image is displayed on the monitor and saved to disk or hard drive. The
Monitor mode can be selected by clicking on the green arrow on the toolbar. The
Record mode can be selected by clicking on the red button on the toolbar.
The SCAN-650 is now ready to operate. Recorded files can be played back at any
time by clicking the playback arrow on the toolbar. If the operator does not select a file
from the file menu, the last recorded file will automatically be played back.
Summary of Contents for SCAN-650
Page 10: ...10 LEFT BLANK...


