background image

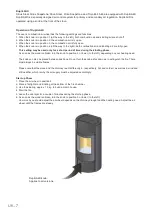
7. Stoking Instructions


It is very important to ensure that your chimney has a decent draught (at least 12 Pa chimney draught).  The 
Alpha and Omega is the cooperation between the chimney and the stove. The draft is affected both by the 
length and the area of the chimney, as well as by how well the chimney is sealed. The minimum recommended 
chimney length is 3.5 m, and the suitable  cross-section area is 150-200 sq. cm (140-160 mm in diameter).  
Your dealer or your chimney sweep will be able to guide and advise you on your chimney conditions.  If the 
chimney has not been used for a while, it has to be inspected for blockages. In some cases, it can be relevant 
to install a draught control device in order to be able to control the draught in the stove. 


Fuel


The product has been tested and approved pursuant to EN13240 and NS 3058 for stoking with split, dried birch wood 
with a water content of 12-20%. Stoking with wet firewood results in soot, environmental pollution and bad fuel 
economy.  Newly cut wood contains approx. 60-70 % water and is absolutely unsuitable for stoking. At least 1 year 
of storage time is necessary for newly cut wood before it can be used. Regardless of the wood size, it should 
always be split and have at least one bark-free side. 


We strongly advise against stoking with impregnated, painted and laminated wood, 

plywood, chipboard, domestic waste, milk cartons, printed paper or the like. The use of 

these materials invalidates the warranty since they can produce poisonous corrosive 

or hazardous fumes. 

Furthermore, the poisonous gas dioxin can be produced, which is damaging both to 

the stove and to the environment.  USE RECOMMENDED FUELS ONLY 
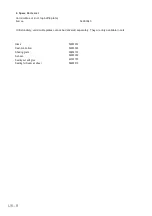
 

Recommended Fuels


The following table shows the calorific value of the different types of wood, which have been stored for 2 years 

and have residual moisture of 15-17%. 


Wood 

Kg dry wood per m3 

compared to 

beech/oak


Hornbeam 

640 

110% 

Beech and oak 

580 

100% 

Ash 

570 

98% 

Maple 

540 

93% 

Birch 

510 

88% 

Mountain pine 

480 

83% 

Fir 

390 

67% 

Poplar 

380 

65% 

1 kg of wood yields the same heat energy irrespective of wood type. 1 kg beech merely takes up less space than 1 

kg of fir. 


When this is settled, the next important step is to ensure that the chimney and the stove work well together. 
This is done by following the operating instructions carefully and using dry fuel that inflames easily. For further 
information on correct kindling and stoking, please refer to Jydepejsen's Manual for installation and stoking. 


Please note that the stove paint will harden during the initial stoking. Touching the stove should be avoided since 
this may cause the paint to scale. Ensure effective ventilation during this phase because the stove can generate 
smoke and unpleasant odour. The smoke and the odour are not harmful and will dissipate after about 1 hour of 
operation. 


The stove will expand and contract during the stoking and cooling phase, which could result in creaking noises. 
This phenomenon is completely normal for sheet-iron stoves and cannot be regarded as a fault.  All Jydepejsen 
wood-burning stoves are intermittent, which means that new wood should be added when there is a layer of 
embers in the burning chamber. 


Incorrect stoking or combustion is often due to wet wood or insufficient draft in the chimney.  Always 

make sure that the chimney is not blocked and that the vermiculite panels are properly placed.  In 

case of overheating or chimney fire, shut off all air supply and monitor the situation. 


Never attempt to put off a chimney fire with water because steam will form (water evaporates at a rate of 1:1700), 
resulting in a fast pressure build-up, which can cause serious damage to the chimney. 

UK - 7

Summary of Contents for Sirius Soapstone

Page 1: ...K Betjeningsvejledning DE Bedienungsanleitung UK User Manual F Manuel d utilisation IT Installazione e istruzioni per l uso NO Bruksanvisning SE Bruksanvisning NL Gebruikshandleiding SIRIUS ORION TROJ...

Page 2: ...nstallation of a stove to your local authority The owner of the house is personally responsible for ensuring compliance with the mandatory safety requirements and must have the installation approved b...

Page 3: ...or ask your local authority for advice regarding building regulations Structural Support Check that the wood joists are strong enough to bear the weight of stove and chimney The stove and chimney can...

Page 4: ...distributor chimney sweep will also be able to tell you exactly which chimney you need Below is an illustration of wall and corner installation with and without insulated flues Distance to combustibl...

Page 5: ...these is shown in the illustration in this instruction manual You must install your stove according to the required minimum distance to combustible materials Floor foundation wall The stove must be i...

Page 6: ...rewdriver to release the plug from the rear and the jet plate 3 Switch the smoke adapter plug and the rear outlet plug Finally install the topplateandtheplugofthetopoutletin place The same approach is...

Page 7: ...and or a screwdriver to release the top plate plug Troja 44 45 46 Top flue outlet 2 Install the supplied smoke adapter If the stove is supplied with accumulation stones 10 stones from each set must b...

Page 8: ...s and the nuts and dismantle the steel plate 2 Loosen the bolts and remove the top plate 3 Remove the rear outlet plate and install it on the top outlet 4 Install the supplied smoke adapter on the rea...

Page 9: ...or Troja 44 45 46 which has no combustible plate 1 Start by uninstalling the combustible plate The combustible plate is attached using magnets 2 Adjust the base using a 4 mm Umbraco key Use a spirit l...

Page 10: ...f air needed for combustion is approx 25 m 3 h The connector has an external diameter of 100 mm In hot areas the duct should be insulated to prevent condensation formation For this purpose use 25 mm m...

Page 11: ...rear plate Sirius Steel Sirius Soapstone Orion Steel and Orion Soapstone Troja 44 45 46 Use a hammer and or a screwdriver to release the rear plate plug Use a pair of cutting pliers or a screwdriver t...

Page 12: ...nsequential damages and damages to other property resulting from the use of the stove Non compliance with the operating instructions Glass and soapstone In case of repairs under warranty any costs ass...

Page 13: ...f the different types of wood which have been stored for 2 years and have residual moisture of 15 17 Wood Kg dry wood per m3 compared to beech oak Hornbeam 640 110 Beech and oak 580 100 Ash 570 98 Map...

Page 14: ...ling phase As soon as the wood is ablaze turn the knob to position 3 or lower to the left depending on your heating need The knob can also be placed between positions Do not turn the knob as far down...

Page 15: ...y cause smoke to flow out into the room 1 Place the air wheel in position 4 maximum air supply 2 In order to minimise the low pressure leave the door ajar for one minute before opening it fully 3 Open...

Page 16: ...ges etc The stove and the chimney must be inspected by a qualified professional at regular intervals in order to ensure the optimal operation of the stove It is prohibited to carry out unauthorised al...

Page 17: ...all versions 1 Remove the top plate 2 Remove the side plates 3 Remove the rear plate 4 Remove the top baffle plate To install the plates back on follow the above steps in reverse order Unauthorised mo...

Page 18: ...no 56900040 Unfortunately vermiculite plates cannot be delivered separately They are only available in sets Glass 56900030 Cast iron bottom 56900025 Shaking grate 56650100 Ash pan 56900002 Sealing set...

Page 19: ...Ahornsvinget 3 7 Nr Felding 7500 Holstebro Denmark Tel 45 9610 1200 salg jydepejsen dk www jydepejsen com...

Reviews: