3
CAUTION
Do not fix the side handle to the ring of the keyless
chuck because of a risk that doing so may damage
the ring.
6. Selecting the appropriate drill bit
䡬
When boring concrete or stone:
Use the drill bits for concrete.
䡬
When boring metal or plastic:
Use an ordinary metalworking drill bit.
䡬
When boring wood:
Use an ordinary woodworking drill bit.
However, when drilling 6.5 mm or smaller holes, use
a metalworking drill bit.
7. Selecting the driver bit
Screw heads or bits will be damaged unless a bit
appropriate for the screw diameter is employed to
drive in the screws.
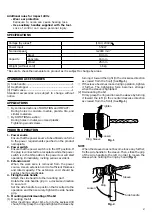
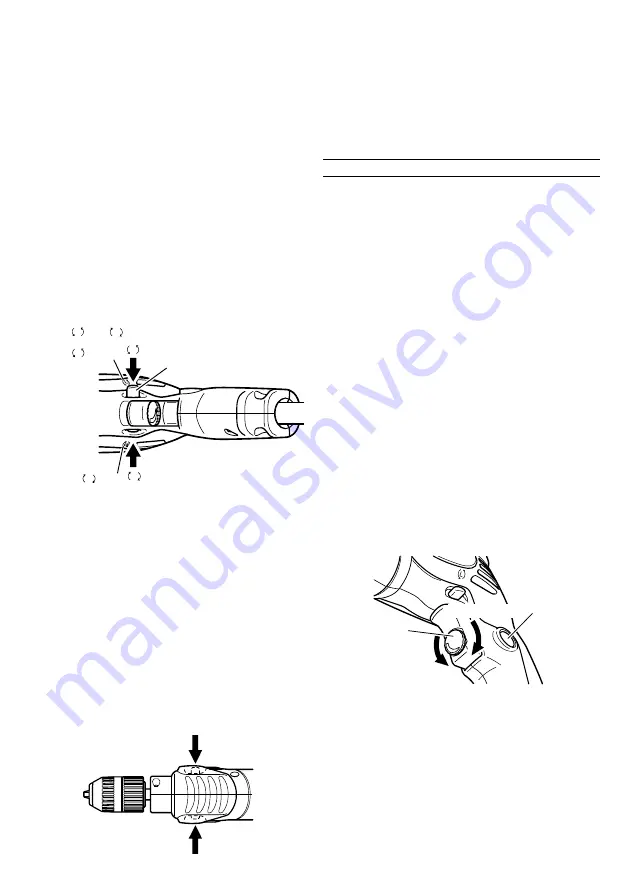
8. Check the rotational direction (Fig. 3)
The bit rotates clockwise (viewed from the rear side)
by pushing the R-side of the push button.
The L-side of the push button is pushed to turn the bit
counterclockwise.
(The
L
and
R
marks are provided on the body.)
Fig. 3
CAUTION
䡬
Never change the direction of bit rotation during
operation.
Turn the power switch OFF before changing the
direction of bit rotation; otherwise, the motor will
burn.
䡬
Always use with clockwise rotation, when using it
as an impact drill.
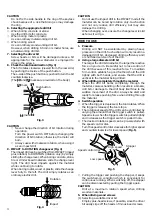
9. IMPACT to ROTATION changeover (Fig. 4)
The impact drill can be switched from IMPACT (impact
plus rotation) to ROTATION (rotation only) by simply
sliding the change lever. When boring concrete, stone,
tile or similar board materials, slide the change lever
right. The drill head impacts against the material
while continuing to rotate.
When boring metal, wood or plastic, slide the change
lever fully to the left. The drill simply rotates as an
ordinary electric drill.
Fig. 4
CAUTION
Do not use the impact drill in the IMPACT mode if the
material can be bored by rotation only. Such action
will not only reduce drill efficiency, but may also
damage the drill tip.
When changing over, ensure the change lever is slid
as far as it will go.
HOW TO USE
1. Pressure
Drilling will NOT be accelerated by placing heavy
pressure on the drill. Such action will only result in a
damaged drill bit, decreased drilling efficiency and/
or shortened service life of the drill.
2. Using a large diameter drill bit
The larger the drill bit diameter, the larger the reactive
force on your arm. Be careful not to lose control of
the drill because of this reactive force. To maintain
firm control, establish a good foothold, hold the drill
tightly with both hands, and ensure that the drill is
vertical to the material being drilled.
3. When drilling completely through the material
When the drill bit bores completely through the
material, careless handling often results in a broken,
drill bit or damage to the drill body itself due to the
sudden movement of the drill. Always be alert and
ready to release pushing force when drilling through
the material.
4. Switch operation
䡬
When the trigger is depressed, the tool rotates. When
the trigger is released, the tool stops.
䡬
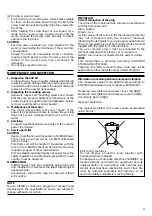
The rotational speed of the drill can be controlled by
varying the amount that the trigger switch is pulled.
Speed is low when the trigger switch is pulled slightly
and increases as the trigger switch is pulled more.
䡬
The desired rotation speed can be pre-selected with
the speed control dial.
Turn the speed control dial clockwise for higher speed
and counterclockwise for lower speed (Fig. 5).
Fig. 5
䡬
Pulling the trigger and pushing the stopper, it keeps
the switched-on condition which is convenient for
continuous running. When switching off, the stopper
can be disconnected by pulling the trigger again.
CAUTION
Drill at a maximum rotation speed when drilling
wooden materials.
5. When driving wood screws
(1) Selecting a suitable driver bit
Employ plus-head screws, if possible, since the driver
bit easily slips off the heads of minus-head screws.
Impact
Rotation
Push button
L
mark
R
mark
R
L
Speed control dial
Stopper
Low speed
High speed
Summary of Contents for EDH550VRE
Page 7: ...6 ...


