background image

K2 Mounts Warranty

K2 Mounts warrants to the original purchaser of its mounting brackets for the life of the bracket,


that the bracket shall be free from defects in assembly, material, or workmanship and will repair or 
replace, at its sole discretion,  a defective bracket free of charge, provided the bracket is returned to 
K2 Mounts prepaid by purchaser.   Unauthorized service or repairs by anyone other than K2 Mounts 
or a pre-approved repair facility renders this warranty void and shall release K2 Mounts from any

further r esponsibility or obligation.

K2 Mounts will repair or replace up to a maximum of $10,000.00, at its option, any component 
(television, projector, monitor or screen) which is damaged by a K2 Mounts bracket’s failure to 
perform* when that product is properly installed** for its intended use. This Lifetime Warranty is 
subject to the limitations and exclusions set forth herein.

     K2 Mounts will repair or replace the 

damaged components (television, monitor or screen) at K2 Mounts option, up to an amount equal 
to the fair market value of the damaged equipment or the original purchase price of the equipment,


whichever is less, up to the maximum amount set forth above. 

K2 Mounts reserves the right to inspect the damaged component, the K2 Mounts bracket alleged

 to have failed, and the site where the damage occurred.   All costs of shipping the K2 Mounts 

bracket and damaged component to K2 Mounts for inspection shall be borne solely by 
the purchaser.

    K2 Mounts reserves the right to negotiate the costs of repairs.

   If K2 Mounts 

determines, in its sole discretion, that it is impractical to ship the damaged component or bracket to 
K2 Mounts, K2 Mounts may designate, in its sole discretion, a component (television, monitor 
or screen) repair facility to inspect and estimate the cost to repair.   The cost, if any, of shipping 
the component to and from such repair facility and of such estimate shall be borne solely by the 
purchaser.   Damaged components must remain available for inspection until the claim is finalized.


Whenever claims are settled, K2 Mounts reserves the right to be subrogated under any existing 
insurance policies the claimant may have.

All above warranties are null and void if:  the K2 Mounts bracket in use during the occurrence is 
not provided to K2 Mounts for inspection upon K2 Mounts’ request at the sole expense of 
the purchaser; or if K2 Mounts determines that the K2 Mounts bracket has been improperly 
installed, altered in any way or tampered with; or if it is determined by K2 Mounts that the damage 
did not result from the K2 Mounts product’s failure or that in fact no occurrence took place; or 
the repair or replacement of the damaged equipment is covered under a manufacturer’s warranty; 
or K2 Mounts determines that the equipment was not used under normal operating conditions 
or in accor dance with any labels or instructions.  Improper installation voids the warranty.  The  

K2 Mounts warranty and insurance only protects against damage to properly connected and installed 

equipment where K2 Mounts has determined, in its sole discretion, that the damage resulted from 

14

Rev00

16

www.k2mounts.com

Summary of Contents for K2-F-Series

Page 1: ......

Page 2: ...n 6 Attach the Mounting Plate to aWood Stud Wall 7 Attach the Mounting Plate to a Concrete or Concrete Block Wall 9 Attach the Screen Mounting Brackets to the TV 11 Hang theTV on the Mounting Plate 13 Adjust the ScreenAngle K2 T SERIES and K3 T SERIES 14 Position the Cables 14 K2 Mounts Warranty 16 1 Package Contents 2 ...

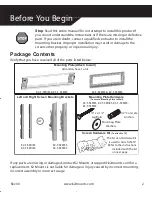
Page 3: ...Wall K2 F SERIES K2 T SERIES K3 F SERIES K3 T SERIES The Screen Hardware Kit is used to attach theTV Refer to the instructions included with the kit on next page K2 F SERIES K3 F SERIES K2 T SERIES K3 T SERIES Left and Right Screen Mounting Brackets or 2 Stop Read this entire manual Do not attempt to install this product if you do not understand the instructions or if there are missing or defectiv...

Page 4: ...f your TV does not include rear mounting screws use these instructions to find appropriate hardware within the hardware kit Verify that you have received all of the parts listed below 4 M4 x 16 Pack A 4 M4 x 30 Pack B 4 M5 x 12 Pack C 4 M5 x 30 Pack D 4 M6 x 12 Pack E 4 M6 x 35 Pack F 4 M8 x 16 Pack G 4 M8 x 35 Pack H 4 M4 Lock Washer 4 M5 Lock Washer 4 M6 Lock 4 M8 Lock Washer 8 M4 M5 Screen Brac...

Page 5: ...the longer length of the appropriate diameter screw Use only the set of four screws that fits your TV The rest are not needed to attach the Screen Mounting Brackets Find Other Hardware Next select the washers that match your screw diameter for example if the M8 screws match your TV select the M8 lock washers if the M4 screws match select the M4 washers and the M4 lock washers If you are using long...

Page 6: ...easuringTape Level Stud Finder for wood stud wall installation Pencil or Pen Electric Drill 1 8 Drill Bit for wood stud wall installation 1 2 Masonry Drill Bit for concrete or concrete wall installation Hammer Ratchet with 7 16 Socket Phillips Screwdriver 3 Rev00 www k2mounts com 5 ...

Page 7: ... T SERIES 6 Position the Cables Determine the Wall Mounting Location Decide where you want to hang your TV A good location is near an electrical outlet and within cable reach of any components you plan to connect to theTV Use common sense when determining the wall mounting location For example do not hang your TV over a bed crib or child s play area Draw a mark on the wall where you want the cente...

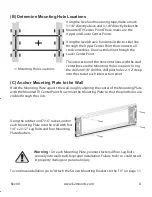
Page 8: ...he left and right edges of the two closest studs on each side of the MountedTV Center Point Repeat this process to mark the same studs twice more approximately 6 above and 6 below your first stud location marks Mark the centerline of each stud by holding the level vertically and drawing a line halfway between the left and right edges of each stud These stud centerlines should be vertical and rough...

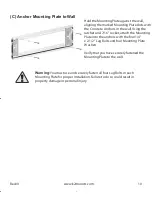
Page 9: ...he stud at each intersection point C Anchor Mounting Plate to the Wall Hold the Mounting Plate against the wall roughly aligning the center of the Mounting Plate with the MountedTV Center Point Now move the Mounting Plate so that the pilot holes are visible through the slots Using the ratchet and 7 16 socket anchor each Mounting Plate into the wall with four 1 4 x 2 1 2 Lag Bolts and four Mounting...

Page 10: ...aligning the center of the Mounting Plate with the Mounted TV Center Point Now move the Mounting Plate so that the Upper and Lower Center Points are visible through two slots in the Mounting Plate Using the Mounting Plate as a template mark the wall within the four corner slots These four marks are the Mounting Hole Locations Using the level make sure each set of three marks on the wall is on a st...

Page 11: ...t attach the Mounting Plate into the anchors with the four1 4 x 2 1 2 Lag Bolts and four Mounting Plate Washers Verify that you have securely fastened the Mounting Plate to the wall W You must use and securely fasten all four Lag Bolts in each Mounting Plate for proper installation Failure to do so could result in property damage or personal injury 8 10 Warning www k2mounts com Rev00 ...

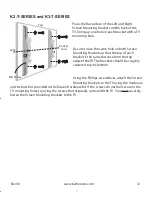
Page 12: ...e same distance from the top of the TV K2 F SERIES and K3 F SERIES Place the flat surface of the Left and Right Screen Mounting Brackets on the back of the TV lining up one hole in each bracket with a TV mounting hole Be sure to use the same hole on both Screen Mounting Brackets so that the top of each bracket is the same distance from the top edge of theTV The brackets should be roughly centered ...

Page 13: ...e same distance from the top edge of theTV The brackets should be roughly centered top to bottom Using the Phillips screwdriver attach the Screen Mounting Brackets to the TV using the hardware and instructions provided in the Screen Hardware Kit If the screws do not feel secure in the TV mounting holes try using the screws that originally came with theTV You must securely fasten the Screen Mountin...

Page 14: ...r position on the wall and then tighten the M5 Screw towards the Mounting Plate using the Philips screwdriver This will prevent the TV from moving up on the Mounting Plate Verify that you cannot pull the bottom edge of theTV away from the wall If you can the Screen Mounting Brackets are upside down Remove theTV from the wall and re install the Screen Mounting Brackets Make sure to hook the screen ...

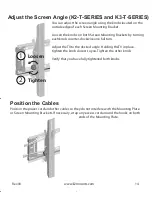
Page 15: ...se one full turn Adjust theTV to the desired angle Holding theTV in place tighten the knob closest to you Tighten the other knob Verify that you have fully tightened both knobs Position the Cables Position the power cord and other cables so they do not interfere with the Mounting Plate or Screen Mounting Brackets If necessary wrap any excess cord around the hooks on both ends of the Mounting Plate...

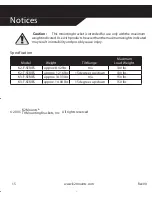
Page 16: ... possibly cause injury Specification Model Weight Tilt Range Maximum Load Weight K2 F SERIES approx 8 42 lbs n a 100 lbs K2 T SERIES approx 12 16 lbs 15 degrees up down 100 lbs K3 F SERIES approx 10 33 lbs n a 150 lbs K3 T SERIES approx 14 08 lbs 15 degrees up down 150 lbs 2005 All rights reserved 13 Caution Rev00 K2 Mounts TV Mounting Brackets Inc TM 15 www k2mounts com ...

Page 17: ... Mounts reserves the right to negotiate the costs of repairs If K2 Mounts determines in its sole discretion that it is impractical to ship the damaged component or bracket to K2 Mounts K2 Mounts may designate in its sole discretion a component television monitor or screen repair facility to inspect and estimate the cost to repair The cost if any of shipping the component to and from such repair fa...

Page 18: ...ct and only if the original purchaser registers the purchase on line at www k2mounts com or by mailing a copy of the purchase receipt and product warranty registration card to TV Mounting Brackets Inc 5 Hutton Center Drive Suite 830 Santa Ana CA 92707 within thirty 30 days of the date of purchase All damage claims against the product must be made within fifteen 15 days from the date of the occurre...

Page 19: ...16 Rev00 K2 Mounts is a Product of TV Mounting Brackets Inc 18 www k2mounts com ...

Reviews: