OPERATION
21
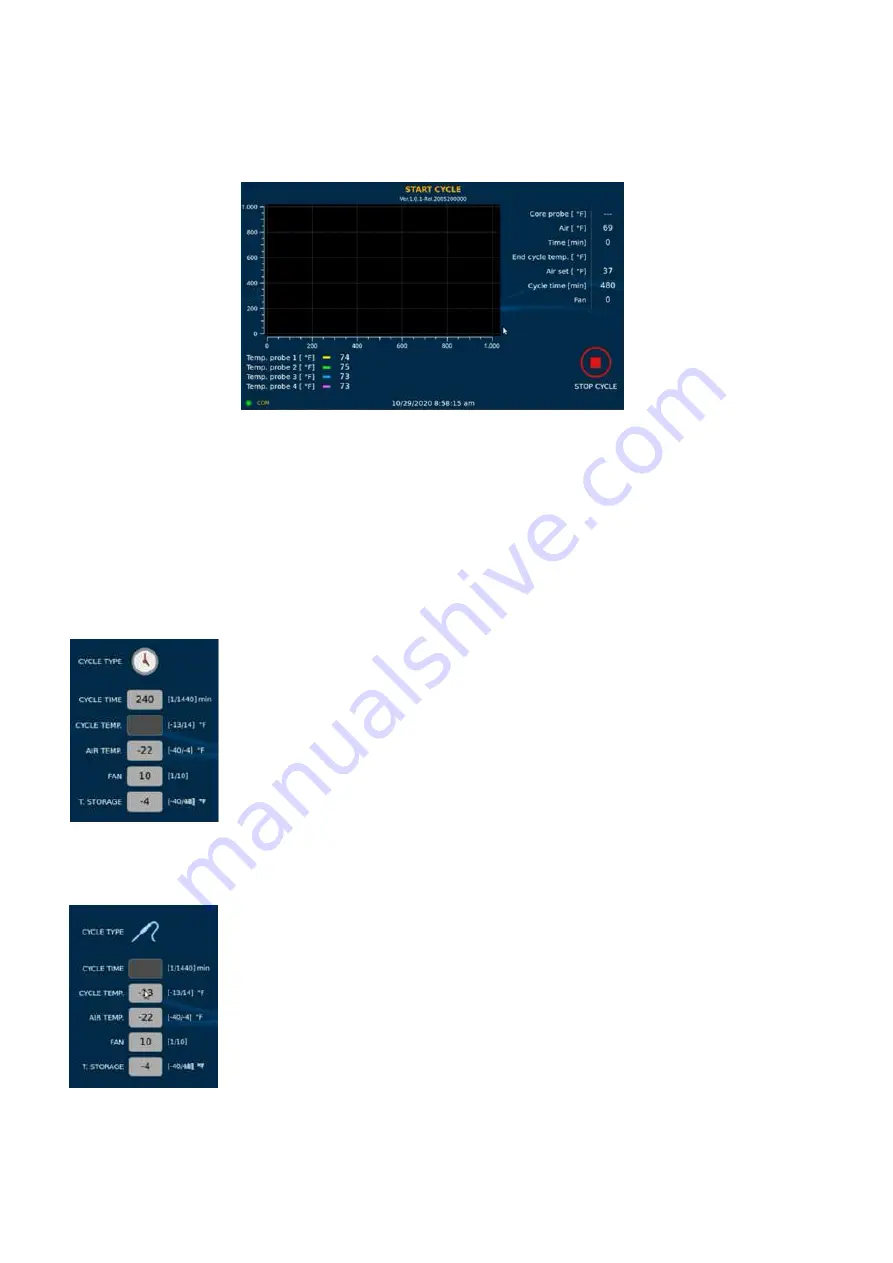
Once the cycle starts, the screen will show the cycle main view: a graph shows in real time the
temperatures detected by the four cores of the product probe as well as the cavity temperature:
On the right side of the screen instead the hottest core probe value, the cavity temperature, the
counting time from the start of the cycle, the end cycle temperature set point, the cavity temperature
set point, the cycle time set point and the fan speed are displayed.
Once the cycle is completed, a flag icon will appear on the screen and a buzzer will alert that the
cycle ended. The unit switches automatically into storage mode.
If you want to interrupt an ongoing cycle, press the
STOP CYCLE
red button. The screen will return
to the Home page.
3.1.1 Time Cycle
During a Time Cycle (clock icon in the
CYCLE TYPE
tab) the unit will run the
cycle pulling down and holding the temperature inside the cavity at the desired
temperature set in the “
AIR TEMP.
” tab, for the desired target time set in the
“
CYCLE TIME
” tab.
Once the
CYCLE TIME
is elapsed, a checkered flag will appear on the screen
and a buzzer will start to sound alarming that the cycle ended.
At the end of the cycle, the unit will switch automatically into the STORAGE
mode, adjusting and holding the temperature set in the T.STORAGE tab until the unit is not
stopped manually by touching the stop button on the screen.
3.1.2 Product temperature Cycle
During a Temperature cycle (Needle probe icon in the
CYCLE TYPE
tab), the
multi-core needle probes of the unit must be inserted inside a simulation bag.
The Unit will run the cycle pulling down and holding the temperature inside the
cavity at the desired temperature set in the “
AIR TEMP.
” tab until the 4 cores of
the needle probe reads the target temperature set in the “
CYCLE TEMP.
” tab.
Once the multi-cores needle probe hits the target temperature, a checkered
flag will appear on the screen and a buzzer will start to sound alarming that the
cycle ended.
At the end of the cycle, the unit will switch automatically into the STORAGE mode, adjusting and
holding the temperature set in the
T.STORAGE
tab until the unit is not stopped manually by
touching the stop button on the screen.

