background image

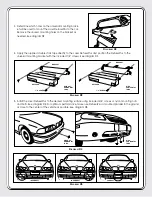
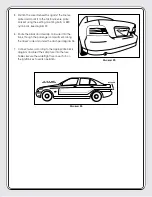
5.  Position the Laser DefuserPlus against the license 

plate and mount it to the factory license plate 

bracket using the existing mounting bolts or K40 

nylon bolts. See diagram F5.

6.  Route the black and clear zip cord wires into the 

trunk, though the passenger compartment, along 

the driver’s side and under the dash per diagram F6.

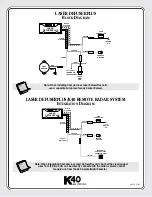
7.  Connect wires according to the appropriate block 

diagram and insert the 3amp fuse into the fuse 

holder. Secure the watertight fuse cover. Turn on 

the ignition key to verify operation.

DEFUSER

TO L.E.D. LIGHT

AND PIEZO BEEPER

D

IAGRAM

F5

D

IAGRAM

F6

Summary of Contents for LD5500

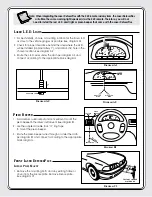
Page 1: ...al IMPORTANT PLEASE READ BEFORE INSTALLING When installing the Laser DefuserPlus outside of the system s license plate frame the unit should be mounted as close to the center of the vehicle as possible without obstruction The mounting location of the Laser DefuserPlus is important as police laser gun operators are trained to aim for the flat reflective surface of a targeted vehicle s front license...

Page 2: ... FACTORY LICENSE PLATE BOLTS Note When integrating the Laser DefuserPlus with the K40 remote radar system the Laser DefuserPlus will utilize the same warning light speaker s as the K40 remote Therefore you will not need to install the red L E D alert light or piezo beeper that come with the Laser DefuserPlus 1 DIAGRAM A1 DIAGRAM A2 DIAGRAM A3 ALERT LIGHT RED ALERT L E D GREY L E D WIRE BLACK L E D...

Page 3: ...s must be mounted parallel to the ground Use the supplied K40 nylon nuts and bolts to correct the mounting angle of the DefuserPlus either up or down as needed On some vehicles it may be necessary to adjust or reposition the factory license plate bracket to achieve the parallel mounting On vehicles that have only one set of bracket mounting holes it is recom mended that the Laser DefuserPlus and t...

Page 4: ...BRACKET TAPE DEFUSER 1 4 SCREW DIAGRAM D3 WITHOUT HORIZONTAL TABS WITH HORIZONTAL TABS 3 Determine which holes on the universal mounting brack et will be used to mount the Laser DefuserPlus to the car Remove the unused mounting holes on the bracket as needed See diagram D2 DIAGRAM D2 4 Apply the supplied double stick tape directly to the Laser DefuserPlus and position the DefuserPlus to the univer...

Page 5: ...diagram E1 2 Position the Laser DefuserPlus around the existing rear license plate and mount it against the factory license plate bracket Use the existing mounting bolts or K40 nylon bolts to secure the DefuserPlus frame and license plate to the bracket See diagram E2 DIAGRAM E2 FACTORY LICENSE PLATE BOLTS DIAGRAM E1 Note For optimum per formance the DefuserPlus must be mounted parallel to the gro...

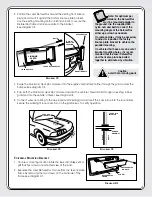
Page 6: ...See diagram F1 2 Separate the Laser DefuserPlus module from the license plate frame by removing the two screws on the back side of the frame See diagram F2 DIAGRAM E3 DEFUSER TO L E D LIGHT AND PIEZO BEEPER FACTORY LICENSE PLATE BOLTS DIAGRAM F1 DIAGRAM F2 DEFUSERPLUS FRAME DEFUSERPLUS MODULE SCREW DIAGRAM F3 DIAGRAM F4 BRACKET TAPE DEFUSER 1 4 SCREW WITHOUT HORIZONTAL TABS 3 Remove the 3 unused h...

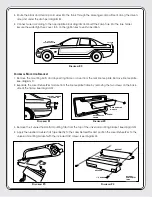
Page 7: ... the black and clear zip cord wires into the trunk though the passenger compartment along the driver s side and under the dash per diagram F6 7 Connect wires according to the appropriate block diagram and insert the 3amp fuse into the fuse holder Secure the watertight fuse cover Turn on the ignition key to verify operation DEFUSER TO L E D LIGHT AND PIEZO BEEPER DIAGRAM F5 DIAGRAM F6 ...

Page 8: ...userPlus units use a separate 3amp fuse for each Laser Defuser LASER DEFUSERPLUS K40 REMOTE RADAR SYSTEM INTEGRATION DIAGRAM BLACK ZIP CORD COPPER SILVER 3AMP COPPER LASER DEFUSERPLUS CLEAR ZIP CORD CHASSIS GROUND FUSE CONNECTION 12V IGNITION ON K40 REMOTE RADAR VOLUME CONTROL MODULE YELLOW SILVER NOT USED Note When integrating front and rear Laser DefuserPlus units both of the clear copper wires ...

Reviews: