background image


W W W . K A A R T A . C O M  


1 8  


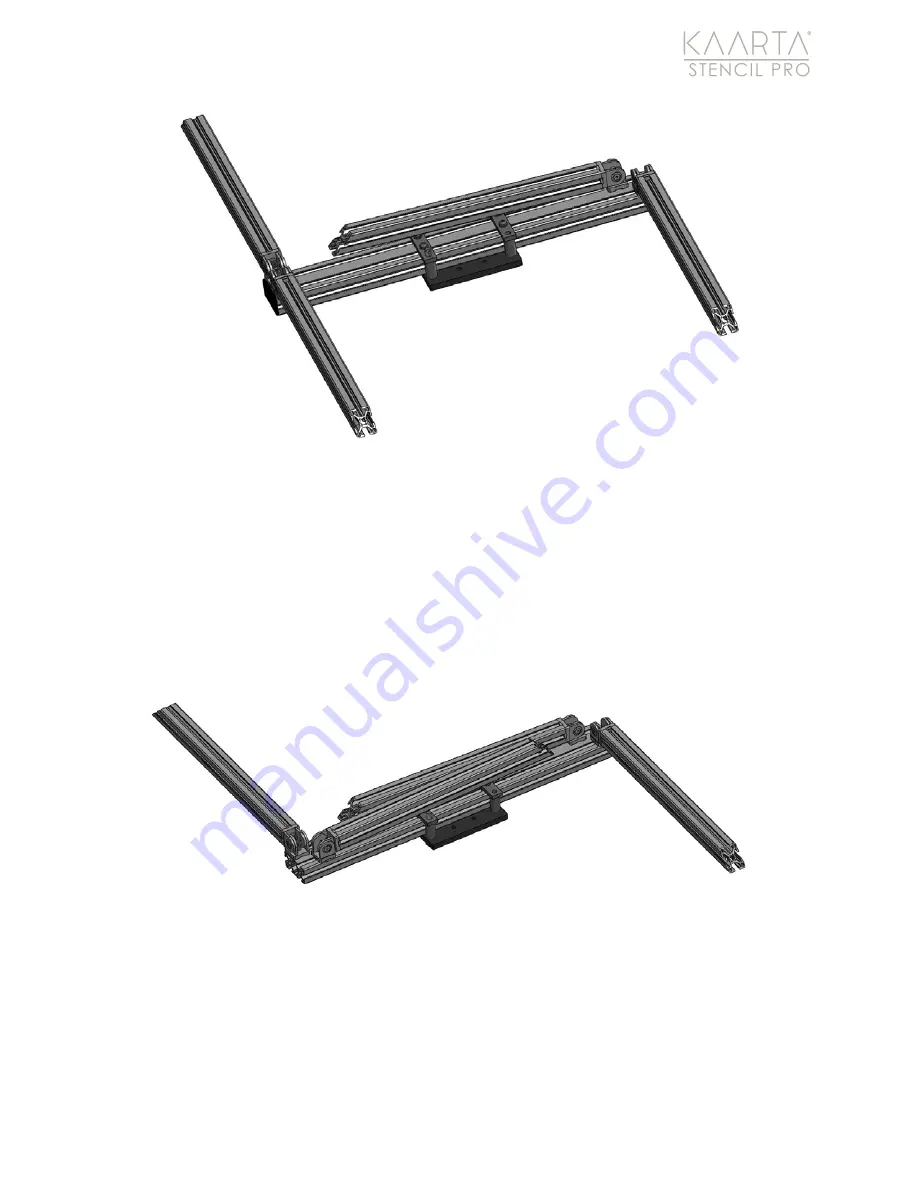
Figure 20: Stowage of first Upper Support Arm. 

3.


Using a 3mm hex allen key, tighten the two (2) M5 flat head fasteners in the pivot 
joint at this time. Leave the M8 socket head fastener loose in case it needs to slide 
to allow the adjacent pivot to rotate. 

Repeat steps for the Upper Support Arm diagonal to the arm that was just stowed as shown in  

4.


Figure 21. 


Figure 21: Stowage of second Upper Support Arm. 

5.


Repeat steps for the remaining two (2) Upper Support Arms. See Figure 22 for final 
Upper Vehicle Mount Assembly stowage configuration. 

Summary of Contents for STENCIL PRO

Page 1: ...K A A R T A E N G I N E U S P A T E N T N O 1 0 9 6 2 3 7 0 A N D O T H E R P A T E N T S P E N D I N G Stencil Pro Vehicle Mount Assembly Stowage Use V M G S 3 2 1 0 2 0 0 0 1 0 7 2 1...

Page 2: ...curate and visually stunning reality capture in urban areas An IP65 rating makes Stencil Pro a workhorse in infrastructure mapping mining forestry earthworks construction and other harsh environments...

Page 3: ...o Vehicle Mount 4 Vehicle Mount Components 4 Assembly Instructions 5 Stowed Assembly 5 Assemble Mount 6 Stowage Procedure for Shipping Transport 13 Mounting Instructions 20 Placement of Mount on Vehic...

Page 4: ...VEHICLE MOUNT V E H I C L E M O U N T C O M P O N E N T S Tools Required for Assembly Disassembly 1 3mm hex allen key 2 4mm hex allen key 3 6mm hex allen key MOUNTING PLATE TOP CROSS RAIL FRONT SUPPOR...

Page 5: ...Stowed Vehicle Mount Base Assembly and the Stowed Upper Vehicle Mount Assembly Figure 3 Caution Whether using the Kaarta vehicle mount as described here or another setup it is crucial that the vehicle...

Page 6: ...L E M O U N T S t e p 1 A s s e m b l e t h e S t o w e d V e h i c l e M o u n t B a s e 1 Unfold the Vehicle Mount Base Assembly Figure 4 Vehicle Mount Base Assembly unfolded STOWED VEHICLE MOUNT BA...

Page 7: ...on of the plates Tighten all sixteen 16 M6 button head fasteners until M6 split lockwashers have been flattened Maintain reinforcement plate contact with the stops during this process Figure 5 Figure...

Page 8: ...icle Mount Assembly support arm fastener location 3 Rotate the Upper Support Arm in place so that the arm is pointing out from the Top Cross Rail and the pivot joint alignment tab is in the T slot of...

Page 9: ...cle Mount Assembly first outside support arm deployment 4 Repeat 2 and 3 above with the stowed outside Upper Support Arm at the other end of the Top Cross Rail Figure 9 OUTSIDE UPPER SUPPORT ARM M8 X...

Page 10: ...ort Arms have been rotated outward ensure that all four 4 Upper Support Arm pivot joints are at the end of the Top Cross Rail and each pivot joint alignment tab is up against the end caps Tighten each...

Page 11: ...as shown in Figure 11 Place the Upper Vehicle Mount Assembly onto the Vehicle Mount Base Assembly Extend each Upper Support Arm until it contacts the set screw stop at each corner Using a 6mm hex alle...

Page 12: ...nts of the Upper Support Arms to lock the Upper Vehicle Mount Assembly in place 9 Check all fasteners in the assembly to ensure all are securely installed prior to mounting the Stencil Pro for scannin...

Page 13: ...nt Base Assembly as shown in Figure 12 Set the four 4 M8 fasteners split lockwashers and flat washers aside Figure 12 Upper Vehicle Mount Assembly removal 2 Remove the Upper Vehicle Mount Assembly fro...

Page 14: ...g the four 4 Base Reinforcement plates to the Vehicle Mount Base Assembly Loosen fasteners just enough to so that the Base Reinforcement Plates can slide along the side rails approximately 1 full turn...

Page 15: ...ecure to the front side rail Ensure all four 4 Reinforcement plates and mounting hardware are clear of the rear Side Rails Figure 15 Vehicle Mount Base Assembly Base Reinforcement Plates in stowed pos...

Page 16: ...er as shown in Figure 17 Do not remove the M5 fasteners completely only loosen enough so the Upper Support Arms are free to rotate and access to the M8 x 16mm long socket head fasteners that secure th...

Page 17: ...e pivot joint is clear of the rail slot Figure 19 Ensure that the pivot joint can freely rotate in the slot approximately 1 full turn of the fastener Slide the arm down the rail to the approximate loc...

Page 18: ...the M8 socket head fastener loose in case it needs to slide to allow the adjacent pivot to rotate Repeat steps for the Upper Support Arm diagonal to the arm that was just stowed as shown in 4 Figure 2...

Page 19: ...osition by tightening all four 4 M8 x 16 long socket head fasteners to secure arms to the Top Cross Rail 7 Using a 3mm hex allen key tighten the remaining M5 flat head fasteners in the pivot joints 8...

Page 20: ...P L A C E M E N T O F M O U N T O N V E H I C L E R O O F S t e p 1 C a r e f u l l y P l a c e t h e A s s e m b l e d M o u n t o n t o V e h i c l e R o o f 1 When placing the vehicle mount system...

Page 21: ...s secondary reinforcement in the event of a failure of any of the magnetic devices or if sudden or drastic vehicle movement occurs Figure 24 Tie down straps provide secondary security S t e p 3 A t t...

Page 22: ...nnectors are keyed to avoid improper insertion 5 Route the cables through the vehicle mount and into the vehicle The cables should be connected and routed in a method with relief that does not strain...

Page 23: ...A C O M 2 3 3 Pull to the side of the road to a complete stop and check structural integrity of mount and system Check all fasteners for the Stencil Pro controller attachment and fasteners on the vehi...

Page 24: ...es It should be noted that some of the vehicle will be captured in the LiDAR scan and will need to be eliminated during the Playback process using the Ignore Points Within parameter see the Playback s...

Page 25: ...wn in Figure 27 Figure 27 Command to start Image Exclusion tool This starts the exclusion tool that will generate the list of points and save them to the correct parameter Figure 28 The first panorami...

Page 26: ...W W W K A A R T A C O M 2 6 The following keys are used to control s Save and Exit e exit without saving n switch image c clear polygon u undo last click Figure 28 Image Exclusion interface...

Page 27: ...W W W K A A R T A C O M 2 7 Figure 29 Highlighted exclusion area Figure 30 Original imagery top highlighted exclusion zones bottom...

Page 28: ...lusion polygon This is also written to the active ROS environment so after this is done the color process can be run and it will apply the exclusion zones It will be useful to record this information...

Page 29: ...A E N G I N E U S P A T E N T N O 1 0 9 6 2 3 7 0 A N D O T H E R P A T E N T S P E N D I N G S T E N C I L P R O V E H I C L E M O U N T A S S E M B L Y S T O W A G E U S E V M G S 3 2 1 0 2 0 0 0 1...

Reviews: