background image

EN

BEYOND SECURITY

Kaba programmer 1460

User manual

Doc. no.:  k1evo809en-2014-04

Summary of Contents for 1460

Page 1: ...EN BEYOND SECURITY Kaba programmer 1460 User manual Doc no k1evo809en 2014 04 ...

Page 2: ...Straße 14 Lower Moor Way 3130 Herzogenburg 63303 Dreieich Tiverton Industrial Est AUSTRIA GERMANY Tiverton Devon EX16 6SS www kaba at www kaba de www kaba co uk This documentation may not be reproduced in any manner or otherwise reused without the written consent of Kaba AG Kaba is a registered trademark of Kaba AG Copyright by Kaba AG 2014 ...

Page 3: ...specifications 9 3 3 Programmer design 10 4 Operation 13 4 1 On Off key 13 4 2 Menu keys 13 4 3 Dialogue box display 13 4 4 Navigation keys and ENTER 14 4 5 Alphanumeric keys and home 14 4 6 Wireless programming 14 5 Commissioning 15 5 1 Switching on the Programmer 15 5 2 Settings 15 5 3 Programmer settings 15 5 4 Actuator settings 20 5 5 Data settings 22 5 6 EAC Service Tool updating firmware 24 ...

Page 4: ...grammer 1460 7 Data transfer 39 7 1 Driver installation 39 7 2 Downloading of data from the software 40 7 3 Actuator settings 41 8 Maintenance and troubleshooting 42 8 1 Battery charge status 42 8 2 Charge battery 42 8 3 Menu structure 43 9 Glossary 44 ...

Page 5: ...heconfiguration and programming of products of the Kaba evolo gen eration 1 3 Target group This user manual is intended for qualified specialist staff and specialist staff trained by Kaba involved in the installation commissioningand servicing of electronic components distributed by Kaba 1 4 Supplementary documentation Additional information about the Kaba electronic components and products can be...

Page 6: ...to Kaba that are explained in the glossary on page 44 In order to simplify the user manual for the reader the programming device Kaba Programmer 1460 is short ened to Programmer and KabaeloProgrammer1364 to Programmer 1364 Caution Identifies a possible dangerous situation that can lead to product damage or to damage to its environment ESD Identifies a possible danger and damage for electronic comp...

Page 7: ... For safe use of the Programmer the following safety information is to be noted Caution The Programmer is an electronic device that should be protected from the follow ing external influences direct sunlight direct heat sources e g heating direct fluids e g water changes in temperature e g below 0 C Caution To protect against a loss of data it is recommended to manage the locking sys tems using th...

Page 8: ...ctrostatic discharge This product contains electronic components that are sensitive to electrostatic dis charge ESD To avoid the risk of electrostatic discharge the Programmer housing should not be opened Dispose of packaging in accordance with environmental regulations The packaging is recyclable Please do not dispose of the packaging with household waste instead dispose of with waste for recycli...

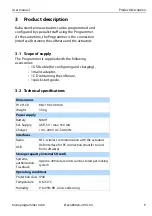
Page 9: ...ing and charging 1 mains adaptor 1 CD containing the software 1 quick start guide 3 2 Technical specifications Dimensions W x H x D 88 x 190 x 40 mm Weight 350 g Power supply Battery NiMH Ext Supply USB 5 V max 350 mA Charger 100 240 V AC 50 60 Hz Interfaces Radio NFC wireless communication with the actuators USB USB interface for PC connection transfer to and from software Storage capacity intern...

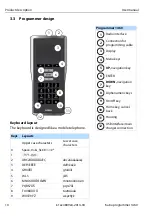
Page 10: ...enu keys UP navigation key ENTER DOWN navigation key Alphanumeric keys On Off key Home key cancel back Housing USB interface main charger connection Keys Layouts Upper case characters Lower case characters 0 Space 0 _ 1 1 2 ABC2ÄÀÁÂÃÅÆÇ abc2äàáâãåæç 3 DEF3ÈÉËÊ def3èéëê 4 GHI4ÌÍÎÏ ghi4ìíîï 5 JKL5 jkl5 6 MNO6ÖÒÓÔÕØÑ mno6öòóôõøñ 7 PQRS7ߊ pqrs7ßš 8 TUV8ÜÙÚÛ tuv8üùúû 9 WXYZ9ÝŽ wxyz9ýž 3 4 6 5 7 8 9 10...

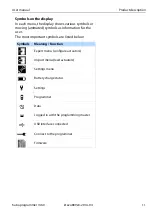
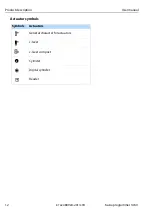
Page 11: ...ls or moving animated symbols as information for the user The most important symbols are listed below Symbols Meaning Function Export menu configure actuators Import menu read actuators Settings menu Battery charge status Settings Programmer Data Logged in with the programming master USB interface connected Connect to the programmer Firmware ...

Page 12: ...Product description User manual 12 k1evo809en 2014 04 Kaba programmer 1460 Actuator symbols Symbols Actuators General character for actuators c lever c lever compact Cylinder Digital cylinder Reader ...

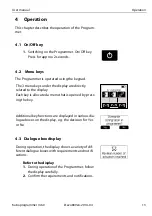
Page 13: ...conds The 3 menu keys under the display are directly related to the display Each key is allocated a menu that is opened by press ing the key Additional key functions are displayed in various dia logue boxes on the display e g the decision for Yes or No During operation the display shows a variety of dif ferent dialogue boxes with requirements and notifi cations Refer to the display 1 During operat...

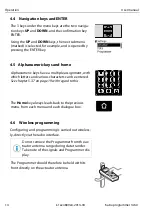
Page 14: ...OWN keys the next submenu marked is selected for example and is opened by pressing the ENTER key Alphanumeric keys have a multiple assignment with which letters and various characters can be entered See chapter 5 3 7 on page 19 with regard to this The Home key always leads back to the previous menu from each menu and each dialogue box ENTER Do not remove the Programmer from the ac tuator antenna r...

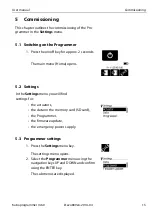
Page 15: ...mmer settings 1 Press the on off key for approx 2 seconds The main menu Home opens In the Settings menu you will find settings for the actuators the data on the memory card SD card the Programmer the firmware update the emergency power supply 1 Press the Settings menu key The settings menu opens 2 Select the Programmer menu using the navigation keys UP and DOWN and confirm using the ENTER key The ...

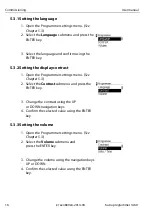
Page 16: ... the language and confirm using the ENTER key 1 Open the Programmer settings menu See Chapter 5 3 2 Select the Contrast submenu and press the ENTER key 3 Change the contrast using the UP or DOWN navigation keys 4 Confirm the selected value using the ENTER key 1 Open the Programmer settings menu See Chapter 5 3 2 Select the Volume submenu and press the ENTER key 3 Change the volume using the naviga...

Page 17: ...he Date time submenu and confirm with the ENTER key The cursor blinks indicates the active posi tion 3 Enter the current date and current time using the alphanumeric keys Note Skip the positions of the cursor using the navigation key UP and DOWN 4 Confirm the set date and time using the ENTER key 1 Open the Programmer settings menu See Chapter 5 3 2 Select the Illumination submenu and con firm usi...

Page 18: ...Select the Key tone submenu and confirm using the ENTER key 3 Confirm Key tone on or off using the ENTER key By setting the optimum switch off time the energy consumption of the Programmer is reduced and operation until charging the battery the next time is extended 1 Open the Programmer settings menu See Chapter 5 3 2 Select the Switch off time submenu and con firm using the ENTER key 3 Select Sw...

Page 19: ...the ENTER key Note You can switch between lower case and upper case characters a A using the right menu key Delete the previous entry using the left menu key x 3 Enter the name using the alphanumeric keys and confirm using the ENTER key max 28 characters The new name appears on the display when starting the Programmer Software Version Checksum Hardware Version 1 Press the on off key To switch off ...

Page 20: ... 2 2 Log in to the actuator using Programming master 3 Select the Setting the time submenu and con firm using the ENTER key 4 Select yes The time changes to the current time Setting the beep tone does not depend upon the software on the actuators 1 Open settings menu See Chapter 5 2 2 Log in to the actuator using Programming master 3 Select the Beep tone submenu and confirm using the ENTER key 4 S...

Page 21: ...ctuator using Programming master 3 Select Light ring in the submenu and confirm using the ENTER key 4 Select Light ring on or off and confirm using the ENTER key 1 Open settings menu See Chapter 5 2 2 Log in to the actuator using Programming master 3 Select Opening time in the submenu and confirm using the ENTER key 4 Select an opening time of between 2 4 6 10 20 30 45 seconds and 1 minute and con...

Page 22: ... Programmer if TouchGo actuators are recognised 1 Connect the Programmer and the actuator E110 using the programming cable 2 Open settings menu See Chapter 5 2 3 Log in to the actuator using Programming master 4 Select Actuator TouchGo Selectivity in the submenu and confirm using the ENTER key 5 Select selectivity from values 1 6 and confirm using the ENTER key Note Value 1 corresponds to the lowe...

Page 23: ... the door and confirm using the ENTER key 1 Open the data settings menu See Chapter 5 2 2 Select Actuator firmware in the submenu and confirm using the ENTER key All technology variants of the actuator firmware that are on the Programmer are displayed 3 Select the technology variant and confirm using the ENTER key All actuator types firmware that are on the Pro grammer are displayed 4 Select the a...

Page 24: ...rammer using the EAC Service Tool Data transfer from the auxiliary programme is set out in the Kaba EAC Service Tool user manual document no k1evo817 1 Open the data settings menu See Chapter 5 2 2 Select Memory info in the submenu and press the ENTER key 3 Open Memory info using the ENTER key The memory status is displayed 1 Open the data settings menu See Chapter 5 2 2 Select Delete everything i...

Page 25: ...nfiguration from the actuator with the Programmer 1460 3 Carry out INI reset at the actuator 4 Open settings menu See Chapter 5 2 5 Select Firmware Update in the submenu and confirm using the ENTER key All firmware versions that correspond to the actuator type connected are displayed on the Programmer 6 Select Firmware Version and confirm using the ENTER key The firmware is transferred to the actu...

Page 26: ...g cable 2 Export the configuration from the actuator with the Programmer 1364 3 Start actuator in bootloader See Chapter 5 9 2 4 Connect the Programmer 1460 to the actua tor 5 Open settings menu See Chapter 5 2 6 Select Firmware Update in the submenu and confirm using the ENTER key All firmware versions that correspond to the actuator type connected are displayed on the Programmer 7 Select firmwar...

Page 27: ...e actuator Remote reader or compact reader Note Always interrupt the current during switching Turn DIP switch 6 ON 2 Connect the Programmer and the actuator using the programming cable 3 Open settings menu See Chapter 5 2 4 5 Select Firmware Update in the submenu and confirm using the ENTER key Select Function type and confirm using the ENTER key 6 Select firmware version 7 Security question Selec...

Page 28: ...t contacts on the actuator 10 s using tweezers Remote reader or compact reader Note No INI reset contacts available Note Always interrupt the current during switching Turn DIP switches 5 and 6 ON Actuator flashes continuously The actuator is in the bootloader 2 Connect the Programmer 1460 and the actua tor with the programming cable All technology variants of the actuator firmware that are on the ...

Page 29: ...e Version and confirm using the ENTER key An upgrade is performed 6 Following the upgrade of the remote reader or compact reader turn the DIP switches 5 and 6 OFF Note Always interrupt the current during switching Actuators Admin Master Programmer 14601 4 Tweezers DIP switches c lever x c lever compact 2 x Digital cylinder 2 x Remote reader x 3 Compact reader x 3 Key 1 Present master medium to the...

Page 30: ...electrically conductive tweezers for approx 10 seconds To perform an INI reset a mas ter medium or authorised user medium must also be presented for some actuators see table Actuators Tweezers DIP switches c lever x c lever compact 5 x Digital cylinder 5 x Remote reader x7 6 Compact reader x7 6 Key 5 Present master medium or authorised user medium Difference Before the INI reset for V4 or during t...

Page 31: ...ction type Kaba exos B COMM as an online reader in the Subterminal func tion type B COMM or as a stand alone reader in the Standalone function type Kaba exos KEM Technology Actuators Crossgrade between the components V4 Online reader Subter minal V31 3 cDML LEGIC Remote reader x Compact reader c lever c lever compact digital cylinder x x x MIFARE Remote reader x x Compact reader x x 2c lever c lev...

Page 32: ...r Behaviour of actuators during emergency power sup ply actuator remains open Emergency power supply event in Trace back TimePro is not evaluated The emergency power supply is only possible once the battery signal is showing empty For access authorisations with time settings and CardLink always replace the batteries for the actuators and set the clock precisely fol lowing emergency power supply 1 ...

Page 33: ... import of data Data can be exported and imported wirelessly using the Programmer via the radio interface or via the pro gramming cable 6 2 Exporting to actuators In the case of export the configuration data from the Programmer are written to the actuators Theconfiguration data shouldbeselectedfromalistin the Programmer and exported to an actuator For export the configuration data for the key plan...

Page 34: ... 3 1 Traceback Only information from the Traceback is imported Configuration All configuration data is imported without Traceback data Diagnostic data Creates a ZIP file with the memory content of the actuator Auxiliary agent for problem solution in support cases See Chapter 6 3 2 1 Press Export menu key 2 Log in to the actuator using Programming master 3 Select Next to export all data to the actu...

Page 35: ...e Serial number LEGIC OS TouchGo UID etc 1 Connect the Programmer 1460 and the actua tor with the programming cable 2 Press Import menu key 3 Log in to the actuator using Programming master 4 Select the Diagnostic data menu and con firm using the ENTER key The content is exported 5 Connect Programmer to the PC 6 Open the EST Service Tool in the KEM soft ware 7 Click on Programmer memory image to l...

Page 36: ...key 2 Select Info menu and confirm using the ENTER key 3 Connect Programmer to TouchGo actuator 4 Navigate to the UID SNR and RSSI points in the menu using the DOWN navigation key 5 Press the middle menu key and touch the door handle the measurement starts The menu is only displayed on the Programmer if TouchGo actuators are recognised ...

Page 37: ...Go medium must be carried in the front trouser pocket and the door handle must be touched with a hand in order to close the signal path Remove the programming cable during the measurement Symbols Causes No signal is received Significant interference The transponder is not available or defective The door handle is not touched or faulty instal lation Increased interference in the environment Increas...

Page 38: ... actuators are implemented using the Programmer in the Settings Actuator menu See Chapter 5 4 The existing configuration data for the actuator stored on the Programmer will be overwritten following confirmation 1 Press Import menu key 2 Log in to the actuator using Programming master 3 Select Configuration menu and confirm using the ENTER key The configuration of the actuator will be read out and ...

Page 39: ...C The following prerequisites are necessary for installa tion PC with Microsoft Windows Version XP Vista 7 or Microsoft Server 2008 Driver CD Programmer with USB cable 2 0 1 Insert the software CD into the CD drive 2 Open File Driver Programmer1460 3 Select the Install file and start 4 Follow the installation instructions on the PC screen 5 Connect the Programmer to the PC using the USB cable 6 Th...

Page 40: ...ng manual for a detailed description of software installation The following steps must be followed Configuration and programming of actuators can only be carried out if data has been transferred from the software to the Programmer previously 1 Switch on the PC 2 Start the software 3 Connect the Programmer to the PC using the USB cable See chapter 7 1 on page 39 with regard to this 4 Transfer the k...

Page 41: ...uator settings is possible using the software and the Programmer 1 Switch on the PC 2 Start the software 3 Connect the Programmer to the PC using the USB cable See chapter 7 1 on page 39 with regard to this The date and time of the connected Program mer are automatically adjusted after the soft ware is started ...

Page 42: ... to the PC or using the mains adapter Caution The battery must only be replaced with a battery of the same type as use of an other type of battery may damage the Programmer Charging the battery using the PC 1 Switch on the PC 2 Connect the Programmer to the PC using the USB cable 3 The Programmer switches on automatically 4 The Programmer charges the battery autono mously if it is connected to the...

Page 43: ...et clock Configuration Buzzer Beep tone Diagnostic LED Illumination Back Latch time TouchGo sensitivity INI Reset Back Data Doors Actuator firmware Technologies Memory info Actuator type Delete all Firmware version Back Programmer Language Contrast Volume Date time Backlight Key click Turn off timeout Name Info Back Firmware update Firmware version Function type Firmware version Emergency charge B...

Page 44: ...uators Charge status The charge status is a display of the current remaining charge of a battery Mechatronic components Mechatronic components are actua tors see actuators NFC Near Field Communication is a trans fer standard for remote exchange of data over short distances Programming master Programming masters are media with a high level of authorisation used to program lower ranking user media a...

Reviews: