background image

User Manual B-Net 93 60  

Mounting and installation


01/2006 

© Kaba Benzing GmbH 

33


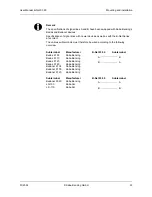
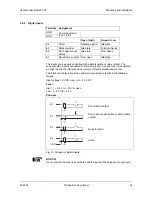
Remark 

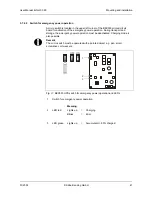
The specifications of signal lines A and B have been swapped with Kaba Benzing’s 
Bedas and Bedanet devices. 

Specifications of signal lines with newer devices as well as with the B-Net Series 
are correct. 

The various subterminals must therefore be wired according to the following 
overview. 


Subterminal 

Manufacturer 

B-Net 93 60 

Subterminal 

Bedas 91 05 

Kaba Benzing 


Bedas 91 10 

Kaba Benzing 

A


Bedas 91 20 

Kaba Benzing 


Bedas 91 40 

Kaba Benzing 

B


Bedanet 91 04 

Kaba Benzing 


Bedanet 91 05 

Kaba Benzing 


Bedanet 91 20 

Kaba Benzing 


Subterminal 

Manufacturer 

B-Net 93 60 

Subterminal 

Bedanet 90 20 

Kaba Benzing 


LR-100 Kaba 

AG 

A


LS -110 

Kaba AG 


B


Summary of Contents for B-Net 93 60

Page 1: ...B Net 93 60 User Manual 01 2006 ...

Page 2: ...ghted Only Kaba Benzing has the right to commercialize market and distribute this document This document or any part of it may not be copied or reproduced adapted arranged reworked or modified without the prior consent of Kaba Benzing All company trademark or product names are trademarks or registered trademarks of their respective owners and are protected Subject to technical changes without noti...

Page 3: ...lines 21 5 3 1 Power supply internal 21 5 3 2 Power supply external 21 5 3 3 Subterminal 21 5 3 4 Door control 22 5 3 5 Host connection 22 5 4 Wall mounted installation 23 5 4 1 Direct surface mounting 23 5 4 2 Hole pattern 23 5 4 3 Using the mounting plate 24 5 5 Insertion of the installation cables 26 5 6 Connectors 27 5 6 1 Connections on BEX101 mother board and BECO500 CPU unit 27 5 6 2 Ethern...

Page 4: ...ss 49 7 2 2 Access after executed network parameter setting 49 7 3 Service functions 49 7 3 1 Demands on the HTTP browser 49 7 3 2 Call of service functions 49 7 3 3 Log in 50 7 3 4 Start page 51 7 3 5 Overview of functions 52 7 3 6 System monitoring and maintenance 53 7 3 7 Hardware settings 62 7 3 8 Hardware analysis 74 7 4 FTP access 77 8 Operating elements 78 8 1 Badge input 78 8 1 1 Contactle...

Page 5: ...al can be found in Software Manual B Client HR3 753 order number 04036907 When installing the device the following remarks listed in the following Kaba Benzing manual must be considered General installation notes order number 04023965 The above mentioned manuals can be found in the included Documentation Software CD ROM order number 04033324 Modification log Listed below are the most important cha...

Page 6: ...erous situation that can lead to minor injuries CAUTION Describes a possibly dangerous situation where the product itself or something near the product could be damaged Symbols If the source of danger can be precisely specified the respective symbol is prefixed Hazardous voltage Explosion hazard Danger for electronic components due to electrostatic discharge Remarks with symbols Please pay special...

Page 7: ... be performed by skilled technical specialists Only specialists authorized by the manufacturer may carry out reconstruction and modification All reconstructions and modifications carried out by unauthorized personnel leads to an exclusion of liability 2 3 Installation instructions Installations at the mains voltage may only be executed by a trained electrical specialist Only trained personnel may ...

Page 8: ...tures Do not short circuit Lithium batteries The Lithium ion accumulator Panasonic CGA103450 is used as buffer battery in the BEX500 UPS optional These batteries may only be charged with the BEX500 s charging connection The Lithium Mangandioxid battery type CR 2032 is used to buffer the memory on the BEC0500 CPU board and the BEX400 add on memory These batteries may in no case be recharged The bat...

Page 9: ...ith electronic components always carry a wristband for the protection against electrostatic discharge Connect one part of the wristband with a discharge socket or an unvarnished grounded metal component Only touch the printed circuit boards at the edges Do not touch the printed circuit board itself or the connector Place all dismantled components on an anti static surface or in a static proof cont...

Page 10: ...ection The terminal features a high contrast monochrome display with a resolution of 240 x 128 pixels The device is operated via a 8 x 8 matrix touch where operational elements can be designed and placed individually Time data capture is performed with the keyless LEGIC identification system Reader modules are also available including inductive mag stripe barcode chip card and contact free readers...

Page 11: ...module integrated Available reader types LEGIC inductive mag stripe barcode verification LEGIC Fingerprint Other readers available on request with SV9001 230 V with SV9001 115 V Rated voltage 24 V AC DC 230 V 115 V Voltage range 12 27 V AC 16 32 V DC 6 10 6 10 Frequency 50 60 Hz 50 60 Hz 50 60 Hz Power supply Power consumption 25 W max 25 VA max 25 VA max Protection class according to IEC 60529 IP...

Page 12: ...ified parameters master records and data records are retained approximately 6 months without power supply Buffer time The optional BEX500 uninterruptible power supply allows for further operation after power failure Buffer time operating time with full function for devices with BEX500 is in case of heavy frequentation at least 90 minutes however under typical conditions up to 4 hours These specifi...

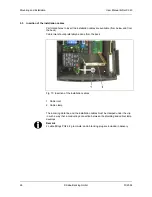
Page 13: ...device may not cause harmful interference and 2 this device must accept any interference received including interference that may cause undesired operation NOTICE Any changes or modifications not expressly approved by the party responsible for compliance could void the user s authority to operate the equipment 3 4 Labeling The identification plate is located on the bottom side of the device Fig 2 ...

Page 14: ...nce or service personnel may open the housing Disconnect power before servicing Voltage must be turned off for devices that are connected fix Devices that are fed via a separable connection the mains plug must be pulled out Secure against re starting Verify that the installation is dead To open the housing please proceed as follows Unlock housing front with key Swing housing front to the left Fig ...

Page 15: ...nterface 3 Display module 4 Trimmer for display contrast 5 BEX500 UPS optional 4 2 1 Trimmer for display contrast The display contrast is set by default Due to special conditions at the installation site light incidence the contrast setting may need to be corrected again NOTICE The device has an automatic temperature sensitive contrast control Therefore the display contrast settings should only be...

Page 16: ... refer to chapter 5 6 3 4 Slot for BEX400 memory expansion module 5 Cold start button refer to chapter 6 3 6 Service button refer to chapter 6 3 7 Backup battery CR2032 8 BECO500 CPU unit 9 Subminiature fuse radial F 315 mA 250 V 5 V supply for second reader at RJ 45 connector on BEX101 10 Microfuse 5x20 cartridge fuse T 1 6 A 250 V input circuit of 24 V terminal supply 11 BEX101 board ...

Page 17: ...ower supply unit with mains switch is optional and therefore not available in devices with external 24 V power supply 4 3 2 Buffer battery To buffer modified parameters master records and data records a Lithium battery type CR2032 is located on the BECO500 CPU board NOTICE The buffer battery must be replaced by a new one every two years Please refer to chapter 9 1 Battery change ...

Page 18: ...upply Earthing The terminal must be grounded In order to ensure an ideal shielding according to EMC electromagnetic compatibility the conductive housing interior must be connected with earth If an internal SV 9001 power supply optional is available the earth lead must be connected to it If no internal power supply is available the earth lead must be routed via the external power supply and clamped...

Page 19: ...ds are to be used for the insertion of the lines into the housing Please consider that the International Protection class depends on the type of reader being used NOTICE Please arrange for a weather protection roof if installed outside Clearances Between two devices with LEGIC readers a distance of 20 cm must be observed on all sides Min 20 cm Min 20 cm Min 20 cm Fig 6 Minimum distance between dev...

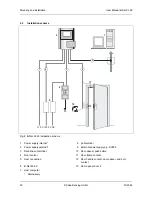
Page 20: ...8 B Net 93 60 installation scheme 1 Power supply internal 8 Subterminal 2 Power supply external 9 External power supply e g SV905 3 Data line subterminal 10 Door opener push button 4 Door control 11 Door frame contact 5 Host connection 12 Door handle contact door opener and bolt contact 6 B Net 93 60 13 Door opener door 2 7 Host computer alternatively ...

Page 21: ...0 5 mm to 0 8 mm can be used Three wires are required for power supply earth SV900 If door opener voltage is required two further wires are needed SV905 Recommended cable CAT 5 S UTP 4 x 2 AWG 24 or AWG 22 according to EIA TIA568 or higher 5 3 3 Subterminal The subterminals are connected via a 2 wire sub partyline It can be designed in star shape or as partyline What must be considered No further ...

Page 22: ...ong item no 04106703 ISDN modem Connecting cable from terminal to RJ45 outlet Recommended cable Telephone cable with RJ45 jack 3 m long item no 04106702 Partyline What must be considered The complete bus connection master lines and branch lines may be up to 2 000 meters long One branch line may not exceed 100 m A maximum of 30 devices may be operated with one partyline The length of the master lin...

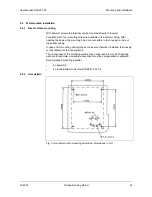
Page 23: ...e mounting holes are accessible in the housing corners of the bottom casing In case of soft mounting undergrounds make sure that when installed the housing is not pressed into the underground The unevenness of the mounting surface may not exceed 0 5 mm With spacing washers for example a possible unevenness must be compensated or adjusted Recommended mounting material 4 x dowel S6 4 x round head wo...

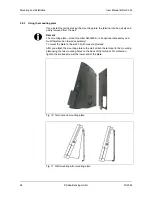
Page 24: ...late product number 04036599 is an optional accesssory and must therefore be ordered separately To mount the plate to the wall 3 drill holes are provided After you attach the mounting plate to the wall attach the terminal to the mounting plate using the two mounting holes on the back of the terminal For protection tighten the knurled screw at the lower end of the plate Fig 10 Terminal and mounting...

Page 25: ...User Manual B Net 93 60 Mounting and installation 01 2006 Kaba Benzing GmbH 25 23 5 259 5 1 5 6 20 160 44 5 168 6 3x 70 Fig 12 Hole pattern and dimensional drawing of mounting plate ...

Page 26: ...and from the back Cable inlet should preferably be done from the back Fig 13 Insertion of the installation cables 1 Cable inlet 2 Cable clamp The incoming data line and the installation cables must be clamped under the clip in such a way that a conducting connection between the shielding and cable clamp develops Remark 2 cable fittings PG22 4 grommets and a blanking plug are included in delivery ...

Page 27: ...n BEX101 mother board and BECO500 CPU unit 1 Slot for optional serial interface or modem refer to chapter 5 6 3 2 RJ 45 connector for second reader refer to chapter 5 6 8 3 RJ 45 Ethernet connection refer to chapter 5 6 2 4 Clamps for the serial interface refer to chapter 5 6 3 5 Digital inputs refer to chapter 5 6 9 6 Relay outputs refer to chapter 5 6 10 7 Input 24 V AC DC supply voltage for the...

Page 28: ...0 100 Mbit Fig 15 Ethernet LED Meaning of the light emitting diodes Off Lights up Data No data Data transmission Link No link Physical connection to network exists 10 100 MBit 10 MBit 100 MBit 5 6 3 Optional serial interface or modem Clamp assignment for the serial interface depends on which optional interface is equipped The clamps for the serial interface are numbered in ascending order from the...

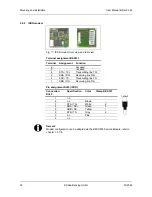
Page 29: ... Is detached as soon as the modem occupies the line 3 A Incoming line exchange PBX A 2 B1 Series connected telephone B Is detached as soon as the modem occupies the line 1 B Incoming line exchange PBX B Remark A series connected telephone is disconnected as soon as the modem occupies the line Pin assignment TAE telephone jack Connection TAE Assignment Color Clamp BEX101 1 A Green 3 2 B Yellow 1 3 ...

Page 30: ...d 5 not used 4 STA TX Transmitting line TX 3 SRA RX Receiving line RX 2 STB TX Transmitting line TX 1 SRB RX Receiving line RX Pin assignment RJ45 ISDN Connection RJ45 Specification Color Clamp BEX 101 1 n c 2 n c Brown 3 STA TX White 4 4 SRA RX Green 3 5 SRB RX Yellow 1 6 STB TX Gray 2 7 n c Pink 8 n c 1 8 Remark Modem configuration can be adapted via the BECO500 Service Module refer to chapter 7...

Page 31: ...02 jumper assignment 4 wire partyline to host recommended Clamp BEX 101 Specification Function from the terminal PIN assignment RJ 45 connector 6 GND Signal ground Shield 5 A TxD A line Transmit 4 wire 6 4 B TxD B line Transmit 4 wire 3 3 A RxD A line Receive 4 wire 2 2 B RxD B line Receive 4 wire 1 1 C Potential compensation C 7 8 2 wire partyline to host Clamp BEX 101 Specification Function from...

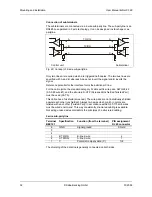
Page 32: ...he standard category 5 cable with 4 wire pairs AWG 24 22 0 5 0 65 wire Ø and the structure S UTP Screened Unshielded Twisted Pair must be used CAT 5 This cable has a foil shield screened The wire pairs are not individually shielded against each other unshielded Always two wires which match in colors are twisted with each other Twisted Pair In accordance with EN 50 173 all 8 wires must be wired end...

Page 33: ...e B Net Series are correct The various subterminals must therefore be wired according to the following overview Subterminal Manufacturer B Net 93 60 Subterminal Bedas 91 05 Kaba Benzing Bedas 91 10 Kaba Benzing A B Bedas 91 20 Kaba Benzing Bedas 91 40 Kaba Benzing B A Bedanet 91 04 Kaba Benzing Bedanet 91 05 Kaba Benzing Bedanet 91 20 Kaba Benzing Subterminal Manufacturer B Net 93 60 Subterminal B...

Page 34: ...8 RJ 45 Connection for second reader The second serial reader can be connected to this connector In this case the optional interface BEX301 RS232 must be equipped Assignment Pin Assignment 1 VCC 5 V DC max 200 mA 2 3 GND 4 5 TxD 6 7 8 1 8 Remarks Communication parameters 9600 8 N 1 The serial interface works with RS 232 levels not with TTL Hardware handshake is not supported No transmit delay of s...

Page 35: ...ple switch or relay contact The corresponding input is connected to common ground An open input is recognized as high due to the internal pull up resistor Ground potential equals low The input circuit also allows the control via connected potential in the following ranges Input voltage 30 V DC max min 30 V DC Level High 2 6 V to 30 V or open Low 30 V to 2 3 V Principle Door frame contact Door open...

Page 36: ...or door openers that are supplied with DC voltage the included diode a freewheeling diode must be connected parallel to the door opener to suppress interference In doing so make sure that the diode is connected in reverse bias direction When using an AC voltage power supply the included varistor type S10K30 must be connected parallelly The diode or varistor must be connected directly to the door o...

Page 37: ...external power supply e g SV900 or SV905 Rated voltage 24 V AC DC Voltage range 12 27 V AC 16 32 V DC Frequency 50 60 Hz Power consumption 25 W max NOTICE Please make sure that the input voltage range during maximum load is observed Important for devices with host connection via RS485 If several terminals are supplied with the same DC voltage it must be considered that the polarity at the input te...

Page 38: ...r supply 1 Jumper to set door opener voltage 2 24 V AC operating voltage for the terminal 3 Operating voltage for door opener 24 V DC 12 V DC or 6 V DC depending on jumper position max 4 VA 100 on time max 8 VA 10 on time 4 Power input 115 V AC max 140 mA 115 V version Power input 230 V AC max 70 mA 230 V version 5 Mains switch NOTICE With the terminal s 24 V AC operating voltage terminal 2 NO add...

Page 39: ...he BECO500 CPU unit can be damaged or destroyed During mounting and demounting of the BEX400 memory expansion unit the ESD protective measures must be considered Fig 25 BEX400 Memory Expansion Unit 1 BEX101 board 4 BECO500 CPU unit 2 BEX400 memory expansion unit 5 Buffer battery 3 SODIMM socket NOTICE The SRAM sector serves as main memory with file system Removing the BEX400 memory expansion unit ...

Page 40: ...UPS is integrated right next to the serial reader in the housing front and is connected to the BEX101 mother board Fig 26 BEX500 UPS 5 7 2 1 Technical data BEX500 UPS Input voltage 24 V according to rectifier level Output voltage 5 V Performance approx 14 Wh Accumulator type 2 x Panasonic CGA103450 Lithium ion or equivalent Accumulator power Voltage 8 8 to 6 0 V average 7 6 V Accumulator capacity ...

Page 41: ...ncy power operation During transport and storage the emergency power operation must be deactivated Charging mode is also possible Remark The micro switch must be operated with a pointed object e g pen small screwdriver or tweezers 1 2 ON OFF 3 Fig 27 BEX500 UPS switch for emergency power operation and LEDs 1 Switch for emergency power operation Meaning 2 LED red Lights up Charging Blinks Error 3 L...

Page 42: ... network parameter Hardware Settings Ethernet Communication Parameter Refer to chapter 7 3 7 1 Enter the group and device address GID DID of BECO500 Hardware Settings Hostline Parameters Please refer to chapter 7 3 7 4 Restart device in application mode System Monitoring and Maintenance Restart or switch device off on Refer to chapter 7 3 6 10 Loading of specific parameters and master records from...

Page 43: ...eader e g CCD hand scanner Hardware requirements The terminal must be equipped with option BEX301 interface RS232 The second reader must be connected to the RJ 45 connector on the BEX101 mother board refer to chapter 5 6 8 Settings in the service module Hardware Settings Serial Line Communication Parameter refer to chapter 7 3 7 2 COM1 Enabled Bits per second 9600 Data bits 8 Parity NONE Stop bits...

Page 44: ...ings serial line communication parameter please refer to chapter 7 3 7 2 COM 1 Enabled Bits per second 9600 Data bits 7 Parity EVEN Stop bits 1 6 2 4 Host connection via modem Hardware requirements The terminal must be equipped with an optional internal analog modem or ISDN modem Settings in the service module Hardware Settings Host Line refer to chapter 7 3 7 4 Host Line Enabled Interface COM1 Gr...

Page 45: ...er board please refer to chapter 5 6 6 Other requirement To support subterminals a corresponding license key is required refer to chapter 7 3 6 8 Settings in the service module Hardware Settings SubLine refer to chapter 7 3 7 5 Sub line 1 Enabled Interface COM1 Hardware settings serial line communication parameter please refer to chapter 7 3 7 2 COM 1 Enabled Bits per second 19200 Data bits 7 Pari...

Page 46: ... start with execution of the following start options Cold start of the application please refer to chapter 6 3 3 Start of service mode please refer to chapter 6 3 4 Start of service mode and set back to default IP please refer to chapter 6 3 5 The light emitting diodes signal if the respective start option has been executed LED red 3 LED green 4 Meaning Lights up Off Application runs Off Lights up...

Page 47: ... on device Release cold start button after approx 5 seconds 6 3 4 Start of service mode Performing a system start in service mode Turn off the device Push and hold the service button Turn on device Release service button after approx 5 seconds 6 3 5 Start of service mode and reset to default IP This start option makes a start of the service mode possible with concurrent reset of the terminal IP ad...

Page 48: ...so be connected directly with the BECO An HTTP browser with Java VM support must be installed on the service PC An http server and an FTP server runs in service mode Data for the display of statistical information is stored on the BECO as HTML files Data for the display of dynamic information is generated by the service module in Servlets Active Server Pages ASP and then sent to the browser as HTM...

Page 49: ...ver cable crossed RJ 45 cable 7 2 2 Access after executed network parameter setting After startup the BECO s service module can be called up via the entered IP address Remark A newly set IP address will be active after the device has been rebooted 7 3 Service functions The communication with the menu driven service functions of the BECO Service Module takes place via an HTTP browser 7 3 1 Demands ...

Page 50: ...a login mask Here user name and password are requested that control the access to the individual functions Fig 29 Log in mask Enter user name and password Then press the Submit button Users The following users are already created by default User name Password Access rights Use localuser Bedanet limited Set up root Bedanet unlimited Expert mode ...

Reviews: