background image


26

APP

HUAWEI Market

á

Download and Install the APP

3

-26

Enable and Register the APP

3

-27

XIAOMI Market

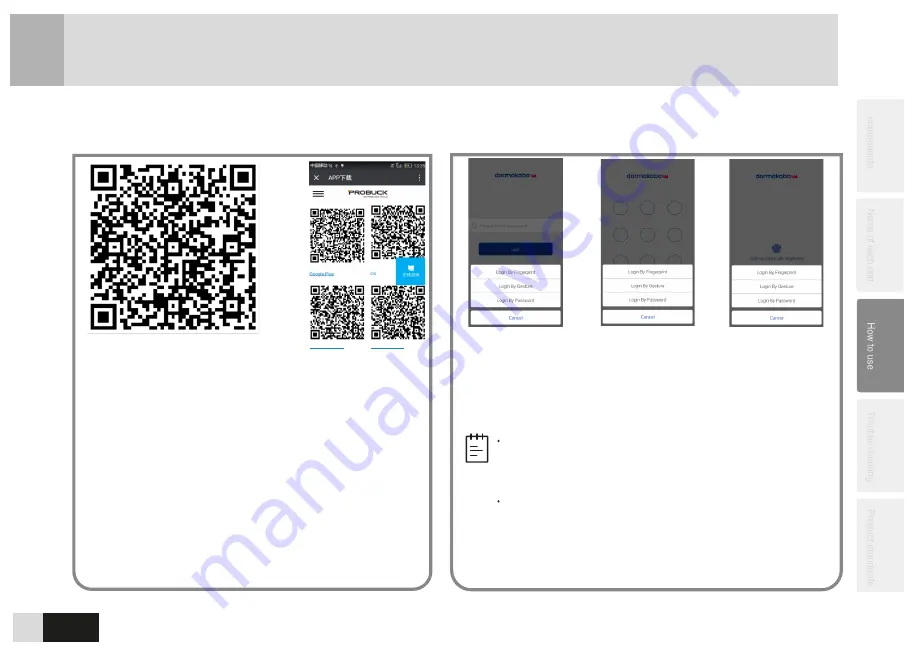
1. Enable 


Wechat


 in 


your 


mobile and scan QR Code 

above to download APP


Installation Package.

2. After entering the downloading interface, select the 
market matching your mobile system including Google 
Play, App Store, HUAWEI Market and 


XIAOMI Market. 

3. Following the onscreen instruction “Open with 
Browser”, click any 

browser in your mobile screen to 

download.
4. Enable the APP and login after successfully 
downloading and installing.

PIN code logon

switchover

Gesture PIN code

logon switchover

Fingerprint logon

switchover

Launch APP to enter logon interface, click “switch over logon 
mode” to verify user's password, gesture PIN code and 
fingerprint for logon. Meanwhile, the mobile phone's 
Bluetooth shall be enabled. After the logon


is finished, the 

device admin interface is entered. 

Login by fingerprint must be supported by mobile, 
which is equipped with fingerprint sensor and 
running Android 6.0 and IOS 8.0 or above.

Within the Android  system, when APP is launched, if 
the PIN code or gesture PIN code is entered 
incorrectly for 3 times, APP will be locked  for 30 
seconds;  within the ISO system, when APP is 
launched, if the PIN code is entered incorrectly for 3 
times, only other logon modes can be selected.

Note

Summary of Contents for E-Flash EF680

Page 1: ...Kaba EF680 Please read the instructions thoroughly before usage Functions and design of the products are subject to change without prior notice ...

Page 2: ...ervice personnel The warranty of Kaba EF680 does not cover the defects damages caused by the door defects improper installation storage shipping handling lack of or improper maintenance abnormal assemble disassembly misuse abuse accidents unauthorized services the usage of unauthorized service parts Disassembly rework and reverse engineering are prohibited without a written approval of KABA Tradem...

Page 3: ...f Wireless Communication 3 22 Please Delete Phone User 3 23 Language Setting 3 24 Passage Open Mode Setting 3 25 Privacy Mode Setting 3 26 Download and Install the APP 3 27 Enable and Register the APP 3 28 Bind Devices 3 29 Device Management 3 30 View the Device Information 3 31 Bluetooth Key Sharing 3 32 View Message 3 33 Lock Management through Mobile 3 34 Language Setting 3 35 Trespassing Damag...

Page 4: ...e that the gap between the door and the doorframe is less than 5mm Guidelines that a user should follow Supplementary information of the product Caution Ban Note Must Ban Consult a qualified installation professional for installation or relocation Do not install the product where it is exposed to rainwater which may cause malfunctions of the product Must Must ...

Page 5: ...alert when you open a door with a PIN code There will be a risk of theft if your PIN code is exposed to an outsider Pay attention to the door handle to prevent possible injuries Watch your children at home for that Do not disassemble reassemble or repair the product by yourselves This may cause damage or malfunctions to the product Do not press a button too hard or use a foreign object to hit it T...

Page 6: ...replace the batteries as soon as possible Do not drop shock the remote control Use new alkaline batteries AA size Otherwise it may cause the malfunction to the product and the lifetime of the product may be shortened Do not mix new batteries with used ones otherwise it may cause damage and shorten the lifetime of the product Do not wear gloves to touch the keypad as the system cannot detect Instal...

Page 7: ...s 3 nos Card Key 4 nos Key Override 4 nos Installation Template AU Mortise Screws 4nos Strike Strike Box 2nos Screws 3nos Screws 4nos Batteries AA 4nos or optional Remote Control Button Cell Battery Optional product components are subject to change according to the requests of different markets Note Strike Plate EN Mortise Screws 5nos User Manual ...

Page 8: ... users to enter a series of number such as PIN codes user IDs menu selection codes ect It also display user IDs 8 2 Name of Parts Outside Lock Front Body Motion light Indicate the status of the door lock When the battery is fully discharged a 9V battery can be used to supply power to operate the product temporarily as an emergency backup Card Reader Handle 2 1 Note ...

Page 9: ... Factory Default Setting 9 Mortise Anti lift button Inside Lock Main Body Clear all information except Admin PIN Code Button M E Factory Default Setting Flashing when enter or exit passage mode Slide the button to LOCK and press for a second to set or cancel privacy mode Slide the button to OPEN to set passage mode Slide the button to LOCK to cancel passage mode Handle 2 2 ...

Page 10: ...emote controls will be deleted after factory reset Admin PIN code will be reset to 00123456 Please touch the keypad to make sure it is power off after batteries removed 3 1 M E M E 10 3 Voice Guide Please input PIN code Voice Guide 1 Chinese 2 English Input 8 digit admin PIN code and press to confirm Select the language based on the voice guide and press to confirm Default admin PIN code for this ...

Page 11: ... Voice Guide Please input PIN code again Input the PIN code again and press to confirm Open the battery cover and press the E button for 10 seconds Voice Guide Please input PIN code Input 6 12 digit admin PIN code and press to confirm Voice Guide Operation succeeded Caution All user information except admin PIN code wireless relay and security housekeeper will be deleted after this operation Note ...

Page 12: ... management 3 PIN code management 4 Wireless communication setting 5 System setting Press corresponding number and pound key to confirm There is only management right for admin card key and admin PIN code It cannot be used to unlock the door Voice Guide 2 Card key management 3 PIN code management 4 Wireless communication setting 5 System setting Press corresponding number and pound key to confirm ...

Page 13: ...e g Please Input User ID Please input the PIN Code twice g Please Input User ID Please input the PIN Code twice g Please Input User ID Please input the PIN Code twice Wireless Communication Setting Turn on Wireless Communication Turn off Wireless Communication Wireless Relay Registration Delete an Individual Remote Control Wireless Relay Deletion Remote Control Registration Press any button of Wir...

Page 14: ... is optional System Setting Sound Volume Setting Language Setting Security Housekeeper Setting High Medium Low Mute Chinese English Security Housekeeper Registration Mobile Phone Registration Security Housekeeper Registration Press any button of the Security Housekeeper Input Mobile Phone Number ...

Page 15: ...card key 2 Temporary user card key 3 SOS card key 4 Admin card key Choose the user category and press to confirm Voice Guide Please input User ID Input the user ID and press to confirm Swipe a card key on the card reader Voice Guide Operation succeeded Up to 100 card keys can be registered General card key user ID 10 79 Temporary card key user ID 80 89 SOS card key user ID 90 99 Admin card key use...

Page 16: ...d press to confirm Voice Guide Please press the pound key to confirm your input please press the star key to input again Press to confirm Enter the menu press 2 and on the keypad Voice Guide 1 Card key registration 2 Delete an individual card key 3 Delete all card keys Voice Guide Please press the pound key to confirm your input please press the star key to input again Press 3 and on the keypad Pr...

Page 17: ...firm Voice Guide 1 PIN Code registration 2 Delete an individual PIN Code 3 Delete all PIN Codes Voice Guide 1 General user PIN Code 2 One time PIN Code 3 SOS PIN Code Voice Guide Please input User ID Input the user ID and press to confirm Voice Guide Operation succeeded Up to 10 PIN Codes can be registered General user PIN Code ID 01 07 One time PIN Code ID 08 SOS PIN Code ID 09 Admin PIN Code ID ...

Page 18: ...d on the keypad Press to confirm Press 3 and on the keypad Press to confirm Voice Guide 1 PIN Code registration 2 Delete an individual PIN Code 3 Delete all PIN Codes Voice Guide Please press the pound key to confirm your input please press the star key to input again Voice Guide 1 PIN Code registration 2 Delete an individual PIN Code 3 Delete all PIN Codes Voice Guide Please press the pound key t...

Page 19: ...off wireless communication 3 Remote control registration 4 Remote control deletion 5 Wireless relay registration 6 Wireless relay deletion Voice Guide Please input User ID Voice Guide Operation succeeded Input the user ID and press to confirm Caution Remote controls can be activated when wireless communication function is turned ON Up to 8 remote controls can be registered and the user ID can be 0...

Page 20: ...tegory and press button Voice Guide Operation succeeded Voice Guide Please press the pound key to confirm your input please press the star key to input again Voice Guide 1 Turn on wireless communication 2 Turn off wireless communication 3 Remote control registration 4 Remote control deletion 5 Wireless relay registration 6 Wireless relay deletion Voice Guide 2 Sound volume setting 3 Language setti...

Page 21: ...a PIN code can be up to 26 digits or less The lock will enter lockout mode for 15 minutes after 3 times wrong entries of PIN code Press any button on the keypad will activate the alarm 3 Push down the handle to unlock the door 2 Input the scramble code and 6 12 digit PIN code and press to confirm 1 Touch the keypad with your palm 2 Voice Guide Verification Succeeded the door has been unlocked 3 Pu...

Page 22: ...afe place Note Open a Door from Inside 3 16 Lock a Door from Inside 3 17 Push down the handle to open a door Auto lock Mode 1 Anti lift handle optional Press Anti lift button and push down the handle to unlock 2 Without Anti lift handle default Push down the handle to unlock The lock will be automatically locked after the door closed Voice Guide The door has been locked Passage Open Mode Note Plea...

Page 23: ...ked before leaving Slide the button to OPEN to activate the auto lock function the door won t be automatically locked after closed Voice Guide Passage Mode Caution Please be alert to the surrounding environment under passage mode 1 Shake the mobile phone to unlock Enter the Device Information interface and shake the mobile phone the lock will be unlocked successfully 2 APP Unlocking Enter the Devi...

Page 24: ... user Voice Guide Operation succeeded Voice Guide 1 Turn on wireless communication 2 Turn off wireless communication 4 Please delete phone user Voice Guide Operation succeeded Voice Guide 1 Turn on wireless communication 2 Turn off wireless communication 4 Please delete phone user Please Delete Phone User 3 22 Enter the menu press 4 and on the keypad Press 4 and on the keypad Input the user ID and...

Page 25: ...outside handle Activate privacy mode Deactivate privacy mode Slide the privacy mode switch to the right and press it downwards to activate privacy mode SAFE light will illuminate 2 seconds after privacy mode activation succeeded Press the privacy mode switch downwards again to deactivate the privacy mode SAFE light will illuminate 2 seconds after privacy mode deactivation succeeded Note The number...

Page 26: ...hover Gesture PIN code logon switchover Fingerprint logon switchover Launch APP to enter logon interface click switch over logon mode to verify user s password gesture PIN code and fingerprint for logon Meanwhile the mobile phone s Bluetooth shall be enabled After the logon is finished the device admin interface is entered Login by fingerprint must be supported by mobile which is equipped with fin...

Page 27: ...ne App can be bound with 10 devices at most Note Unlocking enter management Interface and click the locking icon The smart lock is unlocked Locking enter management Interface and click the locking icon The smart lock is successfully locked Refresh device information enter the device management interface long press a connected device pop up a selection menu click refresh device information and the ...

Page 28: ...ction is only available to administrator s account Binding list Enter the Device Information interface and click Bind List to display the mobiles bound with the smart lock Click the deleting icon U on the right of the user you want to delete and then click OK to confirm the operation Shake to unlock Enter the Device Information interface and shake your mobile to unlock Note Shaking to unlock can b...

Page 29: ...ck All Devices after entering Message interface 2 Select a device name click All Messages to unfold options including All Messages Open Messages User Messages Operation Messages and Alarm Messages You can click All Times to unfold operations including All Times Recent 1 day Recent 7 days Recent 15 days Recent 30 days and Custom Time zones Synchronize Message In the Message interface press a lock i...

Page 30: ...tion Unbind device Click OK to confirm Download all records Share your bluetooth key Choose the start date time and valid period Generates Key Device information View or Change Device Name User List Capacity Current Time Battery Product Module etc Device information Shake to unlock Message Manageme nt View Message Click a device name Choose Message Type Including All Messages Open Messages User Me...

Page 31: ... mode it will alarm out automatically by the highest level volume if the alarm is triggered Damage Alarm SOS Alarm An alarm will be activated if an outsider tries to break into the house by damaging the door lock Note The alarm will last for 30 seconds SOS Alarm 3 36 When the door is unlocked by SOS PIN code or Card key SOS alarm will be activated and the SOS alarm message will be conveyed to the ...

Page 32: ...rd when you try to press any keys during this alarm period Verify the correct Card key Remote control or reset can remove the keypad lockout alarm Note The Keypad Lockout Alarm will be deactivated automatically after about 15 minutes Low Battery Alarm Please replace the battery when you hear the voice guide Low battery please replace batteries Note All the registered information will not be affect...

Page 33: ...4 33 ...

Page 34: ...34 ...

Page 35: ... must be entered within 10 seconds while the touch screen is active or the process will have to be restarted The star or pound can not be used as part of the PIN code PIN codes must consist of 6 12 digits to register ...

Page 36: ...36 ...

Page 37: ...5 37 6 12 digits Product Specification 35 50 51 60 61 100 optional X15 EN Mortise with automatic deadbolt Kaba MS2 Australia New Zealand Mortise with automatic locking function 55 or 70 EN 60 AU ...

Page 38: ......

Reviews: