TOOLS REQUIRED
• Power Drill with
3
⁄
8
” (10mm) drill bit
• Tape
• Center Punch or Awl
• Hex Allen Wrench Set
• Phillips Head Screwdriver
• Small Flat Blade Screwdriver
• Safety Glasses
A.
DOOR PREPARATION—REMOVE EXISTING
OUTSIDE HARDWARE
A-1
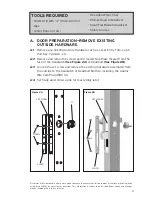
Remove any existing Outside Hardware such as Lever Entry Trim, Latch
Pull, Key Cylinders, etc.
A-2
Remove and retain the screws and Armored Face Plate (Scalp) from the
face of the Deadlatch
(See Figure 2A)
or Deadbolt
(See Figure 2B)
.
A-3
Loosen the set screw and remove the existing hardware assembled from
the outside to the Deadlatch or Deadbolt Mortise, including the Adams
Rite Cam Plug 4580 (d).
A-4
Set Scalp and screws aside for reassembly later.
Figure 2A
d
3
set screw
scalp
screws
Figure 2B
set screw
Disclaimer: While reasonable efforts were made to ensure the accuracy of this document at the time of printing, Kaba
assumes no liability for any errors or omissions. This information is subject to be revised without notice, and changes
may be incorporated in future releases.
scalp
screws
Summary of Contents for E-PLEX 3X00 SERIES
Page 1: ...INSTALLATION INSTRUCTIONS E PLEX 3X00 SERIES NARROW STILE LOCK ...
Page 9: ...9 Notes ...
Page 10: ...10 Notes ...


