background image

5

4

For technical assistance please call

1-800-849-TECH (8324) or 336-725-1331

INSTALLATION QUALIFICATIONS

These instructions are designed for use by maintenance professionals or lock

installers who are familiar with common safety practices and competent to

perform the steps described. Kaba Access Control is not responsible for

damage, injury or malfunction due to incorrect installation.

Handing Diagram

To determine handing, face the door from the exterior (access) side and

select the corresponding diagram below.

LH

RH

LHR

RHR

Chart

Model Number

Handing

Deadbolt

E5x63

LH/RHR

E5x64

RH/LHR

E5x68

LH/RHR

E5x69

RH/LHR

Outside Unit

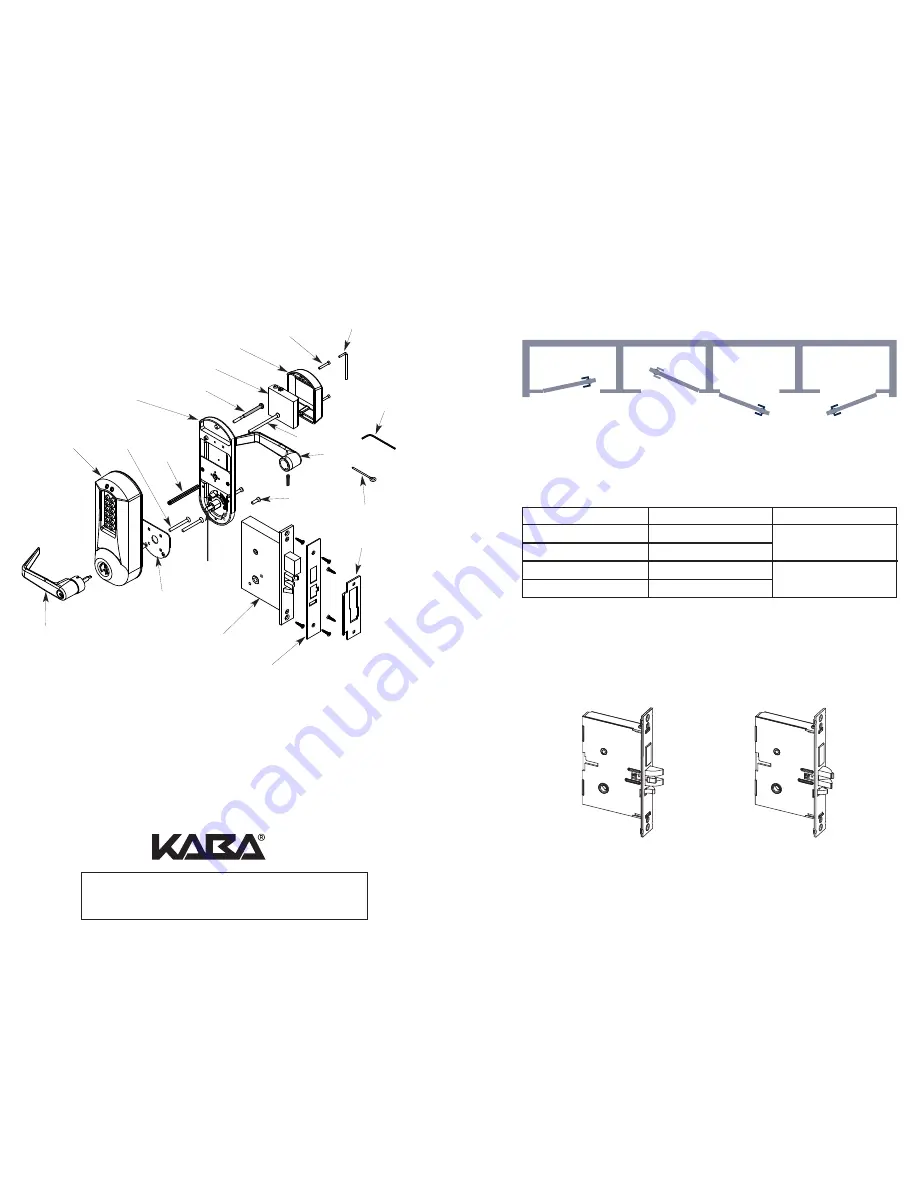
Assembly

Outside Lever

Assembly

Mounting

Plate

Mortise Lock

Mortise Faceplate

Strike

Mortise

Spindle

Thumbturn

Spindle

Lower

Mounting

Screws

Release

Tool

Mounting

Plate

Screws

Allen

Wrench

Battery Cover

Screws

Battery Pack Cover

Battery Pack

Lectrobolt

Inside Unit Assembly

Inside Lever

Security

Screw Tool

Upper

Mounting Screw

E-PLEX 1" Mortise Lock

5x63, 5x64, 5x68 and 5x69

No

Yes

A. MORTISE HANDING

The 1" Mortise is not field reversible. You must have the

appropriate model for the door handing of the installation.

For LH (left hand) and

RHR (right hand reverse)

For RH (right hand) and

LHR (left hand reverse)

Summary of Contents for E-Plex 5x63

Page 1: ...ccess Control 2941 Indiana Avenue Winston Salem NC 27105 USA Tel 800 849 8324 336 725 1331 Fax 800 346 9640 336 725 3269 www kabaaccess com www e plexlock com PKG3140 0507 1 MORTISE INSTALLATION INSTRUCTIONS ...

Page 2: ...utions Important Carefully inspect windows door frame door lights etc to ensure that the recommended procedures will not cause damage Kaba Access Control s warranty does not cover damages caused by installation Caution Wear safety glasses when preparing door TOOLS REQUIRED Safety glasses 1 2 13 mm chisel 1 8 3 mm drill bit 1 4 7 mm drill bit 1 2 13 mm drill bit 21 8 54 mm hole saw Drill Awl or cen...

Page 3: ... RH LHR RHR Chart Model Number Handing Deadbolt E5x63 LH RHR E5x64 RH LHR E5x68 LH RHR E5x69 RH LHR Outside Unit Assembly Outside Lever Assembly Mounting Plate Mortise Lock Mortise Faceplate Strike Mortise Spindle Thumbturn Spindle Lower Mounting Screws Release Tool Mounting Plate Screws Allen Wrench Battery Cover Screws Battery Pack Cover Battery Pack Lectrobolt Inside Unit Assembly Inside Lever ...

Page 4: ...ike cutout and mounting screws B DOOR PREPARATION If using the installation jig to prepare the door refer to the instructions provided with the jig then pro ceed with step 7 B 1 Mark the handle height on the edge of the door as determined directly from the strike The axis of rotation of the handle is level with the bottom lip of the strike B 2 Align the template along the vertical center line of t...

Page 5: ...age to the mounting screws and threads F INSTALLING THE INSIDE LEVER Insert the inside lever A onto the inside unit assembly Secure the inside lever with the hex screw B supplied using the allen wrench C supplied C 3 Drill pilot holes for the strike mounting screws Mortise the door frame for the strike dimensions shown 3 3 8 L X 1 D X 1 W Note Make certain not to mortise over screw holes drilled e...

Page 6: ...ubstituted with a foreign part If the lock is used with a wall bumper the warranty is null and void If a doorstop is required we recommend the use of a floor secured stop The environment and conditions of use determine the life of finishes on Kaba Access Control products Finishes on Kaba Access Control products are subject to change due to wear and environmental corrosion Kaba Access Control canno...

Page 7: ...Door Exercise Room This lock is New Installation Replacing a conventional keyed lock Replacing a Kaba Mechanical Pushbutton Lock Replacing a Kaba Electronic Access Control Replacing a Keyless Lock other than Kaba How did you learn about Kaba Access Control Pushbutton Locks Advertisement Previous Use Internet Web Another Use Locksmith Maintenance Training Class Other please specify What was your re...

Page 8: ...nsure it is oriented to engage the lever sleeve to accommodate desired lock handing as shown Note For all interchangeable removable cylinders except ASSA Medeco Yale proceed to section I 2 For ASSA Medeco Yale cylinders skip to section I 5 G CHANGING KEY IN LEVER CYLINDER On key in lever models of the E Plex 5000 series the outside lever comes preassembled with Kaba s key in lever cylinder Kaba 15...

Page 9: ...sert the outside lever a until it is flush to the outside unit assembly b To secure the outside lever insert the release tool d or screwdriver into the outside lever as shown and slide the lever catch down until it clicks Make certain lever is attached before installing the core I 3 Insert the supplied tailpiece e vertically into the outside lever as shown Make certain that you rotate the tailpiec...

Page 10: ...section L K 3 Rotate outside lever and hold Ensure that the latch is fully retracted and flush with the latch faceplate Release the outside lever the latch should be fully extended When the lock re locks you will again hear the motor K 4 Insert key into the outside lever Rotate key counterclockwise to stop posi tion and hold Ensure that the latch is fully retracted and flush with the latch facepla...

Reviews: