background image

5

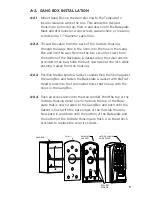
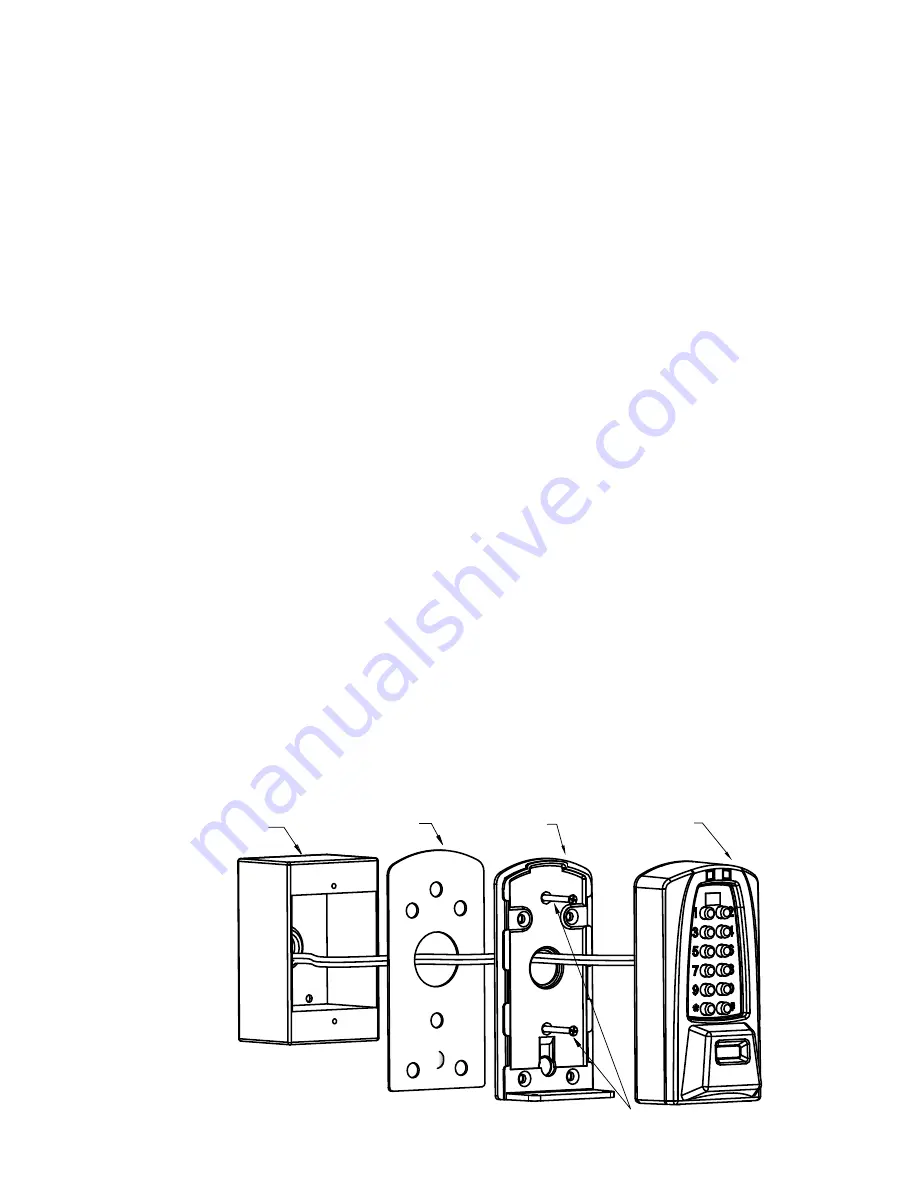
A-2.  GANG BOX INSTALLATION

 
A-2.1

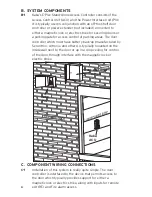
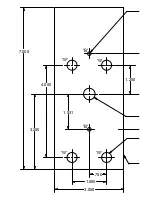
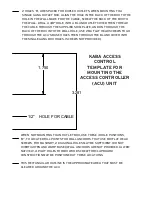
   Mount Gang Box on the wall referring to the Template to  


insure clearance above the box. This allows the Keypad  


Housing to be moved up, then in and down onto the Baseplate.  


Mark and drill holes for wood screws, wall anchors, or masonry  


screws and a 

1

2

" diameter cable hole.


A-2.2

   Thread the cable from the back of the Outside Housing    


through the large hole in the Shim, into the hole in the Gang  


Box and into the wall. Remove the two security screws from  


the bottom of the Backplate & Gasket using the small wrench  


provided in the bag. Slide the back down about one inch while  


pushing it away from the housing.

A-2.3

   Position the Backplate & Gasket, sandwiching the Shim against  


the Gang Box and fasten the Backplate & Gasket with #6 Flat  


Head screws into the two smaller holes that line up with the  


holes in the Gang Box.

A-2.4

   Push all excess cable into the wall conduit. Hold the top of the  


Outside Housing about one inch above the top of the Base- 


plate that is now screwed to the Gang Box and push until the  


Gasket is flush with the back edges of the Outside Housing.  


Now push in and down until the bottom of the Baseplate and  


the bottom of the Outside Housing are flush. Use the wrench  


provided to replace the security screws. 

GANG BOX

SHIM

BACKPLATE

& GASKET


OUTSIDE HOUSING

WITH KEYPAD

SECURITY 
SCREWS

Summary of Contents for E-PLEX 5x70 Series

Page 1: ...1 E PLEX 5x70 Series Stand Alone Access Controller Installation Instructions...

Page 2: ...ation Warning and Cautions IMPORTANT Carefully inspect windows doorframes door lights etc to ensure that the recommended procedures will not cause any damage Kaba Access Control s warranty does not co...

Page 3: ...3 ACU PIU SK3193 Sh2 of 2 01Aug08 jre for Shellberg 03Mar10 jre show Rev 2 board Power Interface Unit Standalone Access Control...

Page 4: ...ity screws from the bottom of the Backplate Gasket using the small wrench provided in the bag Slide the back down about one inch while pulling it away from the housing A 1 3 Position Shim Gasket Backp...

Page 5: ...Slide the back down about one inch while pushing it away from the housing A 2 3 Position the Backplate Gasket sandwiching the Shim against the Gang Box and fasten the Backplate Gasket with 6 Flat Head...

Page 6: ...cess Control Unit ACU and the Power Interface Unit PIU It is typically used in conjunction with an off the shelf door controller or power extender not included connected to either a magnetic lock or e...

Page 7: ...ituted with a foreign part If the lock is used with a wall bumper the warranty is null and void If a doorstop is required we recommend the use of a floor secured stop The environment and conditions of...

Page 8: ...For your records Model No Date Purchased Dealer Name Telephone For technical assistance please call 1 800 849 TECH 8324 or 336 725 1331 Notes 8...

Page 9: ......

Page 10: ...1 250 4 000 750 1 500 3 000 7 000 3 250 1 531 B B W W W W 1 250 4 000 750 1 500 3 000 7 000 3 250 1 531 B B W W W W...

Page 11: ...ES FOR 10 WOOD SCREW FOR CLAPBOARD CONSTRUCTION MAY BE POSITIONED AT THESE LOCATIONS THIS RECTANGULAR OUTLINE IS THE APPROXIMATE AREA THAT MUST BE CLEARED AROUND THE ACU 1 250 1 2 HOLE FOR CABLE 1 750...

Page 12: ......

Page 13: ...CLASS MAIL PERMIT NO 1563 WINSTON SALEM NC KABA ACCESS CONTROL 2941 INDIANA AVENUE WINSTON SALEM NC 27199 3770 POSTAGE WILL BE PAID BY ADDRESSEE NO POSTAGE NECESSARY IF MAILED IN THE UNITED STATES ALI...

Page 14: ...ess Control Pushbutton Locks Advertisement Previous Use Internet Web Another Use Locksmith Maintenance Training Class Other please specify What was your reason for buying this lock Who installed your...

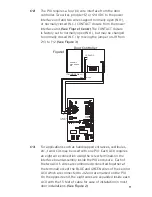
Page 15: ...icapped entrances vestibules etc two ACUs may be used with one PIU Each ACU requires an eight wire connection using the screw terminals on the interface board assembly inside the PIU enclosure Each of...

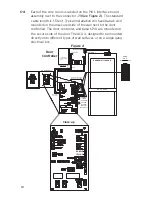
Page 16: ...unted on the secure side of the door The ACU is designed to be mounted directly onto different types of wall surfaces or on a single gang electrical box Close up FIRE ALARM MAG OR STRIKE CENTRAL ALARM...

Page 17: ...ppropriately A remote reset is afforded by connection to J13 This tamper sensing feature may be disabled by turning off the bottom switch on SW8 See Figure 3 D 2 Another feature of this lock is the SH...

Page 18: ...ion on other types of resets that can be performed at the ACU s keypad This procedure requires two people within hearing range of each other to verify the sequence below One person must have access to...

Page 19: ...331 Notes 1 2 O N SW8 FACTORY SETTING HARD RESET TAMPER ENABLED J11 CONTACT CLOSURE NORMALLY OPEN FACTORY SETTING 1 2 3 J10 SHUNT CLOSURE NORMALLY OPEN FACTORY SETTING 1 2 3 O N 1 2 3 4 SW7 0 1 SEC 0...

Page 20: ...Kaba ADS Americas 2941 Indiana Avenue Winston Salem NC 27105 USA Tel 800 849 8324 336 725 1331 Fax 800 346 9640 336 725 3269 www kabaaccess com PKG3239 0410...

Reviews: