Section 4 - 7
K
e
y
C
o
n
tr
o
l
&
R
e
c
o
rd
K
e
e
p
in
g
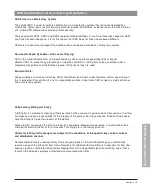
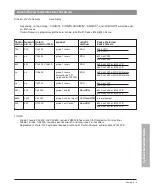
Special Symbols
GGM
CTR
A
B
AA
BA
AA1 AA2
AA3
A1
BA1 BA2 BA3
B1
GGM1
SKD1
Change keys directly under higher level master keys
take the name of their associated master key and add
numbers after the letter(s). SKD’s, if used, are considered part of the system.
CTR is the symbol for a control key. A top control key, capable of operating all the cores in a system, is
shown in the schematic at the same level as the top master key.
Cross keying
Although sometimes required, cross keying, either controlled or uncontrolled, should be discouraged. Cross
keying greatly reduces the keying capacity of a system, severely limits the security of the cross keyed cylinder
and makes the key system less flexible. Whenever possible, alternate solutions to cross keying should be
explored.
If cross keying is required, each set’s operating parameters need to be defined. The expressions can be
written as follows:
XAA1 oby AA1, AA2, AA, A (oby = operated by)
X1X oby AC1 - AC5, AC10, AC, A
In the second example above, the “X” after the cylinder designation indicates that there is no change key
(CK). It should be noted that cross keying requirements need to be defined at the time bittings are being
generated. Cross keyed cylinders are labeled with the “X” symbol.
Additional Details
The letter “X” should not be used to designate a grand master. As stated above, this letter symbol is reserved
for use in cross keying.
The letters I and O should be avoided for use as grand master or master key symbols as they are sometimes
confused for numbers. To avoid confusion with O, Q should also be avoided.
For systems with more than twenty-four master keys under a given grand, the counting numbers are used
between the letters of the pair. For example, A2A, A2B, A2C….A2Z are the symbols for master keys twenty-
five through forty-eight.
Summary of Contents for Peaks Classic
Page 1: ...Technical Manual Preferred Classic ...
Page 3: ...Peaks Preferred Classic Notes ...
Page 4: ...Technical Manual Section 1 Introduction Preferred Classic ...
Page 12: ...Technical Manual Section 2 Product Information Preferred Classic ...
Page 19: ...Section 2 7 Product Information Peaks Preferred Classic Notes ...
Page 41: ...Section 2 30 Product Information Peaks Preferred Classic Notes ...
Page 42: ...Section 2 31 Product Information Peaks Preferred Classic Notes ...
Page 43: ...Section 2 32 Product Information Peaks Preferred Classic Notes ...
Page 44: ...Technical Manual Section 3 Key Cutting and Pinning Preferred Classic ...
Page 66: ...Section 3 22 Key Cutting Pinning Peaks Preferred Classic Notes ...
Page 67: ...Section 3 23 Key Cutting Pinning Peaks Preferred Classic Notes ...
Page 68: ...Preferred Classic Technical Manual Section 4 Key Control Record Keeping ...
Page 79: ...Section 4 11 Key Control Record Keeping Peaks Preferred Classic Notes ...
Page 80: ...Preferred Classic Technical Manual Section 5 Cylinder Installation Guide ...
Page 91: ...Section 5 11 Cylinder Installation Guide Peaks Preferred Classic Notes ...

