Document Number 481.093 Rev. A - 06/04
19
Install the Interchangeable Key Core
Note:
Two (2) tailpieces for the interchangeable core
are included with the lock: one for door thickness
1 1/2” (38.1mm) or less, and one for door thickness
greater than 1 1/2” (38.1mm) . The interchangeable
core is not included with the lock.
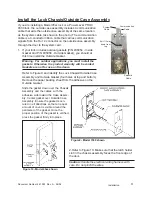
1. Insert the appropriate tailpiece prongs into the core.
Refer to Figure 23.
Note:
Refer to Figure 24.
2. Insert the control key into the core and turn the key
clockwise until the catch disengages.
3. With the control key in the core, insert the core fully
into the outside lever.
4. Turn the control key counter-clockwise, locking the
core in the lever. Then remove the key from the
core.
Locate and Install the Strike
For non-prepped doors:
1. Locate the centerline of the strike opening
on the door jamb at the centerline of the
latchbolt. Trace an outline around the
strike on the door jamb.
2. Mortise the door jamb in alignment with the
center of the latchbolt to accommodate the
strike box and the 4 7/8”(124mm) ASA
strike (refer to Figure 25) or the 2 3/4”
(70mm) T-strike (refer to Figure 26).
For all doors:
1. Insert the strike box and fasten the strike
with the screws provided.
Note:
When the strike box is not used, the
recess in the door jamb must be at
least 9/16” (14mm) deep to allow the
latchbolt to extend to its full free
length.
Figure 26
Figure 23
Figure 24
Figure 25
Summary of Contents for PowerLever 1550
Page 1: ...PowerLever Door Lock Series INSTALLATION GUIDE Models 1550 4550 4560 PROX 9000 ...
Page 4: ...SPECIFICATIONS 22 Electronic Specifications 22 Hardware Specifications 22 TROUBLESHOOTING 22 ...
Page 28: ...Document Number 481 093 Rev A 06 04 24 ...
Page 29: ...NOTES ...
Page 30: ......
Page 31: ......

