background image

6

k2evo708xy-2012-01  

Kaba s-module for c-lever

EN

Quick guide

Installation

Installation instructions


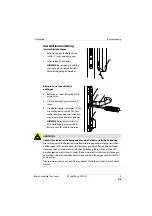
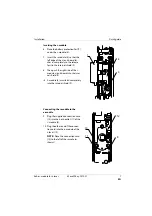
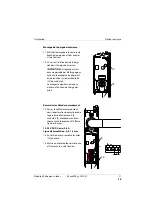
Detaching the internal shield

1. Loosen fixing screw for internal 

shield (1) and remove. 

2. Lift off the internal shield (2).

NOTE:

 The internal shield cannot 

be removed completely in the case 
of some handle styles!

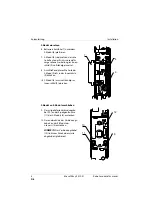
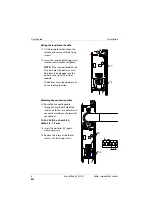
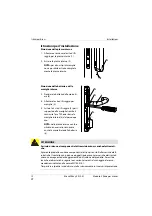
Removing the batteries and inside 
lever handle

3. Remove batteries from the battery 

circuit board (6).

4. Loosen the lever handle fixing 

screw (3).

5. Unscrew the 3 fixing screws (4) for 

the lever handle bearing using a 
T20 star screwdriver and lift the 
inside lever handle (5) off the 
spindle. 

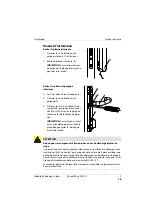
NOTE:

 The battery circuit board (6) 

must also be removed in the case of 
the internal shield with cylinder 
holes.

1

2

3

4

5

6

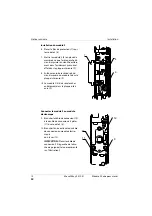
ATTENTION

Danger of damage to electronic components from electrostatic discharge.

This product contains electronic components that are sensitive to electrostatic 
discharge (ESD). Contact by persons or objects can cause an electrostatic 
discharge that may damage or destroy the product. To avoid the risk of electrosta-
tic discharge, note the handling guidelines and recommendations according to 
EN100015-1.

Only transport and send removed modules in protective bags.

Summary of Contents for S-module

Page 1: ...DE EN FR IT Kaba S module for c lever Kurzanleitung Quick Guide Notice succincte Istruzioni brevi Dok Nr k2evo708xy 2012 01 SAP Nr 11685878...

Page 2: ...nburg DE 63303 Dreieich CH 8620 Wetzikon Tel 43 0 2782 808 0 Tel 49 0 6103 99 070 Tel 41 0 848 85 86 87 Fax 43 0 2782 808 5505 Fax 49 0 6103 99 07 133 Fax 41 0 44 931 63 85 www kaba at www kaba de www...

Page 3: ...auben und Innendr cker 5 vom Dr ckerdorn abziehen HINWEIS Beim Innenschild mit Zylinderlochung muss auch der Batterieprint 6 entfernt werden 1 2 3 4 5 6 ACHTUNG Gefahr f r elektronische Komponenten du...

Page 4: ...9 vollst ndig einrastet 8 Anschlie end die rechte Seite des S Modul Prints in das Innenschild 9 dr cken S Modul 8 muss vollst ndig im Innenschild 9 einrasten S Modul an E Modul anschlie en 9 Das mitge...

Page 5: ...child keine Zylinderlochung aufweist muss der Batterieprint an der rech ten Buchse 13 des S Moduls an gesteckt werden Der Batterieprint verf gt ber keine Ladefunktion Anschlusskabel anklemmen 13 Ansch...

Page 6: ...he lever handle bearing using a T20 star screwdriver and lift the inside lever handle 5 off the spindle NOTE The battery circuit board 6 must also be removed in the case of the internal shield with cy...

Page 7: ...it in the internal shield 9 8 Then push the right side of the s module circuit board into the inter nal shield 9 S module 8 must latch completely into the internal shield 9 Connecting the s module to...

Page 8: ...er holes the battery circuit board must be plugged into the outlet on the right 13 of the s module The battery circuit board does not have a loading function Attaching the connecting cable 13 Route th...

Page 9: ...et retirer la poign e int rieure 5 de la broche de poig n e INDICATION Sur les plaques int ri eures avec al sage pour cylindre la plaquette pour piles 6 doit gale ment tre retir e 1 2 3 4 5 6 ATTENTIO...

Page 10: ...rieure 9 8 Enfoncer ensuite le c t droit du circuit imprim du module S dans la plaque int rieure 9 Le module S 8 doit s enclencher enti rement dans la plaque int ri eure 9 Connecter le module S au mod...

Page 11: ...a plaquette de piles doit tre branch e sur la douille droite 13 du module S La plaquette de piles ne dispose d aucune fonction de charge des piles Raccorder le c ble de raccordement 13 Passer le c ble...

Page 12: ...niglia tramite il cacciavite Torx T20 ed estrarre la maniglia interna 5 dal perno qua dro NOTA nella placca interna con foro cilindro necessario rimuovere anche la morsettiera della batteria 6 1 2 3 4...

Page 13: ...9 8 Successivamente premere il lato destro della morsettiera del modulo s nella placca interna 9 Il modulo s 8 deve essere comple tamente incastrato nella placca interna 9 Collegamento del modulo s al...

Page 14: ...cilindro la morsettiera per batteria deve essere collegata alla boccola destra 13 del modulo s La morsettiera per batteria non dis pone di una funzione di carica Uso del cavo di collegamento 13 Condur...

Page 15: ...Installation Notice Kaba s module for c lever k2evo708xy 2012 01 15...

Page 16: ...16 k2evo708xy 2012 01 Kaba s module for c lever Notice Installation...

Reviews: