background image


Translation of the original operating manual for the KTS SpeedTec mini 


B|HM0SM|00001|V0006|EN


Page


57


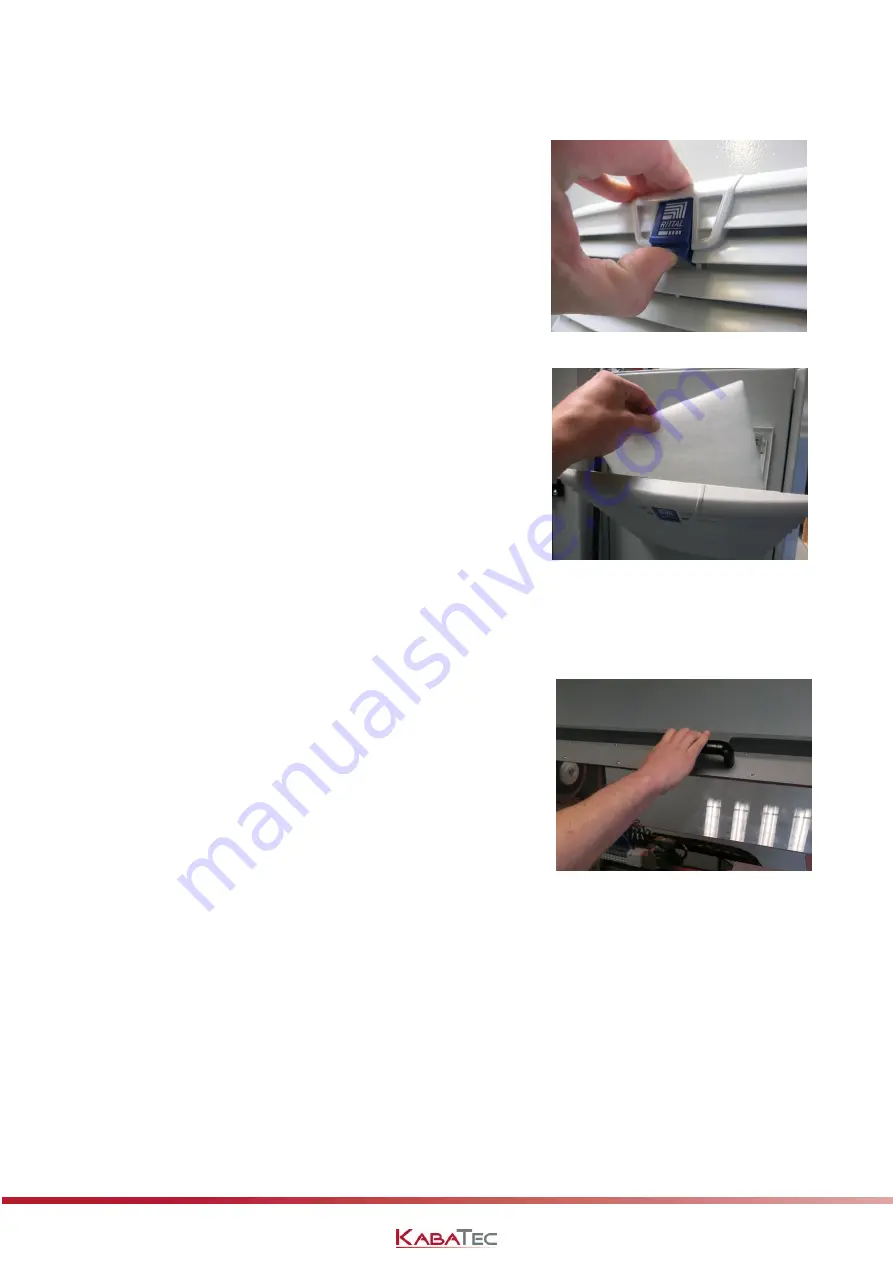
6.7  Cleaning the air filter 

To unlock the filter grille, pull the blue marker (with the 
logo) upwards slightly. The grille can now tilt up by approx. 
70°, thereby allowing easy access to the filter mat. The 
appropriate cleaning frequency is strongly dependent on 
the degree of contamination of the ambient air and cannot 
therefore be stated precisely. 


6.8  Cleaning the Makrolon discs 

Clean the Makrolon safety discs using a commercially-
available disc cleaner. The cleaning interval is dependent 
on the place of installation of the machine and cannot 
therefore be stated precisely. 


Summary of Contents for KTS SpeedTec mini

Page 1: ...erating manual for the KTS SpeedTec mini B HM0SM 00001 V0006 EN Page 1 Taping Insulation Bundling Marking Fixing Wrapping KTS Translation of the original operating manual Machine number Quality contro...

Page 2: ...tical models of the product which are manufactured in accordance with the development design and manufacturing drawings and descriptions included herein these being components of this declaration The...

Page 3: ...E mail info kabatec de Telephone 49 0 6652 7 93 62 0 Telefax 49 0 6652 7 93 62 10 Copyright All texts photos and graphics in this documentation are protected by copyright No portion of this documenta...

Page 4: ...ty measures at setup site 12 2 8 Description of the workplace 13 2 9 Required personal protective equipment 13 2 10 Emissions 13 Description of the machine 14 3 3 1 General information 14 3 2 Taping u...

Page 5: ...adhesive tape 41 5 15 Positioning the clamping unit and safety stop 43 5 16 Tensile force calibration 46 5 17 Inserting items to be taped 48 5 18 Starting the taping process 49 5 19 Ending the taping...

Page 6: ...finger 60 6 14 Changing the belts 60 6 14 1 Belt for drive unit part no 15764 60 6 14 2 Belt for clamping device on right part no 15764 63 6 14 3 Belt for linear unit part no 12817 66 6 15 Fault list...

Page 7: ...C GmbH Co KG shall at its discretion either replace the device or have the device transported to its plant in Burghaun and repair it there 2 No other circumstances shall be covered by guarantee Articl...

Page 8: ...bH Co KG will be borne by the customer Article 4 Transfer of the guarantee 1 The guarantee is valid only for the original purchaser which obtained the machine from KABATEC GmbH Co KG and is not transf...

Page 9: ...start up operation or maintenance of the machine must have carefully read and understood this operating manual Qualified specialist personnel within the context of this basic safety information are t...

Page 10: ...esult in slight or moderate physical injury or damage to property if not avoided Warning Indicates a possible hazard with a medium risk factor which can result in death or severe physical injury if no...

Page 11: ...SpeedTec mini B HM0SM 00001 V0006 EN Page 11 2 3 Safety and warning signs Indicates a hazard zone Indicates a risk of hand injury Indicates a risk of injury from being cut Indicates a risk of electri...

Page 12: ...This allows a wide variety of cable harness geometries to be generated 2 6 Note on familiarization and operation The owner of the winding and taping system must make the operating manual available to...

Page 13: ...ont 2 9 Required personal protective equipment Do not work without using the following personal protective equipment Tight fitting work clothing Hair net to protect long hair Closed work shoes or safe...

Page 14: ...0006 EN Page 14 Description of the machine 3 3 1 General information Identification of individual parts 1 Touch panel 2 USB port 3 On switch 4 Ready indicator 5 Off switch 6 Stop button 7 Fault reset...

Page 15: ...ective hood 11 Line clamp on left side 12 Taping unit 13 Line clamp on right side 14 Signal lamp tower 15 Compressed air maintenance unit 16 Lifting column 17 Clamp button on left side 18 Safety light...

Page 16: ...aping process 7 Reset button Fault indicator The fault indicator lights up whenever a fault occurs After being rectified an active fault can be cleared by pressing the Reset button 8 Emergency stop bu...

Page 17: ...stment of the taping machine 17 Clamp button on left side This button is used to activate the line clamp 18 Safety light barrier The safety light barrier prevents persons reaching into the machine whi...

Page 18: ...Translation of the original operating manual for the KTS SpeedTec mini B HM0SM 00001 V0006 EN Page 18 3 2 Taping unit 1 3 4 5 6 7 8 9 10 2...

Page 19: ...de roller offset The guide roller guides the adhesive tape 5 Lower blade This is used for the cutting of the tape upon completion of the taping process 6 Hold down device retaining blade The tape hold...

Page 20: ...phase 230V 400V 50Hz Power input 2100 W Fuse protection rating 16 A max Control voltage 24 VDC Pneumatic connection pressure 5 5 6 bar Speed 100 2000 rpm settable via touch panel Feed distance 0 40 m...

Page 21: ...sposed of in accordance with the applicable national statutory regulations When receiving the goods check whether the device has any visible or concealed damage Any damage must be reported to KABATEC...

Page 22: ...ystem must be supplied with compressed air pressure 6 bar Danger The winding and taping system is to be connected to the mains by a qualified electrician only Here local regulations as well as VDE 010...

Page 23: ...perating personnel must be made aware of possible accident risks and be instructed about appropriate safety precautions Warning Do not reach into the operating area of the cutter Risk of being cut Dan...

Page 24: ...00001 V0006 EN Page 24 Danger Repair work is to be carried out only by qualified personnel Danger Unauthorized removal of required covers or protective devices or improper use or incorrect operation...

Page 25: ...for operation Connect the machine to the compressed air supply system A pressure lying in the range 0 5 0 6 MPa must be set at the manometer of the compressed air unit Use the main switch at the cont...

Page 26: ...f switch This will also result in the hood being unlocked 5 3 Faults The occurrence of a fault is indicated by the lighting up of the red signal lamp at the control panel and the red signal lamp of th...

Page 27: ...program screens are password protected All or only some of the program screens are accessible depending on the type of password and permissions Start operation Search for barcode Load program Delete...

Page 28: ...t position Distance in mm from left hand connector to point where taping process is started Initial layers Number of tape layers non angled windings at beginning of taping process Length Overall lengt...

Page 29: ...display field and then enter the date and time using the keypad The Home button is used to return to the main menu 5 7 Editing programs With the active setting for the Edit switch position 1 the sett...

Page 30: ...arget pos mm 0 800 Speed rpm 0 2000 Feed distance Traversing distance of linear arm per winding head revolution mm rev 0 25 Final layers Number of tape layers non angled windings at end of taping proc...

Page 31: ...used to return to the main menu A saved program can be loaded by tapping on the respective button The program is opened and can be worked through 5 9 Copying programs With the Edit switch in position...

Page 32: ...ve button The yellow arrow keys at the interface screen can be used for navigation purposes A target program can be selected by tapping on the respective button The yellow arrow keys at the interface...

Page 33: ...up the Delete program interface see 5 5 The yellow arrow keys at the interface screen can be used for navigation purposes The Home button is used to return to the main menu A program can be deleted by...

Page 34: ...5 12 1 Touch panel settings Software version The info panel with the blue background shows the current status of the machine software Touch panel calibration Tapping on the Calibrate touch panel butto...

Page 35: ...on the respective country flag symbol Available languages German English 5 12 3 Table of input variables This table indicates which inputs are active and which are inactive Active inputs are represen...

Page 36: ...p is reached wait for 2 min before activating the height adjustment equipment again 5 12 6 Lamp test The Lamp test button can be used to test the functioning of the signal lamp tower 5 12 7 Archive Th...

Page 37: ...The right hand clamp is closed using the start button on the right The order is not important MODE 2 In this mode the left hand clamp is first closed by pressing one of the two start buttons After pre...

Page 38: ...ser management area the information concerning the individual user groups and the set passwords can be edited 5 12 10 Processes This program screen indicates the machine status It reveals the current...

Page 39: ...e tensile forces Standard values 50N 1 07 10N 0 35 For information on calibration process see 5 16 5 13Service Use the Service button in the main menu to bring up the service menu program screens see...

Page 40: ...HM0SM 00001 V0006 EN Page 40 5 13 2 X axis ACC Drive unit acceleration at X axis DEC Drive unit deceleration at X axis Ref pos Reference point displacement adjustment at X axis Guide length Maximum t...

Page 41: ...o the take up mandrel by sliding it on laterally up to the stop If present remove empty tape roll beforehand Pull off approx 30 cm of the adhesive tape and guide it over the Eladur roller of the elect...

Page 42: ...unter holder The images serve as examples only and there may be differences in comparison to your machine depending on the cable receptacles used Cut the adhesive tape flush with the positioning finge...

Page 43: ...ptacles are changed the clamping unit and the safety stop have to be positioned In the editing area of your program there is a numerical value entered for Sliding carriage position In our example this...

Page 44: ...a small gap 5 10 mm in width between the right hand cable receptacle and the positioning finger it being important that the two component assemblies do not come into contact The cable receptacle shown...

Page 45: ...KTS SpeedTec mini B HM0SM 00001 V0006 EN Page 45 Loosen the cylinder head screw so that the position of the ram can be adjusted Move the ram towards the sensor If the yellow lamp goes out hold the ra...

Page 46: ...he right hand calibration holders Attach a hanging scale to the holders The hanging scale shown in the image is an example only and may differ in appearance to your scale Move the clamping device to t...

Page 47: ...hanging scale and zero it Close the protective hood and switch on the machine Start the clamping process by pressing the start button Make sure that you are within the operating range of the safety li...

Page 48: ...Guide the first line connector into the left hand receptacle pocket Push the line connector in the receptacle up to the stop and clamp the connector Make sure that you are within the operating range...

Page 49: ...h start buttons are lit green this means the machine is on standby Press one of the two start buttons to start taping 5 19Ending the taping process Once taping has finished the two clamps open up allo...

Page 50: ...Page 50 5 21 End of tape An End of tape message at a message display indicates when the end of the tape has been reached Use the Off switch to clear the message and unlock the hood The hood can subse...

Page 51: ...a different work arrangement the maintenance and servicing schedule may have to be adapted accordingly Daily Weekly monthly Half yearly As needed 6 2 Check guides carriages X 6 2 Lubricate guides carr...

Page 52: ...tion of the guide rails and guide carriages we recommend using K2K or KP2N grease in accordance with DIN 51825 Some guide carriages are fitted with grease nipples for lubricating purposes 6 3 Cleaning...

Page 53: ...B HM0SM 00001 V0006 EN Page 53 6 4 Replacing and setting the cutter First remove the side guard of the cutter unit The height limiter of the tape pre puller is on the right side of the taping unit Pu...

Page 54: ...f the retaining device of the upper blade and remove it completely Pay attention to the upper blade while doing this as this can easily fall off The lower blade can now also be removed It might move t...

Page 55: ...l for the KTS SpeedTec mini B HM0SM 00001 V0006 EN Page 55 The retaining device for the upper blade has a cross head screw which allows the blades to be positioned relative to one another The cross he...

Page 56: ...ing the safety light barriers Use the standardized test rod supplied to check the safety light barriers Ensure that the safety light barrier is active and check the functioning of the barrier Further...

Page 57: ...by approx 70 thereby allowing easy access to the filter mat The appropriate cleaning frequency is strongly dependent on the degree of contamination of the ambient air and cannot therefore be stated p...

Page 58: ...nd the core for the active taping process to be ended and the cable set to be completely taped The setting of the sensor is thus critically dependent on the length of the cable set being taped Setting...

Page 59: ...aner making sure that contaminants are removed 6 11Cleaning the taping unit carriage guide Clean the carriage guide using a cloth moistened with benzene or a comparable cleaning agent such as brake cl...

Page 60: ...n the test contacts using a cloth moistened with benzene or a comparable cleaning agent such as brake cleaner making sure that contaminants are removed 6 14Changing the belts 6 14 1 Belt for drive uni...

Page 61: ...c mini B HM0SM 00001 V0006 EN Page 61 and remove the cover Loosen the fastening screw of the belt tensioning roll Displace the belt tensioning roll and remove the belt Now loosen the two screws of the...

Page 62: ...by pulling it to the left The belt can now be removed and replaced To measure the belt tension use an acceptable measuring instrument e g Tummeter from Hilger Kern at the arrow marked position Stretc...

Page 63: ...V0006 EN Page 63 6 14 2 Belt for clamping device on right part no 15764 Loosen the four fastening screws of the front cover and remove the cover Afterwards remove the rear protective cover too Push b...

Page 64: ...rating manual for the KTS SpeedTec mini B HM0SM 00001 V0006 EN Page 64 Loosen the coupling and screw this off the gear rack Loosen and remove the anti rotation safety mechanism Loosen the fastening sc...

Page 65: ...l operating manual for the KTS SpeedTec mini B HM0SM 00001 V0006 EN Page 65 Take off the belt Loosen the two grub screws at the tension ring of the flanged ball bearing Next remove the flanged ball be...

Page 66: ...ing instrument e g Tummeter from Hilger Kern at the arrow marked position Stretch the belt until the measuring instrument displays a value of 135 Hz 10Hz After attaching the new belt fit all parts pre...

Page 67: ...M 00001 V0006 EN Page 67 Replace the belt To measure the belt tension use an acceptable measuring instrument e g Tummeter from Hilger Kern at the arrow marked position Stretch the belt until the measu...

Page 68: ...switched on No connection for compressed air supply system Make connection for compressed air supply system Compressed air supply specifications do not match rating plate specifications Set the compr...

Page 69: ...ope of delivery along with an English language translation of the original operating manual 7 2 Optionally available items Signal lamp NOK box connection components Lockable compressed air maintenance...

Page 70: ...Translation of the original operating manual for the KTS SpeedTec mini B HM0SM 00001 V0006 EN Page 70...

Reviews: