


Applying Wireless Sensor to a Metal Door or Patio Door:
Wireless door sensor operation can be adversely affected when affixed to a metal door or metal-frame opening
such as a patio door. Prior to mounting the unit, the sensor may operate flawlessly. But once applied to the
metal surface, there may be little, if any, detected signal at the controller / receiver.
IMPORTANT: The receiving antenna should be located at ceiling height and oriented vertically. Ensure 3
ft. separation (minimum) from HVAC equipment, metal shelving, plumbing, conduits, electronic devices,
appliances, etc. An improperly located antenna may result in poor signal reception and marginal system
performance.
Option 1: Direct attach (traditional mounting)
In many instances, the problem can be resolved with a minor relocation adjustment of the sensor (& magnet).
Just an inch or two in one direction or the other can make a huge impact. Be prepared to commit a few
minutes of patient trial-and-error testing. (Hint: Use masking tape for temporary attachment to the intended
surface, avoiding use of the 3M adhesive backing until you achieve consistent and reliable results at the
controller/receiver.) If wireless signal reception continues to remain poor or marginal after multiple re-
positioning attempts, proceed to Option 2.
Option 2: Re-orient sensor (pivot method)
Consider adjusting the sensor orientation, pivoting the device 90-degrees away from the metal surface. In
order to achieve this new orientation, a custom “side-mount” attachment will be necessary as shown below:
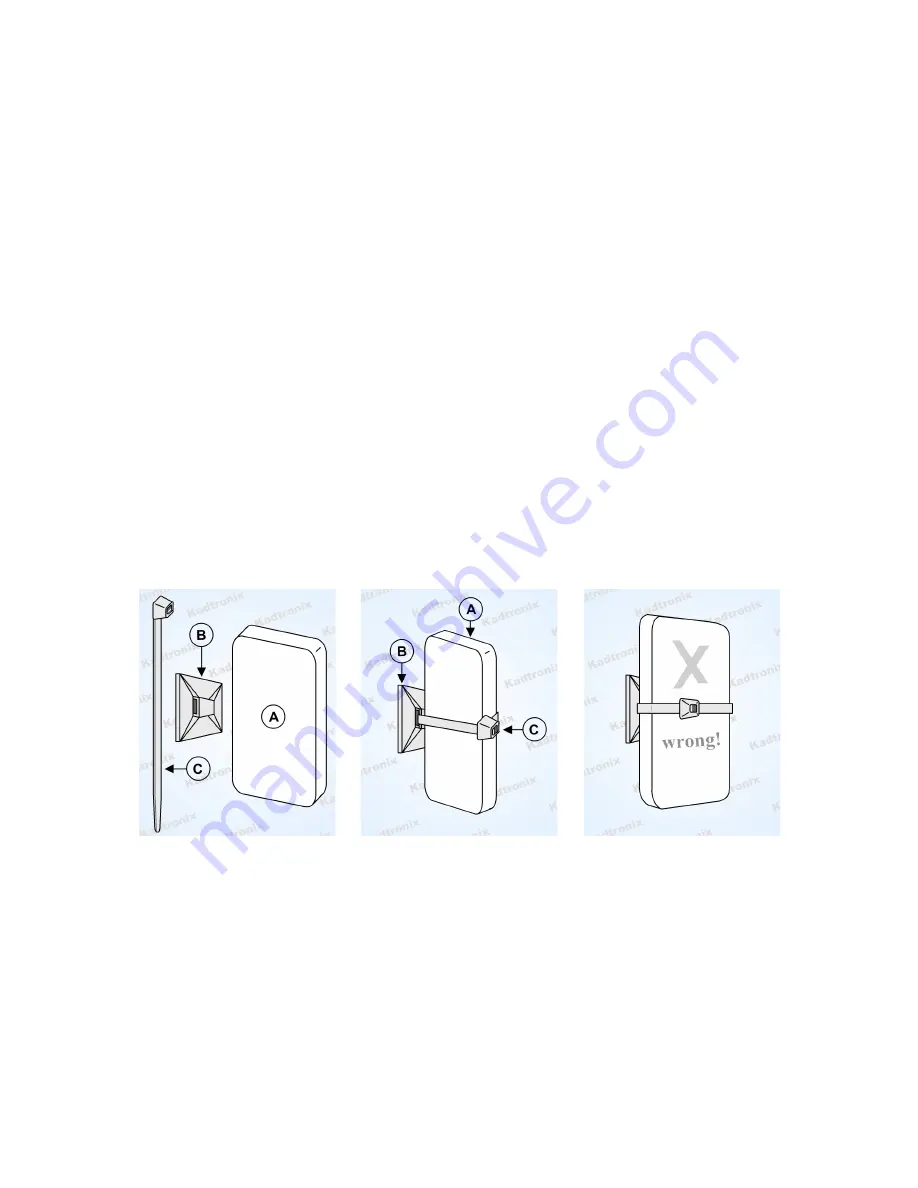
Custom “side-mount” (using nylon fasteners)
(A = door sensor, B = cable-tie mount, C = zip tie)
Apply cable-tie mount to the sensor as shown, securing with a zip tie. Ensure the orientation allows for proper
detection of the external magnet. (The magnetic sensing side should face outward, away from the mount.) Do
not apply the cable-tie’s 3M adhesive backing at this time. Instead, use masking tape to temporarily affix
assembly ( custom mount) to the intended surface, allowing for easy re-positioning. (Hint: Trial-and-
error tests will be necessary to determine the best locations for the sensor assembly and magnet.)
Notes: 1) Cable-tie mount and zip tie are comprised of plastic or nylon. (Metal compositions are to be strictly
avoided.)
2) Smaller devices such as the GEN3 mini sensor require only a single mount. Larger sensors may
require dual mounts.
3) For convenience, perform sensor registration (pairing) prior to permanently affixing sensor (with
mount) to door or frame surface.
4 of 7


