background image

MENUS:

Press SET button on the main screen to access the menus. If the 
lock function is deactivated, PROG menu appears on the screen. Use 
the direction buttons to see ADJUST,DISPLY and EXIT 

MANUAL MODE

Manual mode is used for setting or testing the desired relay output, or 
deactivating the program operation. This mode could be activated for 
both of the relays separately. If output A is locked it can't be switched 
to manual mode for output A, but it can be switched for output B. 
For blocking the activation of manual mode, the related output should 
be locked. Lock function is described on page 7.
There are two different manual modes.

1-TEMPORARY MODE :

 When the subsequent program steps in, 

temporary manual mode would be deactivated.

Temporary manual mode for Relay A :

Push 

▼ 

button until the flashing hand icon appears on the left of the 

screen.
Throughout the manual mode, for changing Relay 

A

 output, it is 

necessary to push and release ▼ button. 
In this mode, if the subsequent program for Relay 

A

 changes the 

output, manual mode would be deactivated automatically and 
ASTRO operates the program. Otherwise manual mode would 
continue to be active for Relay 

A

To deactivate this mode for Relay

 A 

as an option, push 

▼ 

button until 

the flashing hand icon disappears.

Temporary manual mode for Relay B :

Push 

▲ 

button until the flashing hand icon appears on the right of the 

screen.
Throughout the manual mode, for changing Relay 

B

 output, it is 

necessary to push and release 

 button.

In this mode, if the subsequent program for Relay 

B

 changes the 

output, manual mode would be deactivated automatically and 
ASTRO operates the program. Otherwise manual mode would 
continue to be active for Relay 

B

.

To deactivate this mode for Relay

 B 

as an option, push 

▲ 

button 

until the flashing hand icon disappears.

2- PERMANENT MODE :

 It is only possible to deactivate permanent 

mode as manually.

Permanent manual mode for Relay A:

Push 

▼ 

and 

SET

 buttons at the same time until the hand icon 

appears on the left of the screen. 
Permanent manual mode is not deactivated automatically. The only 
way to deactivate this mode is manually.
Throughout the manual mode, for changing Relay 

A

 output, it is 

necessary to push and release ▼ button.
To deactivate this mode for Relay

 A

, push 

▼ 

button until the hand 

icon disappears.

Permanent manual mode for Relay B:

Push 

▲ 

and

 SET 

buttons at the same time until the hand icon 

appears on the right of the screen. 
Permanent manual mode is not deactivated automatically. The only 
way to deactivate this mode is manually.
Throughout the manual mode, for changing Relay 

B

 output, it is 

necessary to push and release 

 button.

To deactivate this mode for Relay

 B

, push 

▲ 

button until the hand 

icon disappears.
                  

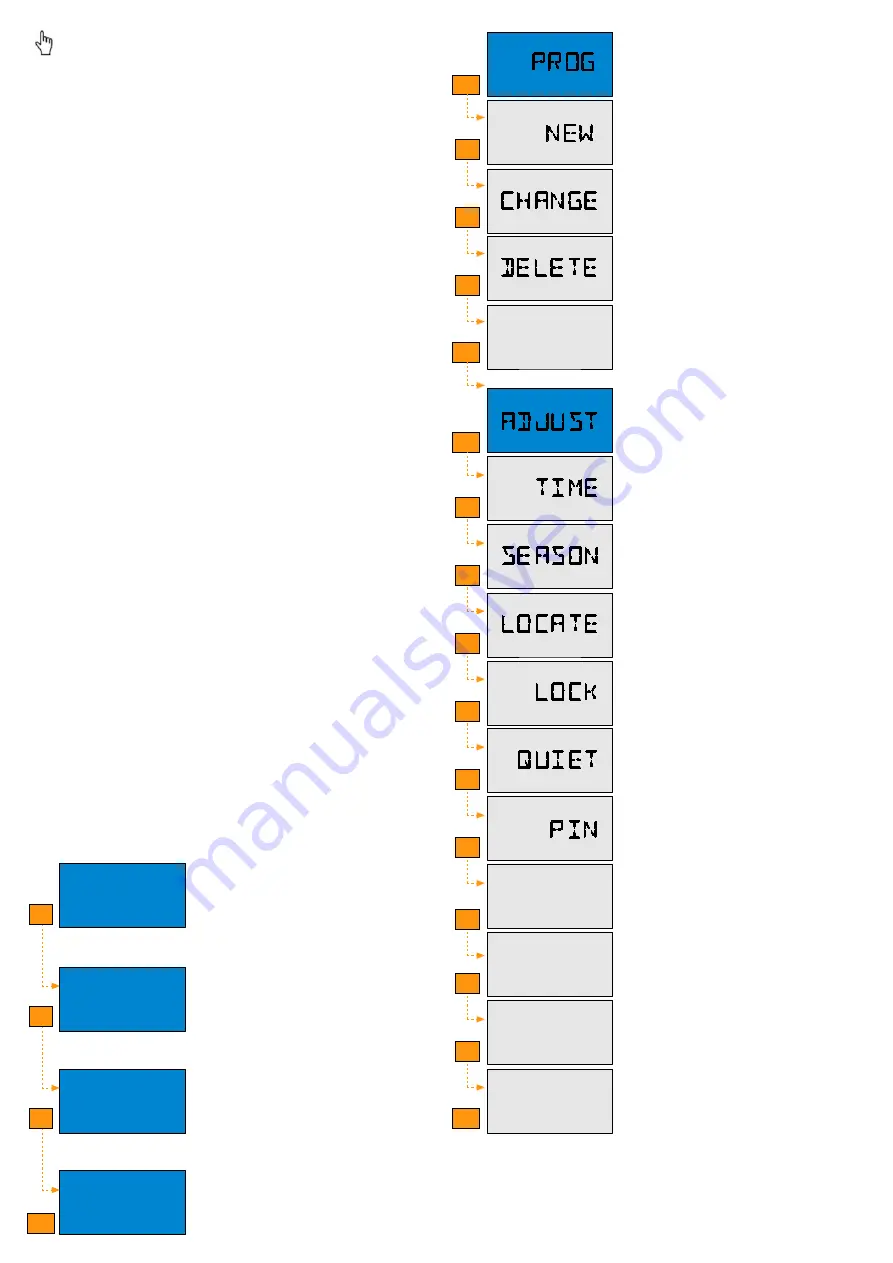
PROGRAM:

 All program settings could be done.
Creating new program, changing or 
deleting an existing program.

ADJUST:

Device settings could be done.

information :

In this menu, program and device 
settings could be monitored without 
making changes. Use the direction 
buttons to see information about sunrise, 
sunset, programs, memory status, 
season (summer-winter), latitude, 
longitude,quiet mode status.

PROGRAM MENU:

Press SET button on PROG screen to 
access the Program Menu. Use the direction 
buttons to see NEW,CHANGE,DELETE and 
EXIT menus.

NEW 

: New  programs are created.

CHANGE : Existing programs could be 

  changed.

DELETE : Existing programs could be 

  deleted. It is possible to delete all 
  of them or the selected one.

SET

SET

SET

SET

SET

ADJUST MENU:

In this menu, device settings could be done.

Real Time Clock and Calender could be set 
in TIME menu

In this menu, daylight saving time settings 
could be done. If AUTO is chosen, device 
determines beginning dates of the summer 
and winter automatically. 

Coordinates and time zone settings of the 
location could be done in this menu.

Lock function could be activated to prevent 
unauthorized persons from using the device. 
This mode could be activated for both of the 
relays separately.

Quiet mode could be activated to stop the 
program operation for a certain period.

In this menu, PIN code could be changed.
PIN code is a 4 digit number.

Language could be changed to turkish or 
english

All device settings except time and date are 
set to default.

The device could be restarted time and date
Settings would be cleared.

www.kael.com.tr                  2

ınfo

prog

adjust

back

Langua

defaul

reset

back

back

Summary of Contents for ASTRO-30

Page 1: ...ode Manual mode Relay B Lock function Quiet mode Manual mode 12 1 2 3 4 5 6 11 10 9 8 7 Clock faces represent output states of the relay contacts during current day Before midday am icon appears After midday pm icon appears There are two clock faces on the left for Relay A and on the right for Relay B Warnings The connection of device must be done by authorized technical service staff according to...

Page 2: ... only way to deactivate this mode is manually Throughout the manual mode for changing Relay A output it is necessary to push and release button To deactivate this mode for Relay A push button until the hand icon disappears Permanent manual mode for Relay B Push and SET buttons at the same time until the hand icon appears on the right of the screen Permanent manual mode is not deactivated automatic...

Page 3: ...splay EAST east ERR2 PIN code error ERR5 Program overload error EXIT exit HOUR hour LANGUA language LATITU latitude LOCATE locate STRT M start of quiet mode month STRT Y start of quiet mode year SUMMER summer SUNRSE sunrise SUNSET sunset T ZONE time zone TIME time UNUSED unused USED used UTC coordinated universal time W DAY winter beginning day W HOUR winter beginning hour W MIN winter beginning m...

Page 4: ...sired relay output is selected Required contact position is selected as ON or OFF Monday If YES is selected program operation is enabled for flashing day If NO is selected program is not used for flashing day This process is repeated for each day of the week After making choice for the last day of the week program could be stored with selecting SAVE or could be cancelled with selecting EXIT DELETI...

Page 5: ...ogram operation time OFFSET is added to sunrise or sunset time OFFSET This parameter is used to adjust the program operation time OFFSET is subtracted from sunrise or sunset time If timer mode is selected hour minute and second values are entered respectively Sunrise or Sunset is set If it is desired OFFSET would be adjusted For related program desired relay output is selected Required contact pos...

Page 6: ...ed it is stored by pressing SET button Second parameter is beginning week for the summer in chosen month With using buttons week value is set as 1 2 3 4 or last Third parameter is beginning day for the summer With using buttons day is set Fourth parameter is beginning hour for the summer With using buttons hour value is set Fifth parameter is beginning minutes for the summer With using buttons min...

Page 7: ... or negative offsets from UTC LOCK FUNCTION LOCK menu could be reached by pressing button in ADJUST sub menus This function could be used to prevent unauthorized persons from using the device If this function is enabled just for Relay A manual mode could not be activated for it But it is possible to activate manual mode for Relay B In this case for reaching the menus PIN code is required If this f...

Page 8: ...tart Date is 20 03 2011 and stop date 25 03 2011 Quiet Mode starts on 20th March at 00 00 00 am and ends on 25th March at 23 59 59 During this time period Relay A would be off To activate Quiet mode just for 1 day start and stop date should be set as same day PIN PIN menu could be reached by pressing button in ADJUST sub menus If the LOCK function is enabled entering the pin code is required befor...

Page 9: ...n in ADJUST sub menus By restoring an ASTRO to factory defaults following settings are installed Programs 4 preset programs Lock A B Off Quiet A B Off Manual A B Off Season Auto Location Contrast 7 NOTE Reset an ASTRO to factory defaults does not change the pin code and the real time adjust tıme season locate lock quıet pın langua TURKCE ENGLIS back adjust tıme season locate lock quıet pın languad...

Page 10: ...vice Additional Reserv Time 3 7 hour Screen LCD Language English Turkish Programming with InfraRed No Mounting To connection rail in electrical panel Storage Temperature 10 ºC 70 ºC Ambient Temperature 0 ºC 50 ºC Device Protection Class IP 20 Connector Protection Class IP 00 Dimensions 2 x DIN modules 58mm 32mm 48mm 90mm 36mm 45mm 62mm 35mm 18 16 15 28 26 25 TECHNICAL DATA www kael com tr 9 CONNEC...

Reviews: