background image


10

6 General Appearances                                                 

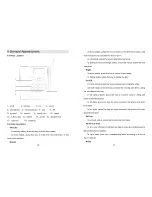
6.1 Keys Location 


1

LCD              2

left key            3

ok            4

send 

5

phonebook    6

numerical keys    7

set          8

KF 

9

symbol        10

switch        11

hands free        12

redial 

13

CALL LOG    14

delete        15

on/off    16

direction key 

17

right key            18

antenna 

6.2 Keys description 

·

OK/Left:


In standby status, press the key to enter main menu


In  menu  status,  press  the  key  to  enter  the  next  sub-menu  or  the 

level menu surface. 

·

Delete: 


11

In menu status, press the key to return to the last menu status, and 

main function is to complete the exit function; 

In edit status, press the key to delete the last word; 

In dialing or send message status, press the key to delete the last 

character. 

·

Right: 

In menu status, press the key to return to last menu; 

In dialing status, press the key to delete the digit. 

·

On/Off: 

In menu status, press the key to quickly exit to standby state; 

On-hook state, press the key to reject the coming call when calling 

(do not disturb function); 

In  the  calling  status,  press  the  key  to  end  the  current  calling  and 

return to standby status; 

In  off  state,  press  the  key  for  some  seconds,  the  phone  will  enter 

boot state. 

In  on  state,  press  the  key  for  some  seconds,  the  phone  will  enter 

close/off condition. 


·

Set key: 

In on-hook status, press the key to enter set menu. 

·

Numerical keys: 

In on-hook, off-hook or hands free status, press the related keys to 

dial out the phone number; 

In  input  state,  input  the  corresponding  letter  according  to  different 

input methods. 

·

# Key: 

Summary of Contents for KT2000

Page 1: ...r supply and area covered by CDMA network This product meets the national standard indicators the standards of implementation YD T1626 2007 fixed wireless telephone technical requirements and test met...

Page 2: ...all instructions before using the phone follow the warnings and instructions marked on the product This unit is an electrical device do not use the phone when it is drenched in water or liquids Unplug...

Page 3: ...Key 8 Schedule Alarm Clock Calculator 9 Speed Dialing 10 Two Way SMS Messaging 11 Adapter AC Input 100 240 VAC 50 60Hz 5 12 Adapter DC Output 4 6VDC 1000mA 13 Battery Capacity 3 7V 800mAh Li Battery 1...

Page 4: ...y The display shows Charge Complete when finished Antenna setting method Twist the antenna perpendicularly up to the screw pillar in the right side of the base unit tightly Before use make sure the po...

Page 5: ...y not cause harmful interference and 2 this device must accept any interference received including interference that may cause undesired operation Changes or modifications not expressly approved by th...

Page 6: ...e key to delete the last character Right In menu status press the key to return to last menu In dialing status press the key to delete the digit On Off In menu status press the key to quickly exit to...

Page 7: ...out 2 Pick up the handset or press HF to get dial tone then press 13 the numerical key 3 After dialed the phone number the LCD screen will display the dialed number press delete to erase wrong inputte...

Page 8: ...dby status input the order 68460 the default password is 000000 if forget this password please use the super password 5080 Then choose NAM1 or NAM2 normally we select NAM1 3 Following the menu set the...

Reviews: