background image

5  Installation and Operating Conditions

5.1  Ensuring safety

The conditions in which the machine is installed and operated effect the safety of personnel and

surroundings.
Warning instructions are located before a potentially dangerous task.

Disregard of warning instructions can cause serious injuries!

Complying with safety warnings

Disregard of safety warnings can cause unforeseeable dangers!
➤ Strictly forbid fire, open flame and smoking.
➤ If welding is carried out on or near the machine, take adequate measures to prevent sparks or

heat from igniting fuel or oil vapors or parts of the machine.

➤ Do not store any flammable materials in the vicinity of the machine.
➤ The machine is not explosion-proof!

Do not operate in areas in which specific requirements with regard to explosion protection are

applied.

➤ Keep suitable fire extinguishing agents on hand and ready for use.
➤ Ensure that required ambient conditions are maintained.

Required ambient conditions may be:
■ A specific ambient temperature range
■ Air composition at the installation site:

─ clean with no damaging contaminants (e.g., dust, fibers, fine sand)
─ free of explosive or chemically-unstable gases or vapors
─ free of acid/alkaline forming substances, particularly ammonia, chlorine or hydrogen sulfide.

5.2  Installation conditions

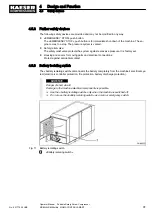
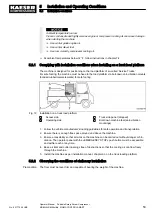
Fire hazard from build-up of heat and hot exhaust system!

Insufficient clearance above the machine may well cause heat build-up that could damage

the machine.
➤ Do not position the machine directly under a low roof or covering.
➤ Always ensure sufficient ventilation space around the machine.

5

Installation and Operating Conditions

5.1

Ensuring safety

52

Operator Manual    Portable Rotary Screw Compressor  
MOBILAIR M58utility  SIGMA CONTROL SMART

No.: 901779 08 USE

Summary of Contents for MOBILAIR M58utility

Page 1: ...Portable Rotary Screw Compressor MOBILAIR M58utility SIGMA CONTROL SMART No 901779 08 USE Manufacturer KAESER KOMPRESSOREN SE 96410 Coburg PO Box 2143 GERMANY Tel 49 0 9561 6400 Fax 49 0 9561 640130...

Page 2: ...Original instructions KKW M58U 2 08 en Z1 SBA MOBILAIR 20220512 154416...

Page 3: ...8 2 5 2 Compressed air outlet 8 2 5 3 Safety valves 8 2 5 4 Temperature 9 2 5 5 Cooling oil recommendation 9 2 5 6 Cooling oil charge quantity 10 2 6 Engine 11 2 6 1 Engine specification 11 2 6 2 Oil...

Page 4: ...stem 44 4 7 3 Regeneration of the diesel particulate filter 45 4 8 Sealed floor pan 46 4 9 Options 46 4 9 1 Air treatment options 47 4 9 2 Auxiliary electrical systems 49 4 9 3 Low temperature equipme...

Page 5: ...g the machine after operation 78 8 5 1 Cleaning the exterior of the machine 79 8 5 2 Cleaning the interior of the machine 80 8 6 Operating the options 82 8 6 1 Operating the machine with the Start sto...

Page 6: ...Fit the flexible pipe connection 143 10 7 Cleaning the cooler 144 10 7 1 Cleaning the compressor cooler and engine radiator 144 10 7 2 Cleaning the compressed air after cooler 145 10 8 Checking screw...

Page 7: ...200 12 4 3 Draining condensate 200 12 4 4 Removing filters filter elements 201 12 4 5 Disposing of the machine 201 13 Annex 13 1 Identification 202 13 1 1 Identification of the machine 202 13 1 2 Iden...

Page 8: ...Contents vi Operator Manual Portable Rotary Screw Compressor MOBILAIR M58utility SIGMA CONTROL SMART No 901779 08 USE...

Page 9: ...opping procedure 67 Fig 28 Battery isolating switch 68 Fig 29 Control line shut off valve 70 Fig 30 Quick access adjustment compressed air output pressure 71 Fig 31 Setting the compressed air discharg...

Page 10: ...ible pipe connection 143 Fig 66 Cleaning the compressor cooler and engine radiator 145 Fig 67 Cleaning the compressed air after cooler 146 Fig 68 Tool lubricator maintenance 152 Fig 69 Cleaning the co...

Page 11: ...ns 11 Tab 28 Engine oil recommendation 12 Tab 29 Initial engine oil quantity 12 Tab 30 Water quality parameters for cooling water 13 Tab 31 Initial filling of engine water cooler 14 Tab 32 Fluid volum...

Page 12: ...Advise others that the machine is being serviced 96 Tab 70 Maintenance messages and required actions 97 Tab 71 Maintenace tasks on the machine after commissioning 99 Tab 72 Maintenance intervals and r...

Page 13: ...e you provide the data from the nameplate when ordering documents 1 3 Copyright This operator manual is copyright protected Queries regarding use or duplication of the documen tation should be referre...

Page 14: ...Warning notices for damages are identified by their signal term Signal term Meaning Consequences of ignoring the warning NOTE Warns of a potentially dangerous situation Damage to property is possible...

Page 15: ...ture separator Option codes used in this service manual are explained in chap ter 2 3 Information referring to potential problems are identified by a question mark The cause is named in the help text...

Page 16: ...n number remains associated with the machine throughout the entire dura tion of its service life The vehicle identification number is stamped into the bodywork of the ma chine Further information For...

Page 17: ...ion ec Tool lubricator Option Option code Available Tool lubricator ec Tab 6 Tool lubricator option 2 3 3 Option fc Air distributor Option Option code Available Separated compressed air lines downstre...

Page 18: ...ries od Tab 10 Automatic engine start stop 2 3 7 Option oc GSM GPS unit Option Option code Available GSM GPS unit oc Tab 11 GSM GPS unit 2 4 Machine without options 2 4 1 Sound pressure level Sound pr...

Page 19: ...bf in 354 620 929 1416 2832 4868 Surface finish zinc flake coating matte Standards based on VDI 2230 Tab 14 Torques for M10 M24 screws 2 4 2 2 Torque cover fixing screws oil separator tank Recommended...

Page 20: ...e with ISO 1217 2009 Annex D Installation of the machine within the EU Maximum working pressure psi 100 145 SIGMA airend 265 260 Volumetric flow cfm 180 154 Tab 17 Working pressure an volumetric flow...

Page 21: ...for general applications SIGMA FLUID MOL S 460 S 570 Description Mineral oil Silicone free synthetic oil Synthetic oil Application Standard oil for all appli cations except in con nection with food pr...

Page 22: ...ions where the compressed air may come into contact with foodstuff Approval USDA H 1 NSF Approved for the manufacture of food packaging meat and poultry processing and other food process ing applicati...

Page 23: ...ion of the machine outside of the EU Tab 26 Kubota V 2403 CR Engine specifications Carbon dioxide emissions Definition of CO2 emissions CO2 emissions are the mass of carbon dioxide produced when subst...

Page 24: ...ways ensure the prescribed lubricating oil quality when selecting the viscosity class Ambient temperatures F Viscosity class 77 SAE 30 SAE 10 W 30 SAE 15 W 40 32 77 SAE 10 W 30 SAE 15 W 40 4 104 SAE 1...

Page 25: ...by contamination 2 6 4 Engine coolant recommendation In fluid cooled engines the cooling fluid must be treated and monitored to prevent engine damage Water quality An important factor for treating the...

Page 26: ...he coolant cooler is filled with a mixture of the following liquid components Components Description Percentages vol Corrosion inhibitor antifreeze KAESER FLUID ENGINE ANTIFREEZE Glysantin G40 50 Wate...

Page 27: ...on Components Characteristics Abbreviation da After cooler Centrifugal separa tor cool and condensate free A ec Tool lubricator Lubricated E Tab 35 Interrelation between compressed air treatment and c...

Page 28: ...equency Hz 60 Supply cable cross section AWG Cu multi core 3 x 16 User s fusing A 16 Tab 37 Power supply details Coolant pre heating diesel engine Coolant pre heater Value Voltage V 240 Power W 500 Ta...

Page 29: ...eature Specification Type CANlink mobile 5 Tab 40 GSM GPS unit 2 Technical Data 2 7 Options No 901779 08 USE Operator Manual Portable Rotary Screw Compressor MOBILAIR M58utility SIGMA CONTROL SMART 17...
Page 30: ...s listed in this service manual Operate the machine only within its performance limits and under the permitted ambient condi tions Do not use compressed air for breathing purposes unless it is specifi...

Page 31: ...ansport personnel possess the following qualifications are of legal age are familiar with and adhere to the safety instructions and sections of the service manual rele vant to transporting are trained...

Page 32: ...er that can occur during machine operation Basic safety instructions are found in this service manual at the beginning of each chapter in the section entitled Safety Warning instructions are found bef...

Page 33: ...he following information concerns work on components that could be under pressure Wait until the compressor has automatically vented Check the pressure gauge it must read 0 psig Then open an outlet va...

Page 34: ...ate measures to prevent sparks or heat from igniting oil vapors or parts of the machine Noise The enclosure absorbs the machine noise to a tolerable level This function will be effective only if the b...

Page 35: ...protective clothing examples Safety work wear Protective gloves Safety boots Eye protection Ear protection 3 5 2 1 Transport The weight and size of the machine require safety measures during its tran...

Page 36: ...p of heat from the hot exhaust gases can damage the machine Ensure accessibility so that all work on the machine can be carried out without danger or hin drance Do not operate in areas in which there...

Page 37: ...s of the EMERGENCY STOP push button of parts that require monitoring Pay particular attention to cleanliness during all maintenance and repair work Cover compo nents and exposed openings with clean cl...

Page 38: ...l and their responsibilities Give clear instructions on reporting faults and damage to the machine Give instructions on fire reporting and fire fighting measures 3 5 4 Danger areas The table gives inf...

Page 39: ...Location of safety signs outside Location Symbol Meaning 265 Injury and or machine defects caused by improper use Maintenance should be performed by properly trained personnel only Read and understan...

Page 40: ...s in use 440 Compressed air quality Injury and or contamination can result from breathing compressed air Contamination of food can result from using untreated compressed air for food processing Never...

Page 41: ...zen Due to risk of explosion please ensure that you bring the battery up to a temperature of at least 60 F before attempting a jump start 303 Fire or explosion caused by refueling Severe injury or dea...

Page 42: ...an for purposes of maintenance repair or replacement of any devices or element of design incorporated into any new com pressor for the purpose of noise control prior to its sale or delivery to the ult...

Page 43: ...y with skin cleaner then with soap and water Contaminated clothing should be intensively cleaned before reuse If inhaled Fuel and oil vapours impair breathing Clear the respirator tract from fuel or o...

Page 44: ...d various modules are designed according to applicable regulations and are sub mitted for approval procedures by the relevant authorities where applicable Concerned modules include Compressor drive mo...

Page 45: ...be operated used and maintained in accordance with instruction provided to the end user Do not intentionally manipulate the engine management of the drive engine or operate it im properly or carry out...

Page 46: ...g against touching Cooling air flow The bodywork is not suitable for the following uses Walking on standing or sitting on Use as resting place or storage of any kind of load Pinch hazard Severe injuri...

Page 47: ...9 Oil separator tank 10 Control valve 11 Compressor air filter 12 Engine air filter Fig 5 Right side panels removed 13 Lifting eye 14 Safety valve 15 Inlet valve 16 Airend 17 Fuel tank 18 Compressor...

Page 48: ...ith water trap 26 Battery isolating switch 27 Operating panel 28 Air outlet valves 29 Fuel fine filter 31 EMERGENCY STOP push button 4 Design and Function 4 2 Machine structure 36 Operator Manual Port...

Page 49: ...ompressor air filter 12 Engine air filter 13 Lifting eye 16 Airend 17 Fuel tank 18 Oil cooler 21 Exhaust silencer 22 Air distributor 23 Instrument panel cover Fig 8 Underside of the machine 27 Front 2...

Page 50: ...rend is driven by an internal combustion engine 15 Cooling oil is injected into the airend It lubricates moving parts and forms a seal between the ro tors themselves and between them and the airend ca...

Page 51: ...DLE The inlet valve is closed The control valve opens allowing pressure in the oil separator tank to be applied to the inlet valve Compressed air then flows in a closed circuit through the airend the...

Page 52: ...onal controller optionally adjusta ble 27 Venting valve 62 Combined auxiliary valve directional con trol valve 4 5 Safety devices 4 5 1 Monitoring functions with shut down The SIGMA CONTROL SMART moni...

Page 53: ...dental contact 4 5 3 Battery isolating switch The battery isolating switch disconnects the battery completely from the machine s electrical sys tem electronic controller protection fire protection bat...

Page 54: ...nowledges resets mainte nance tasks Returns to the superordinate menu item quick touch Closes the menu press for at least two seconds 4 Key LOAD IDLE Toggles the compressor between LOAD and IDLE opera...

Page 55: ...the system controller SIGMA CONTROL SMART In addition to monitoring the engine and exhaust gas treatment the engine control unit ECU also monitors itself Any faults or malfunctions are stored as faul...

Page 56: ...exhaust gas emissions of the machine Fig 13 Principle of treatment devices 1 Engine control unit ECU a Common rail system 2 Engine block 3 Exhaust gas return valve EGR 4 Inlet throttle 5 Intercooler 6...

Page 57: ...or passive continuous regeneration is a sufficient ratio of nitrogen oxides and soot in the engine s exhaust gas Definition of nominal filter load The engine control unit internally monitors the soot...

Page 58: ...to capture small leaks in the vicinity of endangered components is fitted with de watering lines closed with plugs These lines must be tightly re closed af ter performing any cleaning work Is equipped...

Page 59: ...moisture carried in the air is removed in the aftercooler This condensate mixed with oil particles has to be drained by a separator 4 9 1 2 Option da Centrifugal separator A centrifugal separator is...

Page 60: ...air for this purpose A metering valve on the lubricator regulates the amount of oil in the compressed air minimum oil to lubricate the tools and prevent corrosion more oil for cleaning and to prevent...

Page 61: ...he user s power socket Cooling water heater for diesel motor The motor s coolant should be pre heated in order to protect the motor at low temperatures A cool ing water pre heating system is installed...

Page 62: ...he operation in fire hazard areas the machine is equipped with the following accessories Spark arrestor 4 9 4 1 Option la Spark arrestor Sparks in exhaust fumes represent a considerable risk in enviro...

Page 63: ...r 4 9 6 Option oc GSM GPS unit The machine is equipped with a GSM GPS unit This is equipped with a SIM card and provides fleet management capability for the customer The GSM GPS unit comprises GSM mod...

Page 64: ...to explosion protection are applied Keep suitable fire extinguishing agents on hand and ready for use Ensure that required ambient conditions are maintained Required ambient conditions may be A specif...

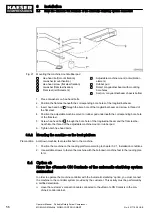
Page 65: ...machine feet anti vibration mountings 1 Follow the vehicle manufacturer s loading guidelines for safe operation and transportation 2 Ensure there is enough free space around and above the machine 3 E...

Page 66: ...ithin reach at all times 4 Ensure there is enough free space around and above the machine 5 Keep air inlet and outlet openings free of obstructions so that the cooling air can flow freely through the...

Page 67: ...machine for visible and hidden transport damage 2 Inform the carrier and the manufacturer in writing of any damage found 6 3 Mounting the machine on the truck platform For safe footing fix the machine...

Page 68: ...e thread of the adjustable machine mount or rubber pad 6 Tighten both hex head bolts 6 3 2 Mounting the machine on the truck platform Precondition bolt down machine feet are attached to the machine 1...

Page 69: ...ery charger is designed for operation in an industrial environment with a dedicated power supply network separated from the public power supply network by a transformer or a generator The operator mus...

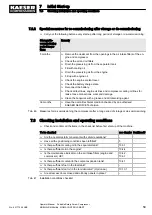
Page 70: ...2 Details of dangers and their avoidance are found in chapter 3 5 7 2 Before initial start up or recommissioning Incorrect or improper commissioning can cause injury to persons and damage to the mach...

Page 71: ...ian Tab 46 Measures for re commissioning the compressor after a long period of storage or de commissioning 7 3 Checking installation and operating conditions Check and confirm all the items in the che...

Page 72: ...harged it can be started with the battery of another vehicle or engine driven machine Material Jumper cables Fire and explosion hazard High currents can flow if the battery is short circuited A shorte...

Page 73: ...serve the instructions provided with the battery jumper cables Keep jumper cables away from rotating parts Avoid short circuits due to incorrect poling and or bridging with tools Do not bend over the...

Page 74: ...minutes This is important in particular for fully discharged batteries The battery will pick up only little current in the beginning and has a high internal resistance Any voltage peaks occurring in t...

Page 75: ...perating side with open operating panel 2 Device connector plug for auxiliary electrical systems 3 Power cable 1 Danger of fatal injury from electric shock Serious injury or death can result from a sh...

Page 76: ...hocks burns or death Work on electrical equipment may only be carried out by authorized electricians Safe working with compressed air tools and hoses Open pressurized compressed air hoses move erratic...

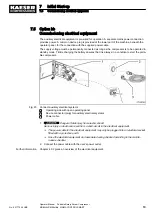
Page 77: ...d in chapter 3 5 8 2 Starting and stopping Precondition No personnel are working on the machine Service doors and panels are locked Fig 24 Starting instruments 1 Instrument panel cover with sticker gi...

Page 78: ...g instructions Brief instructions containing symbolic information on starting and stopping are attached at the in side of the instrument panel cover Starting sequence Fig 26 Brief instructions on star...

Page 79: ...STOP pushbutton 1 EMERGENCY STOP pushbutton locked out The machine cannot be stopped quickly in an emergency Check the function of the EMERGENCY STOP pushbutton Do not operate the machine if the EMER...

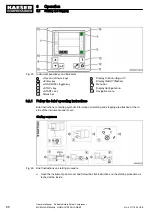
Page 80: ...re engine damage Do not use cold start sprays Preparing the start 1 Open the control panel cover 2 Switch the Controller ON OFF key to ON The controller boots up and the operating indicators appear on...

Page 81: ...ation Precondition Specified value for the engine coolant temperature ECT is attained Press LOAD IDLE key The machine switches to LOAD operation and is ready to deliver compressed air Precondition Spe...

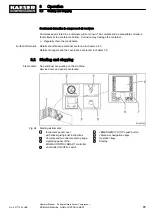
Page 82: ...achine running The pressure can only be set at lower than the nominal working pressure of the machine You can adjust the settings in increments of 0 1 bar or 1 psi The adjustment is displayed Danger f...

Page 83: ...d air discharge pressure is immediately active and remains saved 3 Press Enter The frame disappears 4 Press Enter Jump back to the menu bar the Main menu symbol receives a black background Access via...

Page 84: ...pt stopping of the engine under load can cause a fault or damage to the turbo charger Use the controller to shut down the machine as normal do not use the EMERGENCY STOP push button to save time Switc...

Page 85: ...ngine control unit has completed save process 2 Shut down the controller Switch off the Controller ON OFF key Shutting down the machine If the machine is not to be used again the Battery isolating swi...

Page 86: ...or sparks Do not allow fuel to spill or overflow Do not smoke Follow all instructions carefully 8 3 1 Use the specified fuel type In the worst case scenario use of the incorrect fuel type in a modern...

Page 87: ...must be filled exclusively with liquid fuel of the correct type and the recommended specification A label placed on the fuel tank in the vicinity of the filler port indicates the correct fuel type se...

Page 88: ...is standing level The machine has cooled down The enclosure is open All compressed air consumers are disconnected the discharge valves are open the machine is fully vented the pressure gauge reads 0 p...

Page 89: ...or overflow 5 Fill the tank to the maximum fill level marking Sufficient expansion volume remains 6 Remove the funnel 7 Close the filler port with the cap Dispose of any spilled fuel and fuel contami...

Page 90: ...cknowledged by restarting the controller Precondition Machine shut down Fault is rectified Switch on the Controller ON OFF key The acknowledged message is deleted The machine can be started Further in...

Page 91: ...l and internal cleaning of the machine Deploy the extension pole of the high pressure washer in order to maintain the necessa ry distance from the object being cleaned Keep the extension pole of the h...

Page 92: ...approximately 30 inches Fan jet nozzles approximately 12 inches Dirt blasters approximately 12 inches 1 Do not use jet water to clean plug sockets 2 Deploy the extension pole of the high pressure was...

Page 93: ...mponents and sensitive display instruments Do not direct jet water at electrical components 2 Do not direct jet water at the starter control box or sensitive display instruments 3 Do not direct jet wa...

Page 94: ...ode as usual during normal operation The respective current setting is saved The battery can deplete if the controller is continuously switched on readiness for automatic machine run The starting volt...

Page 95: ...Shutting down the machine When the compressed air demand via the remote contact of the master controller stops the ma chine shuts down as follows 1 Machine switches to run on phase The engine runs at...

Page 96: ...witched off Tool lubricator filled with oil Fig 34 Setting the tool lubricator 1 Shut off valve I open 0 closed 2 Metering knob Open the access door Adding lubricating oil 1 Open the shut off valve 2...

Page 97: ...on Fill the tool lubricator with suitable oil see chapter 10 13 1 Shutting off lubricating oil 1 Close the shut off valve 2 Close the door 8 6 3 Option ba Using the low temperature equipment Start the...

Page 98: ...the controller factory settings and individu al equipment with which the machine is provided 9 2 1 Alarm messages on the controller machine off Fault with automatic deactivation of the machine You mus...

Page 99: ...150 Fault ECU other faults Have it checked X X 1151 Fault ECU SCS com munication Have it checked X X 1160 Fault rail pressure sen sor Have it checked X X 1161 Fault speed sensor Have it checked X X 11...

Page 100: ...lt PLC memory er ror Have it checked X 1302 Fault PLC HMI commu nication Have it checked X 1303 Fault PLC temperature high Check operating condi tions Allow the machine to cool down 5 2 1304 Fault PLC...

Page 101: ...d troubleshooting in General faults 9 2 2 Warning messages on the controller The machine is not shut down In the case of an over temperature warning the machine switches automatically to IDLE mode to...

Page 102: ...Specialized workshop KS KAESER SERVICE DPF Diesel particulate filter ECU Electronic Control Unit UM SCS Separate user manual for the SIGMA CONTROL SMART controller Tab 56 Warning messages and measure...

Page 103: ...lace starter X Engine electrical fault Have it epaired replaced X Fuel tank empty Fill the fuel tank Air pockets in fuel line between fuel tank and injection pump Bleed the fuel line see chap ter 10 4...

Page 104: ...e chapter 10 4 3 Fuel line broken Have it replaced X Engine electrical fault Have it repaired replaced X SIGMA CONTROL SMART con troller faulty Arrange for it to be repaired replaced X SW Specialist W...

Page 105: ...or replaced if necessary X Inlet valve not opening or only opening partially Repair or have replaced if nec essary X Pressure gauge indicating false pressure Have repaired or replaced if necessary X...

Page 106: ...ot workingl Have repaired or replaced if necessary X Working pressure too high pro portional controller maladjus ted Reset to the permissible value or have replaced X Oil separator cartridge heavily c...

Page 107: ...Remedy Where can I get help SW KS Defective non return function of the inlet valve Repair or have replaced if nec essary X SW specialised workshop KS KAESER SERVICE Tab 67 Alarm Oil flows from the co...

Page 108: ...ning Don t activate the machine Warning The machine is being serviced Tab 69 Advise others that the machine is being serviced Before switching on make sure that nobody is working on the machine all pr...

Page 109: ...of the service task are displayed below Upon maintenance the maintenance interval counter must be reset Read the message code from the controller s display 10 2 1 Evaluating the maintenance message D...

Page 110: ...al components with average operating conditions In adverse conditions e g oil and filter changes perform maintenance work at shorter intervals Adverse conditions are e g poor fuel quality high low tem...

Page 111: ...clamps If necessary tighten the hose clamps X KS SW E50 after the first 50 operating hours KS contact KAESER SERVICE SW contact specialised workshop Tab 71 Maintenace tasks on the machine after commis...

Page 112: ...r filter X 10 4 2 Check engine air filter mainte nance indicator X 10 4 2 Check engine oil level X 10 4 4 Clean engine air filter X 10 4 2 Replace the engine oil X 10 4 6 Replace the engine oil filter...

Page 113: ...stem for leaks including the exhaust gas after treatment components X Service the exhaust gas after treatment components X 10 5 Arrange for the DPF to be cleaned X KUBOTA Have all lines to and from th...

Page 114: ...ave excess temperature safety shutdown tested for proper func tion X 10 12 3 KS Bodywork chassis Check screw connections X 10 8 Service rubber sealing strips X 10 9 Arrange for crane suspension to be...

Page 115: ...n the tables must additionally be carried out every 6 months if the annual operational performance is more than 500 operational hours Option Task Daily A250 A500 See chapter Note Option ec tool lubric...

Page 116: ...hine is standing level The machine is fully vented the pressure gauge reads 0 psig The machine has cooled down All compressed air consumers are disconnected and the air discharge valves are open Risk...

Page 117: ...tween the minimum and maximum marks when the engine is cool Fig 35 Checking the coolant level 1 Coolant level A Maximum mark FULL B Minimum mark LOW 2 Filler neck with cap 3 Overflow 4 Coolant expansi...

Page 118: ...Engine housing fracture Check coolant Protect the coolant against freezing Replenish immediately if necessary 2 Use the coolant tester as instructed by the manufacturer to test the coolant Concentrati...

Page 119: ...transfer properties deteriorate beyond this point 10 4 1 4 Filling refilling the coolant In order to ensure optimum frost corrosion protection and prevent the build up of deposits sludge in the coolin...

Page 120: ...release coupling 7 Shut off valve ball valve I Open 0 Closed 8 Rear view air exhaust louvre box removed 1 Loosen and remove the coolant expansion tank filler cap 2 Remove the air exhaust louvre box fr...

Page 121: ...lter elements is mandatory Operating the engine without an air filter insert installed is not permitted Do not use filter elements with damaged pleats or seals The use of an unsuitable air filter can...

Page 122: ...zone Fig 39 Engine air filter maintenance 1 Maintenance indicator 2 Red zone indicator scale 3 Indicating piston of the maintenance indi cator 4 Reset knob of the maintenance indicator 5 Filter elemen...

Page 123: ...the filter housing the cap and sealing faces with a damp cloth 4 Cleaning the filter element Use dry compressed air 5 bar at an angle to blow dust from the element from inside to outside until no more...

Page 124: ...in accordance with environmental protection regulations 10 4 3 Fuel system maintenance Make sure no dirt enters the fuel system during maintenance Clean components and their sur roundings before dism...

Page 125: ...ite a full tank bleed the fuel system Fig 43 Bleeding the fuel system 1 Fuel pre filter with integrated water trap 2 Bleed screw 3 Manual fuel pump 1 Place a receptacle beneath the fuel pre filter hou...

Page 126: ...filter cartridge The water trap is connected by a sensor to the controller If the water in the trap reaches a set lev el the controller displays a warning The display indicates water in the fuel filte...

Page 127: ...drain wa ter and contamination 3 Close the draining stopper 4 Close the access door Warning must be acknowledged after the water trap has been emptied Precondition The water trap is drained Confirm t...

Page 128: ...Check the seal of the draining stopper Gasket damaged replace gasket 8 Screw the draining stopper to a new filter cartridge 9 Clean the sealing faces of the filter cartridge and filter head with a dam...

Page 129: ...r cartridge is seated tightly to turn ap proximately 5 Turn on the battery isolating switch 6 Close the access door The fuel system must be bled after the filter cartridge has been changed Dispose of...

Page 130: ...nimum level or is below the mark Replenish engine oil 4 Attach the panel The marked maximum oil level should not be exceeded in order for the level of oil in the crankcase not to reach the crankshaft...

Page 131: ...e left rear panel 5 After approximately 5 minutes Check the engine oil level Low oil level Replenish engine oil 6 Visually inspect for leaks 7 Attach the panel 10 4 6 Changing the engine oil The engin...

Page 132: ...sump 6 Engine block 7 Oil filler with filler cap 1 Open the access door and remove the left rear panel 2 Remove the filler cap from the oil filler 3 Place the oil receptacle below the drain point 4 Un...

Page 133: ...to unscrew the filter 3 Engine block 1 Remove the left rear panel 2 Prepare a receptacle 3 Use a filter wrench to loosen and unscrew the filter Catch any escaping oil 4 Carefully clean sealing surface...

Page 134: ...disconnected and the air outlet valves are open The battery isolating switch is turned off Beware of rotating pulleys and moving belts There is danger of serious injury from pinching Never check the...

Page 135: ...the battery isolating switch 3 Attach the panel 10 4 8 2 Checking belt tension Check belt tension when they are warm not hot to avoid length variations through temperature The belt tension can be chec...

Page 136: ...e lever between the alternator and engine block 3 Gently push the alternator in the direction of the arrow outwards using the lever until the drive belt is tensioned 4 Re tighten the securing screw an...

Page 137: ...from the fan casing 4 Check the pulleys for dirt and wear Dirty pulley Clean pulley Worn pulley Have the pulley changed Installing a drive belt 1 Push the new drive belt through the service opening of...

Page 138: ...working on batteries comply with the following safety signs A warning label with safety signs is attached to the battery Fig 56 Safety signs warning stickers on the battery Take heed of any safety si...

Page 139: ...ad from the operating mode Battery voltage at the SIGMA CONTROL SMART display Starter battery charge level Charge level Voltage display V Electrolyte density pounds gal Notes 100 12 7 12 85 10 6 Batte...

Page 140: ...lectrolyte concentration and can destroy the bat tery Top off only with distilled water 2 Check the electrolyte level If the electrolyte level does not reach the mark Top off with distilled water Atta...

Page 141: ...e 5 Unscrew the battery fixing clamp 6 Replace in the reverse order 7 Make sure the battery is properly secured 8 Turn on the battery isolating switch 9 Replace the panels Battery replacement If the b...

Page 142: ...ent protection regulations 10 4 11 Checking the fastening of the fuel tank The machine is equipped with a fuel tank or tanks These are fastened with lashing strips and ratchets Precondition The machin...

Page 143: ...k the insulation of the diesel particulate filter Check the insulation of the diesel particulate filter for proper seating and damage The insulation is damaged Please contact KAESER SERVICE Check the...

Page 144: ...Check the cooling oil level If oil is not visible Top up the cooling oil 4 Replace the plug in the filler port 5 Attach the panel 10 6 2 Cooling oil filling and topping up Material Cooling oil Funnel...

Page 145: ...9 Attach the panel Starting the machine and performing a test run 1 Start the machine and run in IDLE until the operating temperature is reached 2 Close the outlet valves 3 Shut down the machine 4 Wai...

Page 146: ...pan the draining points for oil and coolant from the motor and the com pressor have been installed separately to the exterior The oil is drained using internal hose lines screwed into the drain ports...

Page 147: ...steps 1 Replace the plug in the oil separator tank filling port 2 Close the access door and replace the panel Dispose of used oil and oil contaminated working materials according to environmental pro...

Page 148: ...itch 9 Attach the panel Dispose of old cooling oil and any materials or parts contaminated with oil according to envi ronment protection regulations Starting the machine and performing a test run 1 St...

Page 149: ...on nut 4 Oil return line A Detail Dirt trap oil return line 5 Strainer 6 Sealing ring 7 Screw in connector 8 Nozzle B Detail Dirt trap proportional controller 9 Screw plug 10 O ring 11 Strainer Remove...

Page 150: ...contaminated materials according to environmental regulations Starting the machine and performing a test run 1 Switch the machine on and run it in IDLE mode for approx 5 minutes 2 Shut down the machin...

Page 151: ...e dirt trap 5 Air pipe 6 Pipe fitting 7 Cover 8 Fastening screw 9 Control valve 10 Solenoid valve plug 11 Gasket 12 Metal clip 13 Oil separator cartridge 1 Unscrew the union nuts 1 and 3 and place the...

Page 152: ...formation Information on control valve dirt trap maintenance is given in chapter 10 6 5 Putting in operation 1 Turn on the battery isolating switch 2 Replace any removed panels and close the access do...

Page 153: ...ne has cooled down All compressed air consumers are disconnected and the air outlet valves are open Damaged air filter element Machine damage due to contaminated intake air Do not try to clean the fil...

Page 154: ...ent from inside to outside until no further dust develops The blast pipe must be long enough to reach the bottom of the element The tip of the blast pipe must not touch the element Clean sealing faces...

Page 155: ...ged Point shaped small con cavities can be ignored the axial direction must not exhibit any grooves 1 Slide the seal holder 2 and gasket 3 over the pipe 1 2 Slide the pipe end 8 into the bush without...

Page 156: ...onnected and the air outlet valves are open The battery isolating switch is turned off Damage can be caused to the machine by water or steam jets Direct water or steam jets can damage or destroy elect...

Page 157: ...louvre 6 Remove the protective coverings from the air filters 7 Screw the sealing plugs into the drainage openings of the floor pan 8 Turn on the battery isolating switch 9 Replace the panels 10 Star...

Page 158: ...he battery isolating switch 8 Replace any removed panels and close the service door 9 Start the machine and run up to operating temperature so that excess water is evaporated Clean the cooler fins onl...

Page 159: ...screw connections with the specific tightening torque Sealed screw connections Screw connections which must not be adjusted are sealed with a coloured locking varnish 1 Damage to the machine caused by...

Page 160: ...lines are checked at reasonable intervals and are re placed if required see maintenance schedule 10 3 4 1 Comply with all instructions 10 10 1 Replace the fuel lines of the drive engine Have an author...

Page 161: ...intenance openings The liquid will drain 3 Clean the bungs and maintenance openings 4 Close all maintenance openings with bungs The machine body is sealed 5 Using the cleaning cloth remove any dirt wi...

Page 162: ...ting pressure of the safety relief valve reaches a maxi mum of Pmax Pmax see table 78 Check in accordance with section Check activating pressure of safety relief valve in the separate operating manual...

Page 163: ...discharge temperature Have shut down at excessive airend discharge temperature checked Result When the maximum airend discharge temperature is exceeded the SIGMA CONTROL MOBIL controller switches the...

Page 164: ...and screw the plug fully in again 3 Unscrew and withdraw the plug once more and read off the oil level on the dipstick Oil level at the upper third of the dip stick Oil level is correct If oil does n...

Page 165: ...vented the pressure gauge reads 0psig All compressed air consumers are disconnected and the air outlet valves are open The battery isolating switch is turned off Fig 69 Cleaning the condensate drain 1...

Page 166: ...e has automatically vented Pressure gauge reads 0 psig 4 Open the outlet valves 5 Remove both front panels 6 Check the cyclone separator housing and hose line for leaks 7 Replace the panels 10 13 3 Op...

Page 167: ...end of the hose over the drain port and place the other end in the receptacle 3 Start the compressor engine 4 In order to increase the pressure in the exhaust system partially cover the exhaust disch...

Page 168: ...service work carried out in this list Date Maintenance task carried out Operating hours Signature Tab 80 Maintenance log 10 Maintenance 10 14 Documenting maintenance and service work 156 Operator Man...

Page 169: ...is risk of personal injury or damage to the machine resulting from the use of unsuita ble spares or operating fluids materials Use only original parts and operating fluids materials Do not use alterna...

Page 170: ...manual 11 5 Replacement parts for service and repair With the help of the below spare parts list you can plan your material requirement according to op erating conditions and order the spare parts yo...

Page 171: ...11 Spares Operating Materials Service 11 5 Replacement parts for service and repair No 901779 08 USE Operator Manual Portable Rotary Screw Compressor MOBILAIR M58utility SIGMA CONTROL SMART 159...
Page 172: ...11 Spares Operating Materials Service 11 5 Replacement parts for service and repair 160 Operator Manual Portable Rotary Screw Compressor MOBILAIR M58utility SIGMA CONTROL SMART No 901779 08 USE...

Page 173: ...11 Spares Operating Materials Service 11 5 Replacement parts for service and repair No 901779 08 USE Operator Manual Portable Rotary Screw Compressor MOBILAIR M58utility SIGMA CONTROL SMART 161...
Page 174: ...11 Spares Operating Materials Service 11 5 Replacement parts for service and repair 162 Operator Manual Portable Rotary Screw Compressor MOBILAIR M58utility SIGMA CONTROL SMART No 901779 08 USE...

Page 175: ...11 Spares Operating Materials Service 11 5 Replacement parts for service and repair No 901779 08 USE Operator Manual Portable Rotary Screw Compressor MOBILAIR M58utility SIGMA CONTROL SMART 163...
Page 176: ...11 Spares Operating Materials Service 11 5 Replacement parts for service and repair 164 Operator Manual Portable Rotary Screw Compressor MOBILAIR M58utility SIGMA CONTROL SMART No 901779 08 USE...

Page 177: ...11 Spares Operating Materials Service 11 5 Replacement parts for service and repair No 901779 08 USE Operator Manual Portable Rotary Screw Compressor MOBILAIR M58utility SIGMA CONTROL SMART 165...

Page 178: ...11 Spares Operating Materials Service 11 5 Replacement parts for service and repair 166 Operator Manual Portable Rotary Screw Compressor MOBILAIR M58utility SIGMA CONTROL SMART No 901779 08 USE...

Page 179: ...11 Spares Operating Materials Service 11 5 Replacement parts for service and repair No 901779 08 USE Operator Manual Portable Rotary Screw Compressor MOBILAIR M58utility SIGMA CONTROL SMART 167...

Page 180: ...11 Spares Operating Materials Service 11 5 Replacement parts for service and repair 168 Operator Manual Portable Rotary Screw Compressor MOBILAIR M58utility SIGMA CONTROL SMART No 901779 08 USE...

Page 181: ...11 Spares Operating Materials Service 11 5 Replacement parts for service and repair No 901779 08 USE Operator Manual Portable Rotary Screw Compressor MOBILAIR M58utility SIGMA CONTROL SMART 169...

Page 182: ...11 Spares Operating Materials Service 11 5 Replacement parts for service and repair 170 Operator Manual Portable Rotary Screw Compressor MOBILAIR M58utility SIGMA CONTROL SMART No 901779 08 USE...

Page 183: ...11 Spares Operating Materials Service 11 5 Replacement parts for service and repair No 901779 08 USE Operator Manual Portable Rotary Screw Compressor MOBILAIR M58utility SIGMA CONTROL SMART 171...

Page 184: ...11 Spares Operating Materials Service 11 5 Replacement parts for service and repair 172 Operator Manual Portable Rotary Screw Compressor MOBILAIR M58utility SIGMA CONTROL SMART No 901779 08 USE...

Page 185: ...11 Spares Operating Materials Service 11 5 Replacement parts for service and repair No 901779 08 USE Operator Manual Portable Rotary Screw Compressor MOBILAIR M58utility SIGMA CONTROL SMART 173...

Page 186: ...11 Spares Operating Materials Service 11 5 Replacement parts for service and repair 174 Operator Manual Portable Rotary Screw Compressor MOBILAIR M58utility SIGMA CONTROL SMART No 901779 08 USE...

Page 187: ...11 Spares Operating Materials Service 11 5 Replacement parts for service and repair No 901779 08 USE Operator Manual Portable Rotary Screw Compressor MOBILAIR M58utility SIGMA CONTROL SMART 175...

Page 188: ...11 Spares Operating Materials Service 11 5 Replacement parts for service and repair 176 Operator Manual Portable Rotary Screw Compressor MOBILAIR M58utility SIGMA CONTROL SMART No 901779 08 USE...

Page 189: ...11 Spares Operating Materials Service 11 5 Replacement parts for service and repair No 901779 08 USE Operator Manual Portable Rotary Screw Compressor MOBILAIR M58utility SIGMA CONTROL SMART 177...

Page 190: ...11 Spares Operating Materials Service 11 5 Replacement parts for service and repair 178 Operator Manual Portable Rotary Screw Compressor MOBILAIR M58utility SIGMA CONTROL SMART No 901779 08 USE...

Page 191: ...11 Spares Operating Materials Service 11 5 Replacement parts for service and repair No 901779 08 USE Operator Manual Portable Rotary Screw Compressor MOBILAIR M58utility SIGMA CONTROL SMART 179...

Page 192: ...11 Spares Operating Materials Service 11 5 Replacement parts for service and repair 180 Operator Manual Portable Rotary Screw Compressor MOBILAIR M58utility SIGMA CONTROL SMART No 901779 08 USE...

Page 193: ...11 Spares Operating Materials Service 11 5 Replacement parts for service and repair No 901779 08 USE Operator Manual Portable Rotary Screw Compressor MOBILAIR M58utility SIGMA CONTROL SMART 181...

Page 194: ...11 Spares Operating Materials Service 11 5 Replacement parts for service and repair 182 Operator Manual Portable Rotary Screw Compressor MOBILAIR M58utility SIGMA CONTROL SMART No 901779 08 USE...

Page 195: ...11 Spares Operating Materials Service 11 5 Replacement parts for service and repair No 901779 08 USE Operator Manual Portable Rotary Screw Compressor MOBILAIR M58utility SIGMA CONTROL SMART 183...

Page 196: ...11 Spares Operating Materials Service 11 5 Replacement parts for service and repair 184 Operator Manual Portable Rotary Screw Compressor MOBILAIR M58utility SIGMA CONTROL SMART No 901779 08 USE...

Page 197: ...11 Spares Operating Materials Service 11 5 Replacement parts for service and repair No 901779 08 USE Operator Manual Portable Rotary Screw Compressor MOBILAIR M58utility SIGMA CONTROL SMART 185...

Page 198: ...11 Spares Operating Materials Service 11 5 Replacement parts for service and repair 186 Operator Manual Portable Rotary Screw Compressor MOBILAIR M58utility SIGMA CONTROL SMART No 901779 08 USE...

Page 199: ...11 Spares Operating Materials Service 11 5 Replacement parts for service and repair No 901779 08 USE Operator Manual Portable Rotary Screw Compressor MOBILAIR M58utility SIGMA CONTROL SMART 187...

Page 200: ...11 Spares Operating Materials Service 11 5 Replacement parts for service and repair 188 Operator Manual Portable Rotary Screw Compressor MOBILAIR M58utility SIGMA CONTROL SMART No 901779 08 USE...

Page 201: ...11 Spares Operating Materials Service 11 5 Replacement parts for service and repair No 901779 08 USE Operator Manual Portable Rotary Screw Compressor MOBILAIR M58utility SIGMA CONTROL SMART 189...

Page 202: ...11 Spares Operating Materials Service 11 5 Replacement parts for service and repair 190 Operator Manual Portable Rotary Screw Compressor MOBILAIR M58utility SIGMA CONTROL SMART No 901779 08 USE...

Page 203: ...11 Spares Operating Materials Service 11 5 Replacement parts for service and repair No 901779 08 USE Operator Manual Portable Rotary Screw Compressor MOBILAIR M58utility SIGMA CONTROL SMART 191...

Page 204: ...11 Spares Operating Materials Service 11 5 Replacement parts for service and repair 192 Operator Manual Portable Rotary Screw Compressor MOBILAIR M58utility SIGMA CONTROL SMART No 901779 08 USE...

Page 205: ...gs with plastic foil and moisture resistant adhesive tape Engine air inlet Compressor air inlet Exhaust silencer 3 Attach the following notice on the instrument panel showing the decommissioning measu...

Page 206: ...to coat all parts with a protec tive oil film Disconnect the battery the minus terminal first and then the plus ter minal and store in a frost free room Check the battery liquid level 10 9 Check the b...

Page 207: ...ety Allow transport only by personnel trained in safely dealing with motor vehicles and the trans port of goods 1 There is danger of being run over or crushed by an overturning vehicle Death or severe...

Page 208: ...t carefully Take care when setting down the machine 1 Incorrect setting down can damage the machine Machine components particularly the support frame can be damaged by incorrectly setting down Set the...

Page 209: ...tional measures must be taken for the transport of machines by sea or air Please contact KAESER SERVICE for more information Material Squared timbers Straps Carry out a freight securing National direc...

Page 210: ...r freight The machine is designated as dangerous goods for air freight purposes any disregard can result in a heavy fine 1 Danger of fire or explosion from operating fluids materials The machine incor...

Page 211: ...disposed of in accordance with environ mental regulations Once these conditions have been fulfilled deliver the machine to an authorised dispozal agent Overview Remove all batteries Drain all operati...

Page 212: ...ollect the following operating fluids from your machine Designation Drive engine Compressor Fluid Fuel Cooling oil Engine oil Transmission oil Coolant Hydraulic oil Tab 86 Machine fluids Dispose of op...

Page 213: ...n regulations 12 4 5 Disposing of the machine Precondition All batteries have been removed and delivered to the designated disposal system All operating fluids have been drained and disposed of in acc...

Page 214: ...r 2 Machine nameplate with system serial number 3 Options label 13 1 2 Identification of the drive engine Fig 75 Identification of the drive engine 1 Engine 2 Position of the nameplate 3 Nameplate wit...

Page 215: ...ystem 1 Serial number for DPF silencer assembly 2 Serial number for DPF silencer large assembly 13 2 Pipeline and instrument flow diagram P I diagram 13 Annex 13 2 Pipeline and instrument flow diagram...

Page 216: ...13 Annex 13 2 Pipeline and instrument flow diagram P I diagram 204 Operator Manual Portable Rotary Screw Compressor MOBILAIR M58utility SIGMA CONTROL SMART No 901779 08 USE...

Page 217: ...13 Annex 13 2 Pipeline and instrument flow diagram P I diagram No 901779 08 USE Operator Manual Portable Rotary Screw Compressor MOBILAIR M58utility SIGMA CONTROL SMART 205...

Page 218: ...13 Annex 13 2 Pipeline and instrument flow diagram P I diagram 206 Operator Manual Portable Rotary Screw Compressor MOBILAIR M58utility SIGMA CONTROL SMART No 901779 08 USE...

Page 219: ...13 3 Dimensional Drawing 13 Annex 13 3 Dimensional Drawing No 901779 08 USE Operator Manual Portable Rotary Screw Compressor MOBILAIR M58utility SIGMA CONTROL SMART 207...

Page 220: ...lable to third parties Subject to development related changes Drawing may be altered only via CAD on frame stationary rx Area covered by the vehicle without towbar 18 41 feet Center of gravity Positio...

Page 221: ...13 4 Electrical Diagram 13 Annex 13 4 Electrical Diagram No 901779 08 USE Operator Manual Portable Rotary Screw Compressor MOBILAIR M58utility SIGMA CONTROL SMART 209...

Page 222: ...er than the agreed purpose Neither originals nor reproductions must be forwarded or otherwise made accessible to third parties KAESER KOMPRESSOREN SE Manufacturer Postfach 2143 96410 Coburg 1 Sht a b...

Page 223: ...3013 04 5 SK 14 Circuit diagram Digital output assembly SFA58UT SK 03013 04 6 SK 15 Circuit diagram analogue input building group SFA58UT SK 03013 04 7 SK 16 Circuit diagram SFA58UT SK 03013 04 8 SK 1...

Page 224: ...plus unit ON Preheat with glowplug terminal Battery terminal Battery earth Starter Control blue brown yellow green green yellow grey OG PK RD BK VT WH orange pink red black violet white 1 2 3 4 5 6 7...

Page 225: ...EMERGENCY STOP pushbutton Operating unit SCS Pressure transducer Oil separator Pressure transducer Inlet valve Filter maintenance fuel sensor fuel level temperature sensor Airend discharge temperature...

Page 226: ...K22 K30 X21 1 X24 1 X25 1 X21 2 X24 2 X25 2 X1 FLRY 0 75mm Control cabinet K20 X100 X31 2 X31 1 W100 PUR 5x0 34 mm W101 PUR 5x0 34mm W106 Oelflex 110 4x0 75 mm W39 Oelflex 110 3G0 75 mm W32 Oelflex 11...

Page 227: ...B Alternator W2 3 2 3 2 SK 2 1 SK 5 1 SK 3 2 SK 1 4 87 30 500W Preheat with glowplug 16mm 16mm 6mm 30 6mm 30 SK 1 1 31 3 1 M 3 Sht a b c Change Date Date Drawn Released Name 1 07 05 2021 IKM Function...

Page 228: ...X1 56 2 X1 53 8 X1 49 3 X1 52 9 Plug connection 12 pole X1 50 4 X1 51 10 X1 54 11 X1 55 5 1 5mm K22 1 3 1 3 Sht a b c Change Date Date Drawn Released Name 2 07 05 2021 IKM Function Group of functions...

Page 229: ...23 5 X1 40 15 X1 41 18 Sensor camshaft X1 2 24 X1 11 7 Banked piston pump X1 12 3 X1 37 14 Sensor coolant temperature X1 19 38 X1 29 9 X1 28 33 Sensor rail pressure X1 1 41 X1 44 28 X1 20 34 39 Intake...

Page 230: ...9 31 1 X2 52 X2 54 X1 35 X2 50 1 1 86 85 IKM 1 7 87 30 2 2 glow relay X1 21 8 8 KUBOTA X1 36 3 3 85 86 87 87a 30 2 1 Relay Starter IKM 3 4 KL 15 X2 26 KL 50 X2 16 CAN L X2 42 CAN H X2 30 120 CAN Bus E...

Page 231: ...KAESER N2 8 2 6 2 7 4 31 5 Voltage transformer DC DC 31 4 15 1 N1 8 2 Power supply unit PLC CAN interface 17 40 120 42 17 42 40 30 7 F13 15A 31 1 31 3 30 8 F27 2A 15 2 40 41 42 43 31 4 8 9 10 11 W11 8...

Page 232: ...6 W28 W28 30 4 F20 5A 4 87 87a 30 5 5 5 4 21 22 6 6 86 85 3 87 87a 30 3 31 1 ECU switching on W12 W12 31 5 Control board outputs 86 85 2 87 87a 30 2 31 2 Relay fuel pump E 8 2 31 3 W33 W33 4 4 1 1 2 2...

Page 233: ...W101 4 1 3 6 6 Control pressure Inlet valve 7 7 Control board inputs 2 2 3 3 W106 2 3 1 S 1 1 Temperature flow compressor 9 Sht a b c Change Date Date Drawn Released Name 4 07 05 2021 SK Function Grou...

Page 234: ...21 22 3 4 4 4 EMERGENCY STOP W37 8 8 2 sensor fuel level Control board inputs 3 14 68 14 Alternator 3 8 6 6 Filter maintenance fuel 31 5 31 6 1 9 Sht a b c Change Date Date Drawn Released Name 5 07 0...

Page 235: ...alve Inlet valve 10 10 31 4 W32 W32 11 11 12 12 Venting valve Control board outputs 31 3 F 8 2 9 Sht a b c Change Date Date Drawn Released Name 6 07 05 2021 SK Function Group of functions D Sitter Fis...

Page 236: ...Remote ON OFF 51 Remote ON OFF 52 Remove jumper when connecting remote on off 9 Sht a b c Change Date Date Drawn Released Name 7 07 05 2021 SK Function Group of functions D Sitter Fischer C VBBS IN8...

Page 237: ...Released Name 8 07 05 2021 SK Function Group of functions D Sitter Fischer C IN0 VBBS IN1 GND GND IN2 IN3 VBBS IN4 VBBS IN5 GND GND IN6 IN7 VBBS IN8 VBBS IN9 GND GND IN10 IN11 VBBS GND OUT0 OUT1 GND...

Page 238: ...K27 GPS Modem 2 8 option oc 9 Sht a b c Change Date Date Drawn Released Name 9 07 05 2021 SK Function Group of functions D Sitter Fischer C GPS GSM 1 2 3 4 5 ON Status 6 7 8 9 10 11 12 13 14 13 Annex...

Page 239: ...ambda Boersig Boersig Boersig Boersig Boersig Boersig K20 K30 K32 K38 K39 K30 K32 K38 K39 K31 X23 X1 X1 X1 F27 F20 F100 F15 F13 F32 F39 F30 R10 R13 R3 R2 T20 X100 K20N2 K20N1 K20A K20B K20C K20E K20F...

Page 240: ...K21 S10 S10 S1 S1 X25 B10 B11 B40 B37 Q10 F31 E11 K22 M9 B33 K27 T27 2 Sht a b c Change Date Date Drawn Released Name 2 07 05 2021 Typ notwendige techn Daten z B Steuerspannung Frequenz Einstellbereic...

Page 241: ...KM 3 4 X24 2 31 1 85 10 K32 3 2 X21 2 31 2 85 10 3 2 X21 2 31 2 12 Control cabinet IKM 3 4 X24 2 31 11 X100 3 6 X21 2 31 3 13 5 K20F 2 7 X25 2 31 3 GND 9 YE X13 2 1 X25 2 31 4 3 7 1 T20 6 3 X31 2 31 4...

Page 242: ...10 2x0 75mm total 12 Terminals 2 1 IKM M2 1 50 IKM 1 5 IKM G2 2 IG 1 IKM 1 5 IKM G2 3 L 2 3 6 XM9 4 1 1 3 6 XM9 5 2 2 5 6 B33 6 1 3 5 3 XB37 7 2 1 5 4 XB37 8 3 2 3 2 X28 1 9 1 1 3 2 X28 1 10 2 2 3 2 X...

Page 243: ...X2 53 1 3 K22 2 X2 41 1 5 K22 3 X1 36 1 7 K22 4 X2 30 1 7 K22 5 X2 42 1 8 K22 6 X2 16 1 8 K22 7 X2 26 1 5 K22 8 X1 21 1 3 K22 9 X2 51 IKM 3 4 IKM X42 10 2 IKM 3 4 11 12 total 12 Terminals K38 1 2 1 8...

Page 244: ...al 12 Terminals 2 2 S10 1 13 1 2 2 S10 2 14 2 5 4 S1 3 11 3 5 4 S1 4 12 4 3 4 S1 5 21 5 3 4 S1 6 22 6 2 1 Control panel 7 2 8 K21 X1 8 2 RD 2 8 K21 X1 9 3 BK 2 8 K21 X1 10 4 WH 2 8 K21 X1 11 5 BU 12 t...

Page 245: ...Oelflex 110 4x0 75mm total 12 Terminals 4 6 B40 1 1 1 4 5 B40 2 2 2 4 5 B40 3 3 3 4 3 B10 4 1 BN B11 1 BN 4 3 B10 5 3 BU 4 4 B11 6 3 BU 4 4 B10 7 4 BK B11 4 BK 6 2 K1 8 1 6 2 K1 9 2 6 3 K1 10 3 6 3 K7...

Page 246: ...Switchboard F39 20A F30 25A F100 5A F20 5A F32 20A F15 7 5A F13 15A F27 2A 2 Sht a b c Change Date Date Drawn Released Name 1 07 05 2021 I Sitter Fischer C 13 Annex 13 4 Electrical Diagram 234 Operato...

Page 247: ...trol panel Control cabinet K21 S1 S10 X100 K31 X21 X23 X31 X25 X24 2 Sht a b c Change Date Date Drawn Released Name 2 07 05 2021 I Sitter Fischer C 13 Annex 13 4 Electrical Diagram No 901779 08 USE Op...

Page 248: ...Option od Battery charger electrical diagram 13 Annex 13 5 Battery charger electrical diagram 236 Operator Manual Portable Rotary Screw Compressor MOBILAIR M58utility SIGMA CONTROL SMART No 901779 08...

Page 249: ...the agreed purpose Neither originals nor reproductions must be forwarded or otherwise made accessible to third parties KAESER KOMPRESSOREN SE Manufacturer Postfach 2143 96410 Coburg 1 Sht a b c Chang...

Page 250: ...ction 1 2 3 4 5 6 7 8 page Block diagram general instructions components option Battery charger components option Engine coolant pre heating 1 Sht a b c Change Date Date Drawn Released Name 1 18 03 20...

Page 251: ...s b c L1 16 A N Power supply PE Engine coolant pre heating 12V DC 5A 230V AC L1 N PE PE N L1 Battery charger 0 75 mm 7 5A 1 Sht a b c Change Date Date Drawn Released Name 1 18 03 2020 Function Group o...

Page 252: ...13 6 Fuel circulation diagram 13 Annex 13 6 Fuel circulation diagram 240 Operator Manual Portable Rotary Screw Compressor MOBILAIR M58utility SIGMA CONTROL SMART No 901779 08 USE...

Page 253: ...13 Annex 13 6 Fuel circulation diagram No 901779 08 USE Operator Manual Portable Rotary Screw Compressor MOBILAIR M58utility SIGMA CONTROL SMART 241...

Page 254: ...13 Annex 13 6 Fuel circulation diagram 242 Operator Manual Portable Rotary Screw Compressor MOBILAIR M58utility SIGMA CONTROL SMART No 901779 08 USE...

Reviews: