background image

Maintenance

9 --- 41

Remove cover panel (2, siee chapter 9.2).

1

2

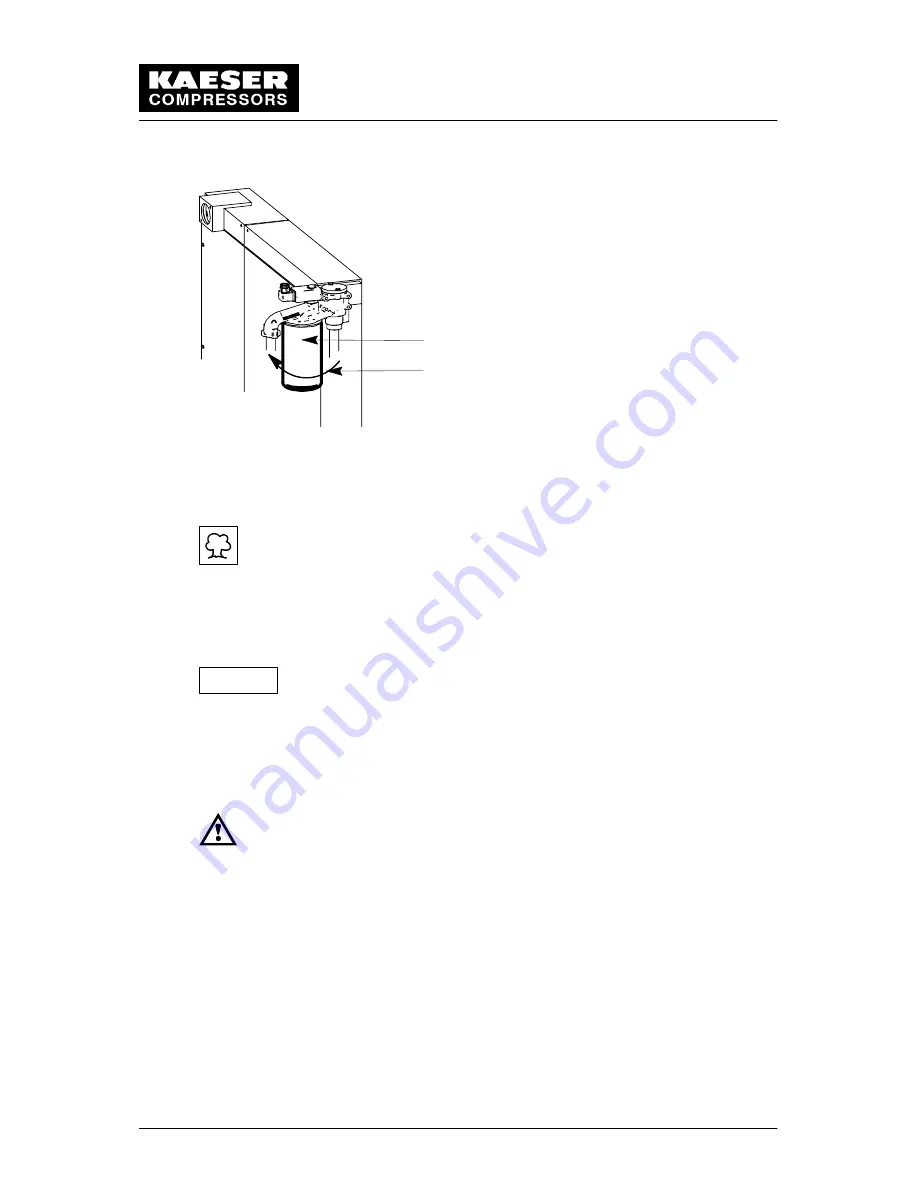
1 Oil filter cartridge
2 Turn in this direction to unscrew the cartridge

Twist the used or contaminated oil filter cartridge counter clockwise to remove and
catch escaping oil in a suitable container.

Dispose of the old oil filter and any used, accumulated oil according to
environmental care regulations!

Clean the face of the combination block with a lint free cloth.

Lightly oil the gasket of the new filter cartridge before screwing into position.

Screw in the new filter cartridge clockwise by hand until the gasket fits tightly.

Do not use a tool as this may cause damage to the oil filter cartridge
and the gasket.

Check the oil level (see chapter 9.11).

Close all maintenance doors and reattach all cover panels.

Open the isolation shut ---off valve between the compressor and the compressed air
system.

Perform a test run

When the operating temperature is reached (see chapter 1.1), shut
down the compressor package (see chapter 8.4) and lock the main
disconnect in the ”off” position in accordance with applicable lock out/
tag out procedures (example: OSHA CFR 29 § 1910.147) to ensure the
compressor does not restart.

Afterwards, carry out a visual check for leaks.

Attention!

Summary of Contents for CSD 75

Page 1: ...75 GL Nr 100265_00060 00 01 L Volt L Cabinet heaters L Wye Delta Start L 115 V receptacle L D O L Start L Outdoor modification L psig L Rainhoods L L Switchable Modulation L L Synthetic lubricant L Wi...

Page 2: ......

Page 3: ...y 2 8 2 4 Spare Parts 2 8 2 5 Compressed Air System 2 8 2 6 Environmental Protection 2 9 3 General 3 10 3 1 Proper use of the Compressor 3 10 3 2 Improper use 3 10 3 3 Compressed Air Treatment 3 10 3...

Page 4: ...Maintenance 9 32 9 1 Observe the following rules during all maintenance and servicing work 9 32 9 2 Location of maintenance doors and cover panels 9 33 9 3 Regular Maintenance Compressor 9 34 9 4 Clea...

Page 5: ...is too high greater than 167 F 200 F 11 73 11 3 2 Motor overload relay switches the unit off 11 73 11 3 3 Compressor is running but produces no pressure 11 74 11 3 4 Oil leaks out of air filter 11 75...

Page 6: ...easurement 1 3 Motor Compressor motor Rated power 75 hp Rated speed 3600 rpm Specification class TEFC Fan motor Rated power 1 3 hp Rated speed 1200 rpm Specification class TEFC 1 4 Electrical Connecti...

Page 7: ...ax cooling air inlet air temperature 115 EF Air inlet opening 14 sq ft Exhaust air for solution A see chapter 6 1 Forced ventilation with exhaust ventilator 11770 cfm at static pressure of 0 4 inches...

Page 8: ...0 Hours 4 000 Hours 8 000 Hours Oil changes may need to be more frequent depending on ambient conditions When high ambient temperatures or dirty conditions are present oil changes may be necessary eve...

Page 9: ...AESER syn thetic compressor oil is less flammable than equal viscosity mineral oils it cannot be classi fied as a fire resistant fluid It has a flash point above 460 F Since the user has total con tro...

Page 10: ...l 2000 h Grease volume per bearing for regreasing 1 25 oz Recommended lithium base saponified bearing grease Exxon Unirex N 3 Replace the compressor motor bearings Under normal operating conditions af...

Page 11: ...Technical Specification 1 6...

Page 12: ...measures This symbol indicates operations to be carried out by the operator or service technician This bullet identifies listings Explanation of warning labels Beware of hot surface Do not touch surf...

Page 13: ...the oil circulation system top off the oil in the oil separator tank to the maximum level run the compressor and keep it under constant observation for a short period Check the oil level again and top...

Page 14: ...ons Maintenance materials wear items replacement parts Ensure that all wear items maintenance and replacement parts accu mulating during operation of the compressor package are disposed of according t...

Page 15: ...ational and maintenance instructions laid down by the manufacturer If the compressor package is operated in an air distribution network the maximum network pressure may not exceed 232 psig 3 2 Imprope...

Page 16: ...63 min 35 Measurements in inches Spreader bar Do not exert any side forces on the compressor package when trans porting with lifting equipment 4 2 Packaging The packaging provided with this compressor...

Page 17: ...ousing from each other and also lubricates the antifric tion bearings The compressed air and oil mixture leaves the airend via the discharge port 1 2 3 6 4 5 1 Drive shaft 4 Male rotor 2 Oil injection...

Page 18: ...d with the Pipe and Instrument Flow Diagram P I Diagram 5 2 6 3 8 7 1 4 9 1 Inlet valve 2 6 Control cabinet 2 Coupling 53 7 Oil separator tank 3 Drive motor 3 8 Air filter 1 4 Oil filter 10 9 Oil air...

Page 19: ...Construction and Operation 5 14...

Page 20: ...Construction and Operation 5 15...

Page 21: ...d and idle If the compressor package runs in idle for longer than the preset period 1 to 2 for example t1 6 min the drive motor is stopped completely 2 When the lower switching point pmin 3 is reached...

Page 22: ...point These two periods are set according to the maximum permissible cut in frequency of the compressor motor The running period starts every time the compressor package is switched on It lasts as lo...

Page 23: ...sor is switched to standstill after the run on period has ex pired 3 If the pressure decay time tpdecay was shorter than the period set for the idle stand still period the idle mode is selected 4 that...

Page 24: ...against the ingress of dust and rain Install the compressor according to the following diagram Adhere to the minimum dis tances shown to allow free access to the compressor package Adequate ventilatio...

Page 25: ...let of the compressor to the system pipework using a flexible hose line or axial compensator and isolation shut off valve with drain Use the NPT adapter if necessary 6 3 Electrical Connection The main...

Page 26: ...Installation 6 21 1 25 x FLA see chapter 1 4 wire temperature rating correction factor for 40 C 100A 60 C 0 82 100A 75 C 0 88...

Page 27: ...NG ATTENTION DANGER CAN LEAD TO ACCIDENTS CAUSING IN JURY TO PERSONS OR DAMAGE TO EQUIPMENT If a power failure occurs the compressor package starts again auto matically normal setting provided the lin...

Page 28: ...irection see chapter 7 4 The ball valve 6 6 and 11 6 see chapter 5 4 must be closed The ball valve 20 see chapter 5 4 in the vent line must be open Lock the main disconnect in the off position in acco...

Page 29: ...ditions yes no Is a shut off valve fitted by the user yes no Is a flexible connecting hose or axial compensator fitted between the compressor package and the compressed air system yes no Have all scre...

Page 30: ...tor Overload Relay Adjustment Lock the main disconnect in the off position in accordance with ap plicable lock out tag out procedures example OSHA CFR 29 1910 147 to ensure the compressor does not res...

Page 31: ...art the starting current is fed via the motor overload protection switch For the nominal motor current see motor nameplate Adjustment This can be set to a maximum of 10 higher than the rated motor cur...

Page 32: ...oil must be of the same type as the oil used to operate the com pressor see label near the oil filler plug on the oil separator tank If no additional oil is available remove required amount of oil fr...

Page 33: ...ible alarms and service messages display of events etc are given in the service manual sup plied for the SIGMA CONTROL controller 8 3 Emergency Stop Pushbutton The Emergency Stop pushbutton shuts down...

Page 34: ...emote ON key 9 Return key 5 Load idle key 10 Info event key 11 Acknowledge reset key 8 3 2 Light emitting diodes and plain text display 12 13 19 14 15 16 17 18 20 21 12 Four line display 17 Load LED 1...

Page 35: ...Press the OFF key 2 LED 19 extinguishes Lock the main disconnect in the off position in accordance with applicable lock out tag out procedures example OSHA CFR 29 1910 147 to ensure the compressor do...

Page 36: ...enance due is shown in the display 12 A list of service messages that may occur during operation is included in the SIGMA CONTROL service manual Carry out the maintenance work Acknowledge service mess...

Page 37: ...on again and all maintenance doors are closed before restarting the compressor unit To start the compressor unit see chapter 8 4 The following points must be observed when handling lubricating and coo...

Page 38: ...Maintenance 9 33 9 2 Location of maintenance doors and cover panels 1 Control cabinet door 2 5 Cover panels 3 1 2 4 5...

Page 39: ...e motor bearings 9 7 2000 h Change the oil filter 9 10 Proper interval varies See chapter 1 8 Change the oil 9 12 6000 12000 h or after 3 years at the latest Change the fan motor bearings 9 7 Annually...

Page 40: ...or package see chapter 8 4 Lock the main disconnect switch in the off position in accordance with applicable lockout tagout procedures to ensure the compressor does not restart If the cooler is only l...

Page 41: ...use a mild detergent soap to rinse out oily dust The mat can also be tapped vacuum cleaned or blown out with compressed air not in excess of 30 psig If the mat is heavily soiled or has been cleaned of...

Page 42: ...with compressed air Use dry compressed air blowing at a pressure of not more than 30 psig at a slant from the inside to the outside of the air filter cartridge surfaces Do not clean the air filter car...

Page 43: ...cavity must be cleaned and regreased every 20 000 hours to 35 000 hours depending on environmental conditions The bearing covers and or the end shields must be removed and the old grease disposed of...

Page 44: ...ation shut off valve in accordance with applicable lock out tag out pro cedures The oil circulation system of the compressor package vents automatically Venting the oil separator tank 1 2 3 4 9 11 12...

Page 45: ...ork must be vented With the ball valve 7 closed insert the male coupling of a maintenance hose in the connecting point of the minimum pressure check valve then slowly open the ball valve to vent the a...

Page 46: ...rew in the new filter cartridge clockwise by hand until the gasket fits tightly Do not use a tool as this may cause damage to the oil filter cartridge and the gasket Check the oil level see chapter 9...

Page 47: ...Optimum oil level 3 Highest oil level Remove cover panel 3 siee chapter 9 2 Check the oil level when the compressor is running Stop the compressor package under full load see chapter 8 4 Lock the main...

Page 48: ...imum indicator level See chapter 1 7 for the oil volume needed to increase the indicated level from minimum to maximum Check the sealing ring of the filler plug 4 for damage and then replace the fille...

Page 49: ...air oil flow through the hose end will result in a whipping action which could cause severe injury or death If the compressor package operates in ambient temperatures close to the maximum ambi ent te...

Page 50: ...Insert the maintenance hose ball valve closed in the hose coupling 3 on the oil separator tank 5 Connect the maintenance hose to external pressure source Pressurize the oil separa tor tank 5 by slowl...

Page 51: ...9 4 Remove the maintenance hose from the hose coupling 5 chapter 9 4 on the oil cooler Dispose of the used oil according to environmental regulations Open the ball valve 1 9 12 2 Oil top off Before o...

Page 52: ...t tag out procedures example OSHA CFR 29 1910 147 to ensure the compressor does not restart Open the cover panel 2 and 3 see chapter 9 2 Check the actual pressure on the pressure gauge 2 Open the shut...

Page 53: ...with the oil or when the relevant service message alarm message is displayed on SIGMA CONTROL see chapter 8 1 Stop the compressor package under full load see chapter 8 4 Lock the main disconnect in th...

Page 54: ...own the cover plate 14 and carefully remove the cover plate Remove the old oil separator cartridge 23 with gaskets 21 When cleaning the sealing surfaces take care that no particles fall into the oil s...

Page 55: ...hapter 1 1 shut down the compressor package see chapter 8 4 and lock the main disconnect in the off position in accordance with applicable lock out tag out procedures example OSHA CFR 29 1910 147 to e...

Page 56: ...Maintenance 9 51 9 14 Maintenance Schedule Model No Serial No Date Description of work Operating hours Signature...

Page 57: ...1 2 1 1 6 3571 0 Important for spare parts orders Enter the data on the compressor name plate in the name plate shown above Always quote the data on the name plate when ordering spare parts Always or...

Page 58: ...Appendix 11 53 11 Appendix 11 1 Wiring Diagram...

Page 59: ......

Page 60: ......

Page 61: ......

Page 62: ......

Page 63: ......

Page 64: ......

Page 65: ......

Page 66: ......

Page 67: ......

Page 68: ......

Page 69: ......

Page 70: ......

Page 71: ......

Page 72: ......

Page 73: ......

Page 74: ......

Page 75: ......

Page 76: ......

Page 77: ...Appendix 11 72 11 2 Maintenance Schedule Model No Serial No Date Description of work Operating hours Signature...

Page 78: ...tercooler are clogged Clean with compressed air water or steam injector See chapter 9 4 On water cooled units the heat ex changer elements may be clogged Inspect heat exchanger elements Clean or repla...

Page 79: ...ing but produces no pressure Possible cause Remedy Airend rotates in wrong direction Reverse motor polarity Inlet valve does not open or opens only partially Check the inlet valve control valve and li...

Page 80: ...lators 11 3 6 Safety relief valve blows off Possible cause Remedy System does not discharge at idle Make sure ball valve in vent line is open Check the control lines inlet valve and combined control v...

Page 81: ...il types not listed Oil separator cartridge has ruptured Check pressure differential and re place oil separator cartridge if neces sary Oil separator cartridge mountings are loose Tighten mounting bol...

Reviews: