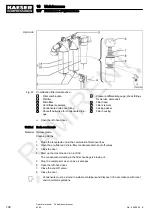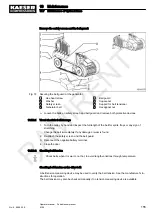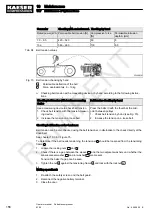
2. Turn the nut
12
by hand until there is no gap between the sleeve
11
and spherical seat wash‐
er
10
and/or washer
20
.
3. Lock the nut
19
with the nut
12
.
4. Tighten the nut
8
against the side of the tensioning frame
4
. The conical seat washer
9
and
the spherical seat washer
23
must lay in the tensioning frame.
5. Lock the nut
24
with the nut
8
.
Making operational:
1. Re-attach the safety screen and the belt guard.
2. Reconnect the negative battery terminal.
3. Close the door.
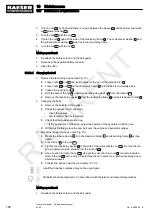
10.7.8.4 Changing the belt
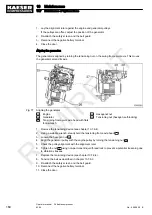
1. Remove the tensioning device (see Fig. 75).
■ Loosen nuts
24
and
8
and lock together at the end of the threaded rod
7
.
■ Loosen nuts
19
and
12
on the tensioning frame
4
until the belt is completely slack.
■ Loosen the locking nut
18
.
■ With the help of the nut
6
, unscrew the tensioning device
8
from the locknut
15
.
■ Remove the tensioning device
6
from the tensioning frame
4
and belt tensioner holder
5
.
2. Changing the belts
■ Remove the belts from the pulleys.
■ Check the pulleys for dirt and wear.
─ Clean the pulleys.
─ Slitt remskive: Skift ut remskiven.
■ Check that the pulleys are lined up.
─ If the pulleys are not lined up, adjust the position of the generator until they are.
■ Without using force, place the new belt over the engine and generator pulleys.
3. Mount the tensioning device (see Fig. 75).
■ Mount the tension device
6
in in the tensioner holder
5
and tensioning frame
4
as illus‐
trated.
■ Lock the nut
8
to the nut
24
.
■ Tighten the tensioning device
6
to the side of the motor with the nut
15
. For this, the ten‐
sioning device must be screwed into the locknut
15
.
■ Use a wrench to fixate the nut
18
. Use another wrench to turn nut
8
counter-clockwise.
Secure the nut
18
with a drop of liquid thread lock to prevent a potential loosening due to
vibration stresses.
■ Tension the belt as described in chapter 10.7.8.3.
A belt that has been replaced may not be used again.
Old belts should be disposed of in accordance with the latest environmental regulations.
Making operational:
1. Re-attach the safety screen and the belt guard.
10 Maintenance
10.7 Maintenance of Optional Items
158
Operator manual Portable compressor
M 64
No.: 9_5898 26 E
RAMIRENT

