background image

In frequency-controlled compressors (SFC) the oil level indicator is only accurate when the

machine is running at or near maximum speed.

The lower the pressure at the compressed air outlet, the higher the speed.

Precondition The machine has been running at least 5 minutes under LOAD.

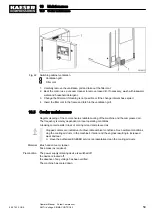
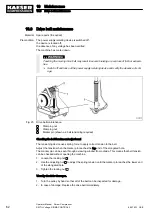
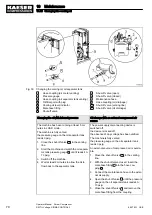
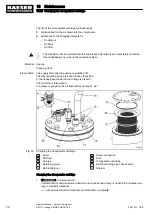
Fig. 27 Checking the cooling oil level

1

Minimum oil level

2

Maximum oil level

3

Optimum oil level

➤ Check the oil level with machine running under LOAD.

Result As soon as the minimum level is reached: Replenish the cooling oil.

10.14  Venting the machine (de-pressurizing)

Venting takes place in three stages:
■ Isolate the compressor from the air system.
■ Vent the oil separator tank.
■ Manually vent the air cooler.

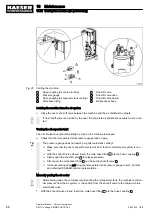
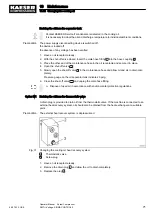
The machine must be isolated from the compressed air network and completely vented be‐

fore undertaking any work on the pressure system.

Material The maintenance hose with hose coupling and shut-off valve needed for venting is stowed beneath

the oil separator tank.

Precondition The power supply disconnecting device is switched off,

The device is locked off,

A check has been made that no voltage is present.

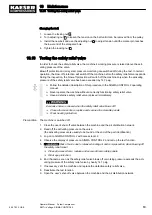
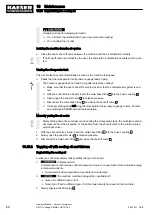
Escaping oil mist is damaging to health.
➤ Do not direct the maintenance hose at persons while venting.
➤ Do not inhale the oil mist.

10 Maintenance

10.14 Venting the machine (de-pressurizing)

9_5875 33  USE

Operator Manual    Screw Compressor  
SM Tri-Voltage, SIGMA CONTROL 2

65

Summary of Contents for SM 7.5

Page 1: ...rator Manual Screw Compressor SM Tri Voltage SIGMA CONTROL 2 9_5875 33 USE Manufacturer KAESER KOMPRESSOREN SE 96410 Coburg PO Box 2143 GERMANY Tel 49 0 9561 6400 Fax 49 0 9561 640130 http www kaeser...

Page 2: ...Original instructions KKW SSM 2 13 en Z1 SBA SCHRAUBEN TRI VOLTAGE SC KKW SSC 2 05 Z1 20151229 083400...

Page 3: ...instructions 12 3 2 Specified use 12 3 3 Improper use 12 3 4 User s Responsibilities 12 3 4 1 Observe statutory and universally accepted regulations 12 3 4 2 Qualified personnel 13 3 4 3 Adherence to...

Page 4: ...uring safety 40 7 2 Instructions to be observed before commissioning or re commissioning 41 7 3 Checking installation and operating conditions 41 7 4 Setting the overload protection relay 42 7 5 Pouri...

Page 5: ...ping off with cooling oil and trial run 68 10 16 Changing the cooling oil 69 10 17 Changing the oil filter 72 10 18 Changing the oil separator cartridge 73 10 19 Documenting maintenance and service wo...

Page 6: ...Contents iv Operator Manual Screw Compressor SM Tri Voltage SIGMA CONTROL 2 9_5875 33 USE...

Page 7: ...Switching on and off from a remote control center 49 Fig 19 Using the timer for switching on and off 50 Fig 20 Acknowledging messages 51 Fig 21 Filter mat for the air and oil cooler 58 Fig 22 Switchi...

Page 8: ...List of Illustrations vi Operator Manual Screw Compressor SM Tri Voltage SIGMA CONTROL 2 9_5875 33 USE...

Page 9: ...21 Safety signs 19 Tab 22 Energy saving control modes 26 Tab 23 Keys 27 Tab 24 Indicators 28 Tab 25 RFID sensor field 29 Tab 26 Voltage selection 38 Tab 27 Overload protection cutout settings 38 Tab 2...

Page 10: ...List of Tables viii Operator Manual Screw Compressor SM Tri Voltage SIGMA CONTROL 2 9_5875 33 USE...

Page 11: ...when ordering documents 1 3 Copyright This service manual is copyright protected Queries regarding use or duplication of the documenta tion should be referred to KAESER Correct use of information wil...

Page 12: ...shown here 2 Always read and comply with warning instructions 1 4 2 Potential damage warnings Contrary to the warnings shown above damage warnings do not indicate a potential personal in jury Warning...

Page 13: ...elating to one option only are marked with an option code e g H1 indicates that this section applies only to machines with machine mountings Option codes used in this oper ator manual are explained in...

Page 14: ...g cfm Voltage Hz RPM Package FLA Phase HP Wiring Diagram FOR SERVICE REFER TO EQUIPMENT NUMBER Tab 3 Nameplate 2 2 Options The table contains a list of possible options Enter options here as a referen...

Page 15: ...00 Maximum airend dis charge temp automatic shut down F 230 230 230 Tab 6 Temperature 2 5 Ambient conditions SM 7 5 SM 10 SM 15 Maximum elevation amsl ft 3000 3000 3000 Permissible ambient tem peratur...

Page 16: ...tilation with exhaust fan Flow rate cfm at 0 0145 psi 1530 1825 2178 Tab 8 Overview Ventilation 2 7 Pressure Maximum working pressure see nameplate Safety relief valve activating pressure psig Maximum...

Page 17: ...the heat pressure and contaminants that are present in every air compressor 2 9 2 KAESER Lubricants KAESER synthetic lubricants should be stored in a protected location to prevent contamination Do no...

Page 18: ...ys between 70 F and 105 F FG 460 synthetic hydrocarbon based food grade lubricant is designed for use in rotary screw compressors in the application where incidental food contact may occur with the di...

Page 19: ...specified alternatives the limits given in these standards must be adhered to Consult manufacturer for any other specific power supply The incoming line within the control panel should be as short as...

Page 20: ...10 14 220 3 310 15 Table 310 16 430 6 430 22 430 24 and other local codes Dual element time delay fuses are selected according to 2014 NEC 240 6 430 52 and ta bles 430 52 430 248 and 430 250 We strong...

Page 21: ...its required flow rate depend on the type of heat exchanger used Maximum permissible pressure loss in the cooling air circuit 8 7 psig Maximum heat capacity available SM 7 5 SM 10 SM 15 kW 4 2 6 2 8...

Page 22: ...d ambient condi tions Do not use compressed air for breathing purposes unless it is specifically treated Do not use compressed air for any application that will bring it into direct contact with food...

Page 23: ...nd take appropriate measures to safeguard persons and property have received adequate training and authorization for the safe installation and maintenance on this equipment Additional qualifications f...

Page 24: ...r can flow back into the machine Depressurize all pressurized components and enclosures Do not carry out welding heat treatment or mechanical modifications on pressurized compo nents e g pipes and ves...

Page 25: ...s can cause adverse health effects Suitable safety meas ures must be taken in order to prevent injuries Strictly forbid fire open flame and smoking Follow safety regulations when dealing with oils lub...

Page 26: ...boots Eye protection Ear protection Transporting The weight and size of the machine require safety measures during its transport to prevent acci dents Use suitable lifting gear that conforms to local...

Page 27: ...tricity pressure and temperature Careless actions can cause accidents with severe ad verse effects for your health Allow maintenance work to be carried out only by authorized personnel Wear close fitt...

Page 28: ...ed personnel Transport Within a 10 ft radius of the machine Installation personnel for transport preparation No personnel during transport Beneath the lifted machine No personnel Installation Within t...

Page 29: ...be replaced by an authorized KAESER service representative after a working life of 20 years 2 Have an authorized KAESER service representative check the reliability of the safety func tions 3 8 Safet...

Page 30: ...dards if used for breathing or food processing Use proper compressed air treatment 13 Hot surface can cause burns Let the machine cool down Work carefully Wear long sleeved garments not synthetics suc...

Page 31: ...nel to safety Help incapacitated persons Close the doors When trained accordingly Attempt to extinguish the fire Extinguishing substances Suitable extinguishing media Foam Carbon dioxide Sand or soil...

Page 32: ...addition we accept no warranty obligation for the use of unsuitable parts or operating materials unauthorized modifications incorrect maintenance incorrect repair Correct maintenance and repair inclu...

Page 33: ...nents Cooling air flow The enclosure is not suitable for the following uses Walking on standing or sitting on As resting place or storage of any kind of load Safe and reliable operation is only assure...

Page 34: ...f injection Pressure with in the machine keeps the oil circulating A separate pump is not necessary A thermostatic valve maintains optimum cooling oil temperature Compressed air freed of cooling oil i...

Page 35: ...h ON The ON LED lights green The drive motor is stopped The inlet valve is closed The minimum pressure check valve isolates the oil separator tank from the air system The venting valve is open The com...

Page 36: ...or several machines supplying similar volumes VARIO Machine for peak load in a compressed air station DUAL Machine for intermediate load in a compressed air station VARIO Machine for basic load in a...

Page 37: ...machine transports compressed air into the air network LOAD The load and power consumption of the drive motor rises and falls with the air demand 4 5 Operating panel SIGMA CONTROL 2 Keys Fig 7 Keys ov...

Page 38: ...en the LOAD and IDLE operating modes 12 Remote control Switches the remote control on and off 13 Timer control Switches clock control timer on and off Tab 23 Keys Indicators Fig 8 Indicators overview...

Page 39: ...r Radio Frequency Identification and enables the identification of per sons or objects Placing a suitable transponder in front of the RFID sensor field of the controller will automatically activate th...

Page 40: ...alve of the heat recovery system opens first so that surplus heat is released into the heat recovery system If the heat recovery system cannot carry away enough heat the thermo static valve of the mac...

Page 41: ...he machine Consult an authorized KAESER service representative on components and layout to en sure proper functioning of the cooling and heat recovery systems 4 Design and Function 4 7 Options 9_5875...

Page 42: ...suitable fire extinguishing agents ready for use Ensure that required ambient conditions are maintained Required ambient conditions may be Maintain ambient temperature and humidity Ensure the appropr...

Page 43: ...unlight dust and rain 5 2 2 Ensuring the machine room ventilation Adequate ventilation of the machine room does several tasks It prevents subatmospheric pressure in the machine room It evacuates the e...

Page 44: ...essor drive motor speeds Further information Further information on the design of exhaust air ducts can be found in chapter 13 3 5 3 Operating the machine in a compressed air system When the machine i...

Page 45: ...olled release of this energy can cause serious injury or death The following safety concerns relate to any work on components that could be under pressure Close shut off valves or otherwise isolate th...

Page 46: ...anced by bracing 1 Serious injury or death can result from loosening or opening components under pressure Vent all pressurized components and chambers completely 2 A shut off valve must be installed b...

Page 47: ...is is a Tri Voltage machine The machine can be set up to one of the following supply voltages 208V 230V 460V Precondition The power supply disconnecting device is switched off The disconnecting device...

Page 48: ...Material The required jumpers also known as bridges or links are provided in the control cabinet Precondition A check has been made to ensure no voltage is present Changing the drive motor connection...

Page 49: ...e control cabinet and connect the transformer in accordance with the electrical dia gram 6 6 Options 6 6 1 Option H1 Anchoring the machine Use appropriate fixing bolts to anchor the machine Further in...

Page 50: ...rgy Uncontrolled release of this energy can cause serious injury or death The following safety concerns relate to any work on components that could be under pressure Close shut off valves or otherwise...

Page 51: ...Confirmed Are the operators completely familiar with safety regulations Have all the positioning conditions been fulfilled 5 Is a user s lockable power supply disconnecting device installed 6 5 Are th...

Page 52: ...the overload protection relay setting The overload protection relay shuts the machine down despite being correctly set Contact an authorized KAESER service representative 7 5 Pouring cooling oil into...

Page 53: ...deactivate the MODULATING control If the MODULATING control is deactivated the machine always delivers the maximum possible compressed air quantity in LOAD mode MODULATING control Shut off valve Swit...

Page 54: ...the green Controller on LED is lit continuously 3 If required Change the display language as described in chapter 7 10 4 Press the ON key The compressor motor runs up and after a short time the machi...

Page 55: ...ch stops the machine as soon as a door or access panel is opened Check the interlock switch function on commissioning The door interlock switch is an important safety device The machine may only be op...

Page 56: ...xxxxxxxx Submenu 3 xxxxxxxxxx Submenu 4 xxxxxxxxxx Submenu 5 xxxxxxxxxx Submenu 6 xxxxxxxxxx Submenu 3 Use the Return key to switch to setting mode The language display flashes 4 Move to the required...

Page 57: ...reen 2 Press the ON key The ON LED lights green If a power failure occurs the machine is not prevented from restarting automatically when power is resumed It can restart automatically as soon as power...

Page 58: ...RGENCY STOP push button Result The EMERGENCY STOP push button remains latched after actuation The compressor s pressure system is vented and the machine is prevented from automatically re starting Swi...

Page 59: ...l the starting device in the remote control center as follows Remote control Risk of injury caused by unexpected starting Before starting make sure that no one is working on the machine and that it ca...

Page 60: ...n messages The controller will automatically display operation messages informing you about the current opera tional state of the machine Operating messages are identified with the letter O Further in...

Page 61: ...ssage Further information Please refer to the SIGMA CONTROL 2 operating manual for a list of possible fault messages dur ing operation Warning message If maintenance work is to be carried out or if a...

Page 62: ...ormer not wired Connect control transformer in accordance with the electrical diagram Machine with refrigeration dry er Connect dryer transformer in accordance with the electrical diagram Machine runs...

Page 63: ...l leaking into the floor pan Hose coupling or maintenance hose still plugged into the quick release coupling on the oil separator tank Remove coupling or mainte nance hose Oil cooler leaking Call auth...

Page 64: ...in electric shocks burns or death Work on electrical equipment may only be carried out by authorized electricians Switch off and lock out the power supply disconnecting device and verify the absence...

Page 65: ...oad Adjust the maintenance intervals with regard to local installation and operating condi tions Document all maintenance and service work This enables the frequency of individual maintenance tasks an...

Page 66: ...filter 10 17 Change the oil separator cartridge 10 18 Variable see table 37 Change the cooling oil 10 16 up to 12000 h Replace the drive belt 10 9 Annually Check the safety relief valve 10 10 Check t...

Page 67: ...r service tasks The table below lists service tasks required Only an authorized KAESER service representative should carry out service work Have service tasks carried out punctually taking ambient and...

Page 68: ...he filter mat in the retaining frame 10 4 Control cabinet Clean or renew the filter mat A filter mat is placed behind every ventilation grill Filter mats protect the control cabinet from in gress of d...

Page 69: ...The frequency is mainly dependent on local operating conditions A leaking cooler results in loss of cooling oil and compressed air Clogged coolers are indicative of unfavorable ambient conditions Such...

Page 70: ...horized KAESER service representative Checking the cooler for leaks Visual inspection Did cooling oil escape Is a cooler leaking Have the defective cooler repaired immediately by an authorized KAESER...

Page 71: ...ltage is present The machine has cooled down Fig 24 Air filter maintenance 1 Snap fastener 2 Air filter element 3 Air filter housing 1 Release the spring clips and remove the element 2 Clean all parts...

Page 72: ...ent The tensioning device uses spring force to apply correct tension to the belt Adjust the tension when the marker pin reaches the top end of the elongated hole The marker pin can be seen through a v...

Page 73: ...replaced immediately Excessive noise is caused when the safety relief valve blows off Close all access doors replace and secure all removable panels Wear hearing protection Precondition The machine is...

Page 74: ...ompressor motor does not stop The safety function of the EMERGENCY STOP push button is no longer ensured Shut down the machine immediately and call an authorized KAESER service representa tive 2 Turn...

Page 75: ...tages Isolate the compressor from the air system Vent the oil separator tank Manually vent the air cooler The machine must be isolated from the compressed air network and completely vented be fore und...

Page 76: ...ure that the user s shut off valve is closed or that the complete air system is ven ted With the shut off valve closed insert the male hose fitting 6 into the hose coupling 3 Slowly open the shut off...

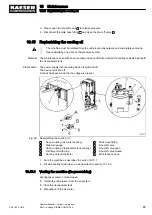
Page 77: ...voltage is present Fig 29 Replenishing the cooling oil 1 Hose coupling air cooler venting 2 Pressure gauge 3 Hose coupling oil separator tank venting 4 Oil filler port with plug 5 Cooling oil level i...

Page 78: ...ontact an authorized KAESER service representative Manually venting the air cooler After shutting down the compressor and venting the oil separator tank the machine is still un der pressure from the a...

Page 79: ...oil separator cartridge when changing the oil Compressed air helps to expel the oil This compressed air can be taken either from the compres sor itself or from an external source An external source o...

Page 80: ...epara tor tank pressure gauge 2 until it reads 43 73 psig 3 Switch off the machine 4 Wait at least 2 minutes to allow the oil to flow back to the separator tank The power supply disconnecting device i...

Page 81: ...rain com pletely Pressure gauge on the oil separator tank indicates 0 psig 6 Close the shut off valve 11 and unplug the male hose fitting Dispose of used oil in accordance with environmental protectio...

Page 82: ...intenance interval counter 4 Start the machine and check the oil level again after about 10 minutes topping off if necessary 5 Switch off the machine and check for leaks 10 17 Changing the oil filter...

Page 83: ...s contaminated with oil in accordance with environmental protection regulations Starting the machine and carrying out a trial run 1 Close all access doors replace and secure all removable panels 2 Ope...

Page 84: ...voltage is present The machine is fully vented the pressure gauge on the oil separator tank reads 0 psi Fig 33 Changing the oil separator cartridge 14 Cover 15 Dirt trap 16 Air pipe 17 Retaining scre...

Page 85: ...ll prevents cooling oil being pressed into the separator cartridge 9 Attach the air pipe to the cover 14 with a new self locking nut 10 Replace and tighten all fittings Dispose of parts and materials...

Page 86: ...d service work carried out in the checklist below Date Maintenance task carried out Operating hours Signature Tab 40 Logged maintenance tasks 10 Maintenance 10 19 Documenting maintenance and service w...

Page 87: ...onal injury or damage to the machine resulting from the use of unsuita ble spares or operating fluids materials Use only original KAESER parts and operating fluids materials Have an authorized KAESER...

Page 88: ...given at the end of this manual 11 5 Spare Parts for Service and Repair With the help of this parts list you can plan your material requirement according to operating condi tions and order the spare...

Page 89: ...11 Spares Operating Materials Service 11 5 Spare Parts for Service and Repair 9_5875 33 USE Operator Manual Screw Compressor SM Tri Voltage SIGMA CONTROL 2 79...

Page 90: ...11 Spares Operating Materials Service 11 5 Spare Parts for Service and Repair 80 Operator Manual Screw Compressor SM Tri Voltage SIGMA CONTROL 2 9_5875 33 USE...

Page 91: ...11 Spares Operating Materials Service 11 5 Spare Parts for Service and Repair 9_5875 33 USE Operator Manual Screw Compressor SM Tri Voltage SIGMA CONTROL 2 81...

Page 92: ...letely cool down 2 Disconnect all air and electrical connections 12 2 Packing A wooden crate is required for overland transport to protect the machine from mechanical damage Other measures must be tak...

Page 93: ...in freezing tempera tures Precondition Transport only by forklift truck or lifting gear only by personnel trained in the safe transportation of loads Make sure the danger area is clear of personnel 12...

Page 94: ...t the machine carefully 12 5 Disposal When disposing of a machine drain out all liquids and remove old filters Precondition The machine is decommissioned 1 Completely drain the cooling oil from the ma...

Page 95: ...with local environmental regulations This procedure facilitates the handling and recycling of batteries Fig 36 Battery disposal 1 Do not dispose of batteries with residential waste 2 Battery contains...

Page 96: ...Annex 13 1 Pipeline and instrument flow diagram P I diagram 13 Annex 13 1 Pipeline and instrument flow diagram P I diagram 86 Operator Manual Screw Compressor SM Tri Voltage SIGMA CONTROL 2 9_5875 33...

Page 97: ...13 Annex 13 1 Pipeline and instrument flow diagram P I diagram 9_5875 33 USE Operator Manual Screw Compressor SM Tri Voltage SIGMA CONTROL 2 87...

Page 98: ...13 Annex 13 1 Pipeline and instrument flow diagram P I diagram 88 Operator Manual Screw Compressor SM Tri Voltage SIGMA CONTROL 2 9_5875 33 USE...

Page 99: ...13 Annex 13 1 Pipeline and instrument flow diagram P I diagram 9_5875 33 USE Operator Manual Screw Compressor SM Tri Voltage SIGMA CONTROL 2 89...

Page 100: ...13 Annex 13 1 Pipeline and instrument flow diagram P I diagram 90 Operator Manual Screw Compressor SM Tri Voltage SIGMA CONTROL 2 9_5875 33 USE...

Page 101: ...13 Annex 13 1 Pipeline and instrument flow diagram P I diagram 9_5875 33 USE Operator Manual Screw Compressor SM Tri Voltage SIGMA CONTROL 2 91...

Page 102: ...Instrument Flow Diagram P I diagram MODULATING control mode 13 Annex 13 2 Pipe and Instrument Flow Diagram P I diagram MODULATING control mode 92 Operator Manual Screw Compressor SM Tri Voltage SIGMA...

Page 103: ...13 Annex 13 2 Pipe and Instrument Flow Diagram P I diagram MODULATING control mode 9_5875 33 USE Operator Manual Screw Compressor SM Tri Voltage SIGMA CONTROL 2 93...

Page 104: ...13 Annex 13 2 Pipe and Instrument Flow Diagram P I diagram MODULATING control mode 94 Operator Manual Screw Compressor SM Tri Voltage SIGMA CONTROL 2 9_5875 33 USE...

Page 105: ...13 Annex 13 2 Pipe and Instrument Flow Diagram P I diagram MODULATING control mode 9_5875 33 USE Operator Manual Screw Compressor SM Tri Voltage SIGMA CONTROL 2 95...

Page 106: ...13 Annex 13 2 Pipe and Instrument Flow Diagram P I diagram MODULATING control mode 96 Operator Manual Screw Compressor SM Tri Voltage SIGMA CONTROL 2 9_5875 33 USE...

Page 107: ...13 Annex 13 2 Pipe and Instrument Flow Diagram P I diagram MODULATING control mode 9_5875 33 USE Operator Manual Screw Compressor SM Tri Voltage SIGMA CONTROL 2 97...

Page 108: ...13 3 Dimensional drawing 13 Annex 13 3 Dimensional drawing 98 Operator Manual Screw Compressor SM Tri Voltage SIGMA CONTROL 2 9_5875 33 USE...

Page 109: ...nt related changes Drawing may be altered only via CAD W1 prepared for ext heat recov H1 Machine mountings Air cooling K1 Center of gravity Position marginally dependent on design Transport opening ma...

Page 110: ...me d rfen nur zu dem vereinbarten Zweck angefertigt werden Weder Original noch Vervielf ltigungen d rfen Dritten ausgeh ndigt oder in sonstiger Weise zug nglich gemacht werden Entwicklungsbedingte nde...

Page 111: ...13 4 Electrical Diagram 13 Annex 13 4 Electrical Diagram 9_5875 33 USE Operator Manual Screw Compressor SM Tri Voltage SIGMA CONTROL 2 101...

Page 112: ...13 Annex 13 4 Electrical Diagram 102 Operator Manual Screw Compressor SM Tri Voltage SIGMA CONTROL 2 9_5875 33 USE...

Page 113: ...13 Annex 13 4 Electrical Diagram 9_5875 33 USE Operator Manual Screw Compressor SM Tri Voltage SIGMA CONTROL 2 103...

Page 114: ...13 Annex 13 4 Electrical Diagram 104 Operator Manual Screw Compressor SM Tri Voltage SIGMA CONTROL 2 9_5875 33 USE...

Page 115: ...13 Annex 13 4 Electrical Diagram 9_5875 33 USE Operator Manual Screw Compressor SM Tri Voltage SIGMA CONTROL 2 105...

Page 116: ...13 Annex 13 4 Electrical Diagram 106 Operator Manual Screw Compressor SM Tri Voltage SIGMA CONTROL 2 9_5875 33 USE...

Page 117: ...13 Annex 13 4 Electrical Diagram 9_5875 33 USE Operator Manual Screw Compressor SM Tri Voltage SIGMA CONTROL 2 107...

Page 118: ...13 Annex 13 4 Electrical Diagram 108 Operator Manual Screw Compressor SM Tri Voltage SIGMA CONTROL 2 9_5875 33 USE...

Page 119: ...13 Annex 13 4 Electrical Diagram 9_5875 33 USE Operator Manual Screw Compressor SM Tri Voltage SIGMA CONTROL 2 109...

Page 120: ...13 Annex 13 4 Electrical Diagram 110 Operator Manual Screw Compressor SM Tri Voltage SIGMA CONTROL 2 9_5875 33 USE...

Page 121: ...13 Annex 13 4 Electrical Diagram 9_5875 33 USE Operator Manual Screw Compressor SM Tri Voltage SIGMA CONTROL 2 111...

Page 122: ...13 Annex 13 4 Electrical Diagram 112 Operator Manual Screw Compressor SM Tri Voltage SIGMA CONTROL 2 9_5875 33 USE...

Page 123: ...13 Annex 13 4 Electrical Diagram 9_5875 33 USE Operator Manual Screw Compressor SM Tri Voltage SIGMA CONTROL 2 113...

Page 124: ...13 Annex 13 4 Electrical Diagram 114 Operator Manual Screw Compressor SM Tri Voltage SIGMA CONTROL 2 9_5875 33 USE...

Page 125: ...13 Annex 13 4 Electrical Diagram 9_5875 33 USE Operator Manual Screw Compressor SM Tri Voltage SIGMA CONTROL 2 115...

Page 126: ...13 Annex 13 4 Electrical Diagram 116 Operator Manual Screw Compressor SM Tri Voltage SIGMA CONTROL 2 9_5875 33 USE...

Page 127: ...13 Annex 13 4 Electrical Diagram 9_5875 33 USE Operator Manual Screw Compressor SM Tri Voltage SIGMA CONTROL 2 117...

Page 128: ...13 Annex 13 4 Electrical Diagram 118 Operator Manual Screw Compressor SM Tri Voltage SIGMA CONTROL 2 9_5875 33 USE...

Reviews: