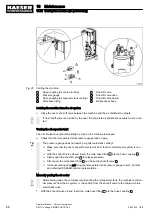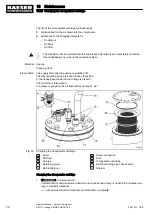
2. Unscrew the fitting
20
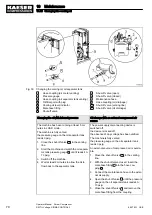
and carefully put the parts to one side, then pull out the copper pipe at
item
15
.
3. Unscrew the nut
19
and turn the air pipe
16
to one side.
4. Remove the cover fixing screws
17
and carefully remove the cover
14
.
5. Take out the old oil separator cartridge
23
together with the gaskets
21
and dispose of ac‐
cording to environmental protection regulations.
6. Clean all sealing faces.
7. Insert the new oil separator cartridge with gaskets and refix the cover.
8. Renew the O-ring and strainer in the dirt trap
15
.
➤ Make sure the ball
30
is properly seated.
The ball prevents cooling oil being pressed into the separator cartridge.
9. Attach the air pipe to the cover
14
with a new, self-locking nut.
10. Replace and tighten all fittings.
➤ Dispose of parts and materials contaminated with oil in accordance with environmental
protection regulations.
Start the machine and carry out a trial run
1. Close all access doors, replace and secure all removable panels.
2. Open the user's shut-off valve between the machine and the air distribution network.
3. Switch on the power supply and reset the maintenance interval counter.
4. After approx. 10 minutes of operation: Switch off the machine and check visually for leaks.
10 Maintenance
10.18 Changing the oil separator cartridge
9_5875 33 USE
Operator Manual Screw Compressor
SM Tri-Voltage, SIGMA CONTROL 2
75


