Initial Start
7 --- 24
7.7
Measures to be taken before Initial Start
Follow the procedure detailed bellow before initial start, after an oil change or if the com-
pressor has not been operated for a period of three months or longer before starting the
compressor:
7.7.1
Pour a small quantity of oil into the air inlet port
Lock the main disconnect in the ”off” position in accordance with ap-
plicable lock out/tag out procedures (example: OSHA CFR 29
§ 1910.147) to ensure the compressor does not restart.
Do not add oil unless the compressor package is completely vented.
See chapter 9.10 to vent the compressor.
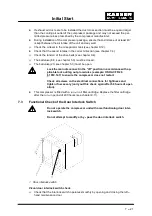
To pour in the oil, unscrew the filler plug (1) on the inlet valve (2) and then pour the
prescribed quantity of oil (see chapter 1.7) into the airend.
Manually rotate the airend in a counter clockwise direction with the drive belts.
Screw the filler plug (1) back in.
This oil must be of the same type as the oil used to operate the com-
pressor (see label near the oil filler plug on the oil separator tank).
If no additional oil is available, remove required amount of oil from the
oil separator tank. See chapter 9.14 for this procedure.
If the compressor unit was at standstill for more than 12 months, addi-
tional precautionary steps have to be taken before putting the unit
back into operation. In this case consult the manufacturer.
Open the isolation shut ---off valve between the compressor and the compressed air
system.
2
1
1 Filler plug
2 Inlet valve
7.7.2
Running the compressor in idle
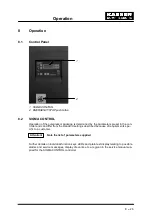
At initial start run the compressor package in idle for 20 seconds by pressing the load/idle
key (5, see chapter 8.2.1).
This measure ensures that the compressor package has sufficient time to flood the oil cir-
culation.
If a power failure occurs, the compressor package will start again
automatically (normal setting) when the power is restored provided the
system pressure is lower than the cut-- in pressure entered in the
SIGMA CONTROL.
Attention!
Summary of Contents for SM 8
Page 9: ...Technical Specification 1 6...
Page 16: ...Construction and Operation 5 13...
Page 17: ...Construction and Operation 5 14...
Page 54: ...Appendix 11 51 11 Appendix 11 1 Wiring Diagram...
Page 55: ......
Page 56: ......
Page 57: ......
Page 58: ......
Page 59: ......
Page 60: ......
Page 61: ......
Page 62: ......
Page 63: ......
Page 64: ......
Page 65: ......
Page 66: ......
Page 67: ......
Page 68: ......
Page 69: ......
Page 74: ...SM 8 SM 11 A 08 B 07 C 14 D 11...
Page 76: ......
Page 78: ......
Page 80: ......
Page 82: ......


