background image

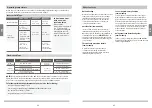
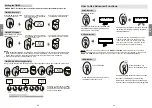
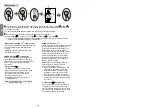
Setting the TIMER

TIMER ON setting

TIMER OFF setting

TIMER ON & OFF setting(example)

TIMER ON/OFF - Set the amount of time after which the unit will automatically turn on/off.

Press TIMER button to initiate

the ON time sequence.

Press Temp. up or down button for

for multiple times to set the desired 

time to turn on the unit.  

Press Temp. up or down button for

for multiple times to set the desired 

time to turn off the unit.  

NOTE:

1. When setting the TIMER ON or TIMER OFF, the time will increase by 30 minutes increments with each

press, up to 10 hours. After 10 hours and up to 24, it will increase in 1 hour increments. (For example,

press 5 times to get 2.5h, and press 10 times to get 5h,) The timer will revert to 0.0 after 24.

2. Cancel either function by setting its timer to 0.0h.

Point remote to unit and wait 1sec, 

the TIMER ON will be activated.

Press TIMER button to initiate 

the OFF time sequence.

Point remote to unit and wait 1sec, 

the TIMER OFF will be activated.

Current

time 1PM

2:00PM

3:00PM

4PM

5PM

6PM

Timer starts 

Unit turns

ON

Unit turns

OFF

2.5 hours later

5 hours later

3:30PM

Example: If current timer is 1:00PM,

to set the timer as above steps, the

unit will turn on 2.5h later (3:30PM)

and turn off at 6:00PM. 

ON/O

FF

M OD

E

FAN

SH

OR

T

CU

T

TIME

R ON

TIME

R OFF

TEM

P

SLEE

P

1

sec

ON/O

FF

M OD

E

FAN

SH

ORT

CU

T

TIME

R ON

TIME

R OFF

TEM

P

SLEE

P

ON/O

FF

M OD

E

FAN

SH

OR T

CU

T

TIME

R ON

TIMER

 OFF

TEM

P

SLEE

P

ON/O

FF

M OD

E

FAN

SH

OR

T

CU

T

TIME

R ON

TIME

R OFF

TEM

P

SLEE

P

1

sec

x5

xn

xn

x10

xn

Keep in mind that the time periods you set for both functions refer to hours after the current time.

TIMER 

TIMER 

TIMER 

TIMER 

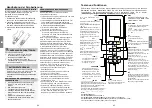
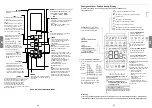
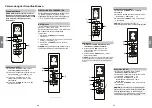
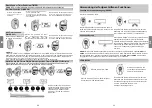
How to Use Advanced Functions

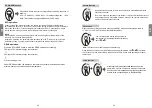
Swing function

Airflow direction

LED DISPLAY

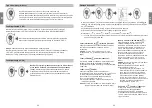
Press Swing button

The horizontal louver will swing up and down 

automatically when pressing Swing button. 

Press again to make it stop.

If continue to press the SWING button, five

different airflow directions can be set. The

louver can be move at a certain range each

time you press the button. 

Press the button 

until the direction you prefer is reached.

NOTE: 

When the unit is off, press and hold 

MODE

 and 

SWING

 buttons together for one second,

the louver will open for a certain angle, which makes it very convenient for cleaning. Press and hold

MODE

 and 

SWING

 buttons together for one second to reset the louver

(Model dependent).

Keep pressing this button more than 2 seconds, 

the vertical louver swing function is activated. 

(Model dependent)

2s

Keep pressing this button more than 5 seconds, 
the indoor unit will display the actual room 
temperature. Press more than 5 seconds again 
will revert back to display the setting temperature.

Press this button to turn on and turn off 
the display on the indoor unit.

5s

Press LED button

Press this button more 

than 5 seconds(some units)

Swing

LED

LED

Swing

Swing

EN

EN

60

61

Summary of Contents for KCD-24

Page 1: ...INSTRUKCJAOBSŁUGI OWNER SMANUAL BEDIENUNGSANLEITUNG KLIMATYZATOR KASETONOWY SUPER SLIM SUPER SLIM CASSETTE AIR CONDITIONER KASSETTEN KLIMAANLAGE SUPER SLIM PL EN DE ...

Page 2: ... PILOT ZDALNEGO STEROWANIA 20 ZESTAW SMART AC 38 OWNER SMANUAL SUPER SLIM CASSETTE AIR CONDITIONER 36 AIR CONDITIONER REMOTE CONTROLLER 51 SMART AC KIT 83 BEDIENUNGSANLEITUNG KASSETTEN KLIMAANLAGE SUPER SLIM 66 FERNBEDIENUNG 81 SMART AC 128 5 36 66 PL EN DE ...

Page 3: ...a zapewnienia prawidłowej obsługi zapoznaj się z instrukcją i przechowuj ją do wykorzystania w przyszłości W przypadku zagubienia instrukcji obsługi skontaktuj się z lokalnym dystrybutorem lub odwiedź stronę www kaisai com lub prześlij wiadomość email na adres handlowy kaisai com w celu uzyskania wersji elektronicznej instrukcji ...

Page 4: ...ażenia prądem pożaru lub obrażeń należy skontaktować się ze sprzedawcą w celu uzyskania instrukcji Nie wolno wkładać palców prętów ani innych przedmiotów do wlotu lub wylotu powietrza Może to spowodować obrażenia ponieważ wentylator może obracać się z dużą prędkością W pobliżu urządzenia nie wolno używać łatwopalnych sprayów takich jak lakiery do włosów lakiery lub farby Może to spowodować pożar l...

Page 5: ...ć zasilanie Nieprzestrzeganie tego zalecenia może spowodować porażenie prądem elektrycznym Nie należy czyścić klimatyzatora nadmierną ilością wody Nie należy czyścić klimatyzatora za pomocą łatwopalnych środków czyszczących Łatwopalne środki OSTRZEŻENIA DOTYCZĄCE CZYSZCZENIA I KONSERWACJI 1 To urządzenie klimatyzacyjne zawiera fluorowane gazy cieplarniane Szczegółowe informacje na temat rodzaju ga...

Page 6: ...Prawidłowa utylizacja tego produktu zużyty sprzęt elektryczny i elektroniczny To urządzenie zawiera czynnik chłodniczy i inne potencjalnie niebezpieczne materiały W przypadku utylizacji tego urządzenia prawo wymaga specjalnej zbiórki i utylizacji Nie należy usuwać tego produktu jako odpadu z gospodarstwa domowego lub niesortowanych odpadów komunalnych Przy utylizacji tego urządzenia masz następują...

Page 7: ...ator jest używany poza poniższymi zakresami temperatur pewne funkcje zabezpieczające mogą zostać aktywowane i spowodować wyłączenie urządzenia Inwerter typu Split Tryb CHŁODZENIA Tryb OGRZEWANIA Tryb OSUSZANIA Temperatura pokojowa 16 C 32 C 60 F 90 F 0 C 30 C 32 F 86 F 10 C 32 C 50 F 90 F Temperatura zewnętrzna 18 C 43 C 64 F 109 F 7 C 24 C 19 F 75 F 11 C 43 C 52 F 109 F 7 C 43 C 19 F 109 F Dla mo...

Page 8: ...zez certyfikowanego technika OSTRZEŻENIE NIE WOLNO WYJMOWAĆ ANI CZYŚCIĆ FILTRA SAMODZIELNIE Pielęgnacja i konserwacja Czyszczenie urządzenia wewnętrznego Czyszczenie filtra powietrza Zatkany klimatyzator może zmniejszyć wydajność chłodzenia urządzenia a także może być szkodliwy dla zdrowia Należy pamiętać by czyścić filtr raz na dwa tygodnie 1 Wyjąć filtr powietrza 2 Wyczyść filtr powietrza odkurz...

Page 9: ...nik Tylko wentylator temperatura zewnętrzna jest zbyt niska i włącza się ochrona przeciwzamrożeniowa urządzenia w celu odszronienia urządzenia Urządzenie przechodzi z trybu chłodzenia ogrzewania do trybu wentylatora Urządzenie może zmienić swoje ustawienie aby zapobiec tworzeniu się szronu na urządzeniu Gdy temperatura wzrośnie urządzenie ponownie zacznie pracować w poprzednio wybranym trybie Po o...

Page 10: ... lub długotrwałym użytkowaniem Sprawdzić szczelność w razie potrzeby ponownie uszczelnić i uzupełnić czynnik chłodniczy UWAGA Jeśli po wykonaniu powyższych czynności kontrolnych i diagnostycznych problem nadal występuje należy natychmiast wyłączyć urządzenie i skontaktować się z autoryzowanym serwisem Problem Możliwe przyczyny Rozwiązanie Urządzenie nie działa Awaria zasilania Poczekaj na przywróc...

Page 11: ... Przyciski funkcji 3 Obsługa pilota zdalnego sterowania 4 Wskaźniki na ekranie monitora LCD zdalnego sterowania 5 Sposób korzystania z funkcji podstawowych 6 Sposób korzystania z funkcji zaawansowanych 13 Spis treści Dane techniczne pilota zdalnego sterowania 22 Obsługa pilota zdalnego sterowania 23 Przyciski i funkcje 24 Wskaźniki na wyświetlaczu pilota 26 Sposób korzystania z funkcji podstawowyc...

Page 12: ...aterii 3 Wsuń pokrywę baterii z powrotem na miejsce UWAGI DOTYCZĄCE BATERII Aby uzyskać optymalną wydajność pracy Nie mieszać starych i nowych baterii lub baterii różnych typów Nie zostawiać baterii w pilocie jeśli urządzenie nie będzie używane przez okres dłuższy niż 2 miesiące UTYLIZACJA BATERII Nie wolno wyrzucać baterii wraz z niesortowanymi odpadami komunalnymi Zapoznać się z lokalnymi przepi...

Page 13: ...wnia komfortowe i ciche otoczenie Model RG10A2 B2S BGEFU1 RG10A10 B2S BGEF 20 28 C 68 82 F RG10A B2S BGEF RG10A B2S BGEFU1 Funkcja Fresh jest niedostępna RG10A2 B2S BGCEFU1 RG10A2 B2S BGCEF Modele tylko z funkcją chłodzenia COOL funkcje AUTO i ogrzewanie HEAT są niedostępne TURBO Model RG10A2 F2S H2S G2S BGEFU1 RG10A10 F2S G2S H2S BGEF 20 28 C 68 82 F RG10A F2S H2S G2S BGEF RG10A F2S H2S G2S BGEFU...

Page 14: ...nie zegara w przypadku korzystania z funkcji włączenia wyłączenia zegara TIMER ON OFF Zakres temperatur 16 30 C 60 86 F 20 28 C 68 82 F Zależnie od modelu Zakres ustawienia zegara 0 24 godziny Zakres ustawienia prędkości wentylatora AU 100 W przypadku pracy w trybie wentylatora FAN wyświetlacz pozostaje pusty Uwaga Wszystkie przedstawione na rysunku wskaźniki służą wyłączenie do celów prezentacji ...

Page 15: ...zycisk TIMER aby aktywować zegar włączenia Naciśnij kilkakrotnie przycisk Temp strzałka w górę lub w dół aby ustawić żądany czas do włączenia urządzenia Skieruj pilot na jednostkę i odczekaj 1 sekundę zegar włączenia TIMER ON zostanie aktywowany Funkcja zegara wyłączenia TIMER OFF Naciśnij przycisk TIMER aby aktywować zegar wyłączenia Naciśnij kilkakrotnie przycisk Temp strzałka w górę lub w dół a...

Page 16: ... temperatury pokojowej na jednostce wewnętrznej Ponowne naciśnięcie przez ponad 5 sekund spowoduje powrót do wyświetlania temperatury zadanej Funkcja ECO GEAR Naciśnij przycisk X ECO aby wejść w tryb oszczędzania energii w następującej kolejności ECO GEAR 75 GEAR 50 Poprzedni tryb ECO Uwaga Funkcja ta jest dostępna wyłącznie w trybie chłodzenia COOL Obsługa funkcji ECO W trybie chłodzenia COOL nac...

Page 17: ...unkcja Breeze Away niektóre jednostki Funkcja ta pozwala uniknąć bezpośredniego nawiewu powietrza na użytkownika i zapewnia uczucie chłodzenia UWAGA Funkcja ta jest dostępna tylko w trybie chłodzenia COOL wentylatora FAN i osuszania DRY Funkcja FRESH niektóre jednostki Gdy funkcja FRESH jest aktywna jonizator plazmowy kolektor pyłu lub lampa UV zależnie od modelu jest zasilana oraz będzie usuwał p...

Page 18: ...t zepsuta Wymienić sprężarkę Napięcie jest za wysokie lub za niskie Zainstaluj manostat do regulacji napięcia Słaba wydajność ogrzewania Temperatura zewnętrzna jest bardzo niska Zastosowanie dodatkowego urządzenia grzewczego Zimne powietrze dostaje się przez drzwi i okna Upewnij się że wszystkie drzwi i okna są zamknięte podczas użytkowania Niski poziom czynnika chłodniczego spowodowany nieszczeln...

Page 19: ...anual carefully If you have lost the Owner s Manual please contact the local agent or visit www kaisai com or sent email to handlowy kaisai com for electronic version Table of Contents Safety Precautions 38 Owner s Manual Unit Specifications and Features 42 1 Indoor unit display 42 2 Operating temperature 44 3 Other features 45 Care and Maintenance 46 Troubleshooting 48 ...

Page 20: ...o do so can cause electrical shock Do not clean the air conditioner with excessive amounts of water CAUTION Turn off the air conditioner and disconnect the power if you are not going to use it for a long time Turn off and unplug the unit during storms Make sure that water condensation can drain unhindered from the unit Do not operate the air conditioner with wet hands This may cause electric shock...

Page 21: ...more but of less than 50 tonnes of CO2 equivalent If the system has a leak detection system installed it must be checked for leaks at least every 24 months 5 When the unit is checked for leaks proper record keeping of all checks is strongly recommended WARNING for Using R32 R290 Refrigerant When flammable refrigerant are employed appliance shall be stored in a well ventilated area where the room s...

Page 22: ... Temperature LED display and Infrared receiver Manual button Operation indicator Timer indicator PRE DEF indicator pre heating defrost Alarm indicator A 3 B MANUAL button This button selects the mode in the following order AUTO FORCED COOL OFF FORCED COOL mode In FORCED COOL mode the Operation light flashes The system will then turn to AUTO after it has cooled with a high wind speed for 30 minutes...

Page 23: ...ecial tropical models COOL mode HEAT mode DRY mode Fixed speed Type When outside temperature is below 0 C 32 F we strongly recommend keeping the unit plugged in at all time to ensure smooth ongoing performance Default Setting When the air conditioner restarts after a power failure it will default to the factory settings AUTO mode AUTO fan 24 C 76 F This may cause inconsistencies on the remote cont...

Page 24: ...filter with clean water and allow it to air dry DO NOT let the filter dry in direct sunlight 4 Reinstall the filter 1 Remove the air filter 2 Clean the air filter by vacuuming the surface or washing it in warm water with mild detergent CAUTION Before changing the filter or cleaning turn off the unit and disconnect its power supply When removing filter do not touch metal parts in the unit The sharp...

Page 25: ...Y Cooling and Heating Models If the Operation light and PRE DEF Pre heating Defrost indicators are lit up the outdoor temperature is too cold and the unit s anti cold wind is activated in order to defrost the unit In Cooling only Models If the Fan Only indicator is lit up the outdoor temperature is too cold and the unit s anti freeze protection is activated in order to defrost the unit A squeaking...

Page 26: ... that all doors and windows are closed during use Low refrigerant due to leak or long term use Check for leaks re seal if necessary and top off refrigerant Indicator lamps continue flashing The unit may stop operation or continue to run safely If the indicator lamps continue to flash or error codes appear wait for about 10 minutes The problem may resolve itself If not disconnect the power then con...

Page 27: ...how to use your air conditioner SPECIAL NOTE Button designs on your unit may differ slightly from the example shown If the indoor unit does not have a particular function pressing that function s button on the remote control will have no effect When there are wide differentces between Remote controller Manual and USER S MANUAL on function description the description of USER S MANUAL shall prevail ...

Page 28: ...receiver is connected Consult the dealer or an experienced radio TV technician for help Changes or modifications not approved by the party responsible for compliance could void user s authority to operate the equipment Handling the Remote Controller ButtonsandFunctions Before you begin using your new air conditioner make sure to familiarize yourself with its remote control The following is a brief...

Page 29: ...D Turns indoor unit s LED display and air conditioner buzzer on and off model dependent which create a comfortable and quiet environment Model RG10A1 F2S H2S G2S BGEF TURBO Information are displayed when the remote controller is power up Breeze Away display Transmission Indicator MODE display TIMER ON display FAN SPEED display TIMER OFF display Silence feature display ECO display GEAR display LOCK...

Page 30: ... range of AU 100 4 1 3 2 1 3 2 4 1 3 2 1 3 2 4 1 3 2 1 Press the MODE button to select AUTO Press the MODE button to select FAN mode 2 Set your desired temperature using the TEMP or TEMP button 3 Press the ON OFF button to start the unit Press the ON OFF button to start the unit Swing Boost Clean Boost Clean Press FAN button to select the fan speed in a range of AU 100 Set your desired temperature...

Page 31: ...H OR T CU T TIM ER ON TIM ER OFF TEM P SLE EP ON OF F MOD E FAN SHO RT CU T TIM ER ON TIM ER OFF TEM P SLE EP ON OF F MOD E FA N SH OR T CU T TIM ER ON TIM ER OFF TEM P SLE EP 1sec x5 xn xn x10 xn Keep in mind that the time periods you set for both functions refer to hours after the current time TIMER TIMER TIMER TIMER How to Use Advanced Functions Swing function Airflow direction LED DISPLAY Pres...

Page 32: ...ion Previous setting mode Under GEAR operation the display on the remote controller will alternage between electical energy consumption and set temperature FP function LOCK function O O O O Keep pressing Fan button for more than 2 seconds to activate disable Silence function some units Due to low frequency operation of compressor it may result in insufficient cooling and heating capacity Press ON ...

Page 33: ...t The SLEEP function is used to decrease energy use while you sleep and don t need the same temperature settings to stay comfortable This function can only be activated via remote control Note The SLEEP function is not available in FAN or DRY mode For the detail see sleep operation in USER S MANUAL This feature avoids direct air flow blowing on the body and makes you feel indulging in silky coolne...

Page 34: ...Sie die Bedienungsanleitung verlieren kontaktieren Sie bitte Ihren lokalen Händler oder besuchen Sie die Internetseite www kaisai com bzw schreiben Sie an die E Mail Adresse handlowy kaisai com um eine elektronische Version der Bedi enungsanleitung zu erhalten Sicherheitsvorkehrungen 68 Benutzerhandbuch Gerätespezifika onen und Merkmale 72 1 Anzeige des Innengerätes 72 2 Betriebstemperatur 74 3 Wei...

Page 35: ...hmutz der sich auf oder um den Stecker herum ansammelt Verschmutzte Stecker können Feuer oder einen elektrischen Schlag verursachen Ziehen Sie nicht am Netzkabel um das Gerät auszustecken Halten Sie den Stecker fest und ziehen Sie ihn aus der Steckdose Durch direktes Ziehen am Kabel kann dieses beschädigt werden was zu einem Brand oder Stromschlag führen kann Ändern Sie nicht die Länge des Netzkab...

Page 36: ... System wenn es über ein Leckdetektionssystem verfügt mindestens alle 24 Monate auf Lecks überprüft werden 5 Wenn das Gerät auf Dichtheit geprüft wird wird dringend empfohlen alle Prüfungen ordnungsgemäß zu protokollieren Hinweis zu fluorierten Gasen gilt nicht für das Gerät mit Kältemittel R290 Europäische Entsorgungsrichtlinien Besondere Hinweise WARNUNG bei Verwendung des Kältemittels R32 R290 ...

Page 37: ...ld am Innengerät kann zur Bedienung des Geräts verwendet werden falls die Fernbedienung verlegt wurde oder die Batterien leer sind FUNC Temperatur A 3 Anzeigefeld Lamellen Lufteinlass Luftauslass LED Anzeige Infrarot Empfänger Manuelle Taste B Anzeigefeld PRE DEF Vorheizen Abtauen Lamellen Lufteinlass Luftauslass Elektrische Heizung einige Modelle LED Anzeige Timer Betriebsanzeige Alarmanzeige Wen...

Page 38: ... 32 F 122 F 15 C 24 C 5 F 75 F 0 C 50 C 32 F 122 F 15 C 50 C 5 F 122 F Für Modelle mit Niedertemperatur Kühlsystemen 0 C 52 C 32 F 126 F Für spezielle tropische Modelle 0 C 52 C 32 F 126 F Für spezielle tropische Modelle Andere Merkmale Standardeinstellung Wenn das Klimagerät nach einem Stromausfall neu startet wird es auf die Werkseinstellungen zurückgesetzt AUTO Modus AUTO Lüfter 24 C 76 F Dies ...

Page 39: ...n Sie den Filter NICHT in direktem Sonnenlicht trocknen 4 Setzen Sie den Filter wieder ein Jegliche Wartung und Reinigung des Außengeräts sollte von einem autorisierten Händler oder einem lizenzierten Serviceanbieter durchgeführt werden Alle Reparaturen am Gerät sollten von einem autorisierten Händler oder einem lizenzierten Serviceanbieter durchgeführt werden VORSICHT Pflege und Wartung Wasserstr...

Page 40: ...eises Zischgeräusch während des Betriebs Dies ist normal und wird durch Kältemittelgas verursacht das durch Innen und Außengeräte fließt Leises zischendes Geräusch wenn das System startet gerade aufgehört hat zu laufen oder abgetaut wird Dieses Geräusch ist normal und wird durch das Anhalten oder die Richtungsänderung des Kältemittelgases verursacht Quietschgeräusch Die normale Ausdehnung und Kont...

Page 41: ...u hoch oder zu niedrig Installieren Sie einen Manostat um die Spannung zu regeln Schlechte Heizleistung Die Außentemperatur ist extrem niedrig Standheizungseinrichtung verwenden Kalte Luft dringt durch Türen und Fenster ein Stellen Sie sicher dass alle Türen und Fenster während des Gebrauchs geschlossen sind Kältemittelmangel durch Leckage oder Langzeitbetrieb Auf Lecks prüfen ggf neu abdichten un...

Page 42: ...gsbereich 8 m Umgebungstemperatur 5 C 60 C 23 F 140 F Schnellstart Anweisungen LEGEN SIE DIE BATTERIEN EIN WÄHLEN SIE DEN MODUS AUS STELLEN SIE DIE TEMPERATUR EIN DRÜCKEN SIE DIE TASTE ON OFF RICHTEN SIE DIE FERNBEDIENUNG AUF DAS GERÄT WÄHLEN SIE DIE LÜFTERDREHZAHL SIE SIND SICH NICHT SICHER WOFÜR DIE FUNKTION GEDACHT IST Eine detaillierte Beschreibung der Bedienung der Klimaanlage finden Sie in d...

Page 43: ... Taste 2 Sekunden lang gedrückt um die automatische Schwenkfunktion der vertikalen Lamelle zu aktivieren bei einigen Geräten verfügbar BOOST Ermöglicht dem Gerät in kürzester Zeit die gewünschte Temperatur zu erreichen MODE Wechseln des Betriebsmodus in der folgenden Reihenfolge AUTO COOL DRY HEAT FAN ECO GEAR Ermöglicht es den Energiesparmodus in der folgenden Reihenfolge zu starten ECO GEAR 75 G...

Page 44: ...ng LED Mit dieser Taste können das LED Display der Inneneinheit und das Tonsignal der Klimaanlage je nach Modell ein und ausgeschaltet werden um eine komfortable und ruhige Umgebung zu gewährleisten TURBO Model RG10A1 F2S H2S G2S BGEF Anzeigen auf dem Fernbedienung Display Die Informationen werden nur angezeigt wenn die Fernbedienung eingeschaltet ist Anzeige der Funktion Breeze Away Anzeige der F...

Page 45: ...SPEED kann im Automatikbetrieb AUTO nicht eingestellt werden 1 3 2 1 3 2 4 FAN Modus 1 Drücken Sie die MODE Taste um den Lüftermodus FAN auszuwählen 2 Drücken Sie die FAN Taste um die Lüfterdrehzahl im Bereich AU 100 auszuwählen 3 Drücken Sie die ON OFF Taste um das Gerät einzuschalten HINWEIS Die Temperatur kann im Lüftermodus FAN nicht eingestellt werden Infolgedessen zeigt das LCD Display auf d...

Page 46: ...Uhr eingestellt stellen Sie den Timer wie oben beschrieben ein das Gerät schaltet sich 2 5 Stunden später 15 30 Uhr ein und um 18 00 Uhr wieder aus Das Gerät schaltet ein Das Gerät schaltet aus 2 5 Stunden später 5 Stunden später Verwendung der fortgeschrittenen Funktionen Funktion der Schwenkbewegung SWING Drücken Sie die Swing Taste Beim Drücken bewegt sich die horizontale Lamelle automatisch au...

Page 47: ...rnbedienung abwechselnd den Stromverbrauch und die Solltemperatur an Leiser Betriebsmodus Silence Drücken und halten Sie die Fan Taste länger als 2 Sekunden gedrückt um den leisen Betriebsmodus Silence zu aktivieren deaktivieren je nach Gerät Dies kann aufgrund der niedrigen Betriebsleistung des Kompressors zu einer unzureichenden Kühl und Heizleistung führen Durch Drücken der Ein Aus Turbo oder C...

Page 48: ...ation um den Schlafkomfort zu erhalten Diese Funktion kann nur mit der Fernbedienung aktiviert werden Einzelheiten siehe Bedienung der Schlaf Funktion im Benutzerhandbuch Follow Me Funktion Mit der Follow Me Funktion kann das Fernsteuermodul die Temperatur am aktuellen Standort messen und im Abstand von 3 Minuten ein Signal an die Klimaanlage senden Die Messung der Umgebungstemperatur mit der Fern...

Page 49: ...kaisai com ...

Reviews: