


21
22
Playback
PC/Mac Playback
You can playback your footage on a PC
or Apple Mac computer/laptop.
Using the supplied USB cable, connect
it to your computer. Choose the MSDC
option when prompted on the camera.
The camera will now appear as an
external device.
You can also use a MicroSD Card reader
to view and playback files directly without
the camera.
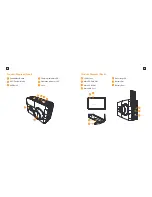
HDTV Playback
To playback on a HDTV you will need
a Micro HDMI – HDMI Cable.
When connected, the HDTV will switch
the Camera LCD screen OFF and mirror
the camera screen instead.
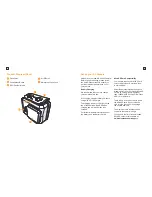
Battery Guide
Important - Only use official KB
batteries with this product.
Never use any third party or unknown
accessories or batteries.
To charge the camera:
1. Insert the battery into the camera
2. Connect the USB Charging Cable to
the Micro USB port located on the side
of the camera.
3. Connect the USB Charging Cable to a
computer or wall charger.
4. The camera status LED will be RED
whilst charging. Once charging is
complete, the status LED light will
switch OFF.
5. A full charge cycle will take
approximately 2.5 hours with a 0.5A/1A
charger.
Battery Tips
To maximise battery life:
• Turn off WiFi
• Turn on LCD Screensaver
• Capture at a lower Video Resolution
and frame rate. Higher resolutions
and frame rates impact battery
performance.
• Avoid exposing the camera and battery
to very cold or hot temperatures. Cold
or hot temperatures may temporarily
affect the battery life and cause the
camera to stop working.
• Only ever charge the camera with a
compliant wall charger marked 5V/1A.
WARNING!: If using a wall charger,
ensure that it is a certified product
for your region. AC Input: 100-
240VAC 50/60Hz. DC Output: 5VDC
0.5A/1A. Only use a USB charger with
suitable approval and certification.
If you do not know the output
voltage/current of the charger use a
computer to charge the battery. Do
not charge in conditions outside of
the 10°C-45°C range.
To charge, connect the X3 to a computer
(or other USB POWER source) using the
USB cable provided.
When the camera is being charged, the
red light on the top will stay solid until the
battery is fully charged. A completely flat
battery will take about 3-4 hours to fully
charge.
Summary of Contents for X3
Page 1: ...1 x3 Complete User Guide X3 Action Camera...
Page 16: ...29 KBA12036 002 A02...