background image

CONDITIONS DE GARANTIE POUR LES APPAREILS ÉLECTROMÉNAGERS

1. 

La garantie pour le bon fonctionnement de l'appareil est valable pour une période de 24 mois à compter de la date d'achat 
(la facture et la preuve d'achat avec la date d'achat et / ou de livraison doivent être présentées). S'il n'est pas présent, la 
réparation est susceptible de payer.

2. 

Le fabricant effectuera la réparation gratuitement si les défauts de l'usine sont détectés pendant la période de garantie (par 
exemple, pas de conception raisonnable, l'assemblage, le matériel défectueux et la fabrication).

3. 

La garantie correspondante n'est valable que pour les produits qui ne sont pas utilisés à des fins commerciales mais 
uniquement à des fins privées. Sinon, la garantie devient nulle.

4. 

La réparation doit être effectuée gratuitement (notamment main-d'œuvre, - frais de matériel et, si nécessaire et compte 
tenu de la législation applicable - frais de transport) par le service après-vente compétent au consommateur ou dans un 
atelier si le centre de service estime qu'une telle action est nécessaire.

5.

  Toute réclamation pour vices doit être examinée par le service après-vente compétent uniquement après un contrôle de 

qualité correspondant du produit et après la préparation d'un rapport.

6. 

Le remplacement de l'appareil ne sera effectué que pendant la période de garantie si, selon les rapports d'experts, la 
réparation n'est pas possible ou si l'appareil continue à présenter des défauts après que 3 réparations ont été effectuées.

7.

  En cas d'utilisation inutile ou injustifiée du service client, nous facturons pour notre service les frais habituels de temps et 

de distance. Avant de demander le service, vérifiez s'il ne s'agit pas d'une opération défectueuse ou d'une cause qui n'a 
rien à voir avec la fonction de l'appareil. Veuillez contacter le centre de service responsable pour le moment.

8.

  L'installation de l'appareil ne doit être effectuée que par des spécialistes qualifiés. Le client est obligé de fournir une preuve 

de cela. Sinon, il n'y a pas de droit à l'octroi d'une garantie.

9

.  L'échange de l'appareil est uniquement effectué par le vendeur.

10. 

La responsabilité à l'égard de cette garantie est limitée, sauf disposition contraire prévue par la loi et spécifiée dans les 
obligations de garantie ci-dessus.

GARANTIE N'EST PAS VALIDE LORSQUE:

1. 

Produits dont les défauts et les défauts ont été causés par: des dommages de transport; mauvaise installation; entretien 
négligent  ou  mauvais  soin;  Connexion  à  une  tension  incorrecte  Utilisation  d'agents  de  nettoyage  et  de  lavage  non 
recommandés; Ne pas tenir compte des instructions d'utilisation ci-jointes ou si le produit a été réparé, reconstruit ou 
installé par des personnes non autorisées et si le numéro de série est illisible, retiré ou modifié.

2.

  Les produits qui ont été utilisés avec des défauts non résolus ou qui ont été entretenus par des services non approuvés.

3.

  Perturbations  causées  par  le  fabricant,  telles  que:  fluctuations  de  tension,  phénomènes  naturels  et  catastrophes 

naturelles, feu bactérien, animaux domestiques ou sauvages, insectes, etc.

4.

  Surfaces en verre et en céramique, ainsi que des éléments extérieurs en plastique, dans le cas où le défaut a été causé par 

la faute de l'utilisateur, après la signature du certificat d'acceptation par le consommateur.

5. 

Éraflures, fissures et dommages mécaniques externes similaires causés pendant l'utilisation.

6. 

Ces  dommages  aux  éléments  dont  la  probabilité  est  significativement  plus  élevée  en  fonction  de  la  nature  de  leur 
utilisation ou qui sont apparus en raison de l'usure normale (y compris les fournitures), tels que: lampes, filtres, etc., les 
pièces en plastique mobiles à la main.

7. 

Ces types de travaux tels que la réglementation, le nettoyage et la maintenance du produit plus loin spécifié dans les 
instructions d'utilisation.

8. 

Ainsi que pour d'autres raisons, qui sont causées par la faute de l'acheteur et ne sont pas dues au fabricant - qui peut être 
éliminé seulement au détriment de l'acheteur.

Les appareils non mis à jour sont potentiellement dangereux.
Le fabricant décline toute responsabilité pour les dommages causés par une utilisation 
incorrecte,  une  installation,  un  fonctionnement,  une  application  ou  une  maintenance 
incorrects.

FR

Summary of Contents for AT 9317

Page 1: ...9317 AT 9317 AT 9317 AT 9317 AT 9317 COOKER HOOD COOKER HOOD COOKER HOOD DUNSTABZUGSHAUBE DUNSTABZUGSHAUBE DUNSTABZUGSHAUBE GEBRAUCHSANWEISUNG GEBRAUCHSANWEISUNG USER MANUAL USER MANUAL GEBRAUCHSANWE...

Page 2: ...ng instructions the oven will bring you a lot of pleasure for a long time Our ovens correspond to the main demands of the security hygiene and environment protection according to the directives of the...

Page 3: ...orliegenden Bedienungsanleitung entsprechen wird Unsere Back fen entsprechen den Hauptforderungen der Sicherheit der Hygiene und des Umweltschutzes laut den Direktiven der EU was mit Zertifikaten DIN...

Page 4: ...tion 12 Installation 14 BRIEF DESCRIPTION 16 Location drawing 16 OPERATING CONDITIONS 18 OPERATION MODE 20 EQUIPMENT 22 Control panel 22 Light 24 USAGE 24 Digital clock timer with sensor 28 Intelligen...

Page 5: ...17 Gesamtansicht 17 BETRIEBSBEDINGUNGEN 19 BETRIEBSARTEN DER ABZUGSHAUBE 21 AUSSTATUNG 23 Bedienblende 23 Beleuchtung 25 BENUTZUNG 25 Elektronische Zeitschaltuhr mit Sensor 29 Intelligent System von...

Page 6: ...efore using the appliance for the first time to avoid the risk of accidents and damage of the appliance The instruction contains important notes about installation safety use and maintenance of the ap...

Page 7: ...Sie das Ger t in Betrieb nehmen Sie enth lt wichtige Hinweise f r den Einbau die Sicherheit den Gebrauch und die Wartung Dadurch sch tzen Sie sich und vermeiden Sch den am Ger t Der Hersteller kann k...

Page 8: ...supply cord must be replaced by the manufacturer its service agent or similarly qualified persons in order to avoid a hazard The air must not be discharged into a flue that is used for exhausting fume...

Page 9: ...einer Besch digung zu vermeiden muss das besch digte Netzkabel durch den Hersteller seiner Serviceagentur oder anderes Fachpersonal ausgetauscht werden Die Luft muss nicht in den Rauchabzug geleitet...

Page 10: ...tion concerning use of the appliance in a safe way and understand the hazards involved Cleaning and user maintenance shall not be made by children without supervision Do not flamb under the range hood...

Page 11: ...etriebssicherheit und die Vermeidung m glicher Gefahren sorgen Die Kinder ohne Aufsicht d rfen das Ger t nicht bedienen oder pflegen Flambieren Sie unter der Dunstabzugshaube nicht Wenn die Reinigung...

Page 12: ...directly to mains terminals fit a switch with minimum aperture of 3 mm between the contacts Make sure that the switch is of sufficient capacity for the power specified on the appliance s data plate a...

Page 13: ...kter Netzanschluss gew nscht wird muss ein allpoliger Schalter mit Kontakt ffnung von min 3mm vorgesehen werden der erlaubt das Ger t von dem Netz zu trennen Der Schalter muss den technischen Daten de...

Page 14: ...oks should be upward oriented Installation of the hood Hang the hood body 1 on the installed hanger 2 If the cooker hood will be use in extractor mode it is necessary to mount a vent conduit of 150 mm...

Page 15: ...ng 2 die Dunstabzugshaube 1 aufh ngen Bei dem Abluftbetrieb der Dunstabzugshaube soll auf die installierte V Klappe 3 das Abluftrohr mit 150 mm Durchmesser montiert werden Bei der Montage eines Abluft...

Page 16: ...e The cooker hood is an electrical appliance manufactured according to class II of shock protection It has its own lighting and an exhaust fan which can be set to one of four rotational speeds The hoo...

Page 17: ...Dunstabzugshaube ist ein Elektroger t in Schutzartausf hrung Klasse II Das Ger t ist mit eigener Beleuchtung und Abzugsl fter mit 4 Geschwindigkeiten ausgestattet Die Dunstabzugshaube wird fest an de...

Page 18: ...eaned at least every 2 months because a filter soaked with grease becomes easily flammable Pull the plug of the power cord from a wall socket before any cleaning filter replacement or repair operation...

Page 19: ...glicher Reinigung Filteraustausch oder Reparatur das Ger t von der Stromversorgung trennen den Stecker aus der Steckdose herausziehen Achtung Bei gleichzeitigem Betrieb einerDunstabzugshaube und einer...

Page 20: ...uld be purchased in a shop selling installation materials A qualified installer should be commissioned to make the connection Setting the odour absorber mode In this option filtered air returns to the...

Page 21: ...l erreichbar angeschlossen Die Montage sollte von einem qualifizierten Fachmann durchgef hrt werden Umluftbetrieb Bei dieser Betriebsart kehrt die gefilterte Luft durch die L cher die sich auf zwei Se...

Page 22: ...l key to return to the upper menu level or to cancel a function 6 Menu key to return to main menu The switching on of the appliance is performed by the simple touching of the sensor display 7 The oper...

Page 23: ...en Ebene oder Beenden der Funktion 6 Men Taste zur ck zum Hauptmen Das Einschalten des Ger tes wird durch ein einfaches Tippen aufs Sensor Display 7 ausgef hrt Die Steuerung der Bbetriebsfunktionen er...

Page 24: ...ppliance is illuminated Touch this key to switch off the lighting You can also switch on the indoor lighting when the cooker hood switched off USAGE Switch on the appliance by touching the display 2 T...

Page 25: ...e um die Beleuchtung auszuschalten Sie haben auch die M glichkeit die Beleuchtung einzuschalten wenn die Abzugshaube ausgeschaltet ist BENUTZUNG Tippen Sie auf das Display 2 um das Ger t einzuschalten...

Page 26: ...eir activating See Digital clock timer with sensor Touch the key Return 3 to return to the previous menu level Touch the key Menu 4 to go to the Main menu The activation of the appliance is signalizes...

Page 27: ...Sensor Tippen Sie auf die Taste Zur ck 3 um zur vorherigen Men Ebene zur ckzukehren Tippen Sie auf die Taste Menu 4 um zum Hauptmen zu bergehen Die Einschaltung von dem Ger t wird durch die entspreche...

Page 28: ...ETTING Touch the field Setting 1 in the main menu Touch the field Language 2 in the Setting menu level Choose the necessary language The default language is English The selected setting will be marked...

Page 29: ...stellungen 1 im Hauptmen Tippen Sie auf das Feld Sprache 2 im Menu Einstellungen Tippen Sie auf die gew nschte Sprache Die Standardsprache ist Englisch Die gew hlte Einstellung wird mit dem Symbol 3 g...

Page 30: ...ugh the keyboard 2 set the actual date The input sequence is year month day Touch OK 3 to save the date and to return to the interface of setting If you want to change the current date touch the Clear...

Page 31: ...tuelle Datum ein Die Eingangssequenz ist Jahr Monat Tag Tippen Sie auf OK 3 um das Datum zu speichern und zum Men Einstellungen zur ckzukehren Wenn Sie das aktuelle Datum ndern m chten Tippen Sie auf...

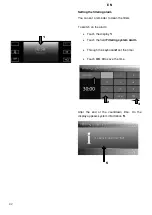
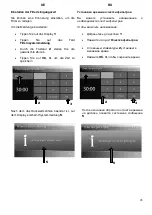
Page 32: ...menu level Through the keyboard 2 set the actual hour and minutes Touch OK 3 to save the time and to return to the interface of setting If you want to change the current time touch the Clear 4 to del...

Page 33: ...r 2 stellen Sie die aktuelle Zeit ein Tippen Sie auf OK 3 um die Zeit zu speichern und zum Men Einstellungen zur ckzukehren Wenn Sie die aktuelle Zeit ndern m chten Tippen Sie auf L schen 4 um die Zei...

Page 34: ...ours 1 The selected setting will be marked with symbol 2 Touch OK 3 to save the clock format and to return to the Setting menu BRIGHTNESS SETTING Touch Brightness in the Setting menu Through the slide...

Page 35: ...em Symbol 2 gekennzeichnet Tippen Sie auf OK 3 um das Uhrzeitformat zu speichern und zum Men Einstellungen zur ckzukehren HELLIGKEIT EINSTELLUNG Tippen Sie auf Helligkeit in dem Men Einstellungen Anha...

Page 36: ...and to return to the Setting menu FACTORY DEFAULT SETTING Touch Factory default setting in the Setting menu Choose the necessary setting 2 No if you do not want to activate the factory default settin...

Page 37: ...ungen zur ckzukehren WERKEINSTELLUNGEN Tippen Sie auf Werkeinstellungen im Men Einstellungen W hlen Sie gie gew nschte Einstellung 2 aus Nein wenn sie die Einstellungen nicht ndern m chten und Ja um d...

Page 38: ...he display 1 Touch the field Minute minder 2 Through the keyboard 3 set the timer Touch OK 4 to save the time The display shows the countdown time 5 After the end of the countdown the time minder emit...

Page 39: ...itwecker 2 Durch die Tastatur 3 stellen Sie die gew nschte Zeit ein Tippen Sie auf OK 4 um die Zeit zu speichern Die verbliebende Zeit wird auf dem Display angezeigt 5 Nach dem das R ckwertsz hlen bee...

Page 40: ...o adjust the speed Set the Duration Touch the Duration 4 Through the 6 keyboard set the necessary duration If you want to change the current time touch Clear 7 and set the new time Touch OK 5 to save...

Page 41: ...n Sie die Betriebsdauer ein Tippen Sie auf Dauer 4 Durch die Tastatur 6 stellen Sie die gew nschte Dauer ein Wenn Sie die eingegebene Zeit ndern m chten tippen Sie auf L schen 7 und stellen Sie die ne...

Page 42: ...to clean the filters To switch on the alarm Touch the display 1 Touch the field Filtering system alarm Through the keyboard 2 set the timer Touch OK 3 to save the time After the end of the countdown t...

Page 43: ...die Meldung einzustellen Tippen Sie auf das Display 1 Tippen Sie auf das Feld Filternsystemmeldung Durch die Tastatur 2 stellen Sie die gew nschte Zeit ein Tippen Sie auf OK 3 um die Zeit zu speicher...

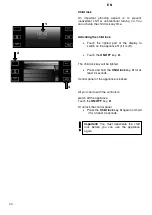
Page 44: ...if it is off Touch the ON OFF key 2 The child lock key will be lighted Press and hold the Child lock key 3 for at least 3 seconds Control panel of the appliance is locked All you can do with the contr...

Page 45: ...tet ist Tippen Sie auf Ein Aus Taste 2 Die Kindersicherung Taste wird beleuchtet Halten Sie die Kindersicherung Taste 3 mindestens 3 Sekunden gedr ckt Elektronische Steuerung des Ger tes ist gesperrt...

Page 46: ...liquid soap Dismantling To dismantle the filter 1 proceed as follows Release the lock catch 2 Remove the metal grease filter Charcoal filter Operation Charcoal filters can be used only when the cooker...

Page 47: ...gt werden Demontage Bei der Demontage der Filter 1 sollen Sie Freistellen der Schnappsperre 2 Metallfettfilter entfernen Kohlefilter Wirkungsprinzip Kohlefilter sind ausschlie lich dann anzuwenden wen...

Page 48: ...d the glass proceeding in reverse order Cleaning The following shall be avoided during normal cleaning of the hood Wet cloth or sponge and water jet Solvents or alcohols which might dull lacquered sur...

Page 49: ...en Reihenfolge den Ring mit Glas wieder anbringen Reinigung Bei normaler Reinigung der Dunstabzugshaube sollen Sie vermeiden Nasse T cher bzw Schw mme und direkten Wasserstrahl L sungsmittel und Alkoh...

Page 50: ...wo years Abolishment of noticed errors Note All installing and maintenance actions mentioned on the top as well as reparations are to be accomplished by a authorized installer Important The user is re...

Page 51: ...durchsehen lassen Beseitigung von entdeckten St rungen Anmerkung Alle oben angef hrten Einstell und Nachstellt tigkeiten sowie Reparaturen m ssen durch eine Kundendienststelle oder einen autorisierte...

Page 52: ...friendly way Recycling in this way saves on resources and cuts down on waste Disposing of old appliances The symbol on the product or on its packaging indicates that this product may not be treated as...

Page 53: ...sportverpackung m glichst umweltgerecht Recycling von Verpackungsmaterialien spart die Rohstoffe und verringert die Abfallsmenge Entsorgung der Altger te Das Symbol auf dem Produkt oder seiner Verpack...

Page 54: ...achweis hierf r zu erbringen Anderenfalls besteht kein Anspruch auf die Gew hrung einer Garantieleistung 9 Der Umtausch des Ger ts wird nur von dem Verk ufer durchgef hrt 10 Eine Haftung in Bezug auf...

Page 55: ...entitlement to the grant of a guarantee 9 Only the distributor selling the products has the right to exchange the defected product for a new one 10 Liability under this warranty is limited to unless...

Page 56: ...il n y a pas de droit l octroi d une garantie 9 L change de l appareil est uniquement e ectu par le vendeur 10 La responsabilit l gard de cette garantie est limit e sauf disposition contraire pr vue...

Page 57: ...1 12 2 3 4 5 6 3 7 8 9 10 1 2 3 4 5 6 7 8 c RU...

Page 58: ...1 12 2 3 4 5 6 3 7 8 9 10 1 2 3 4 5 6 7 8 UA...

Page 59: ...chaser s signature Signature de l acheteur Seriennummer Serial number Num ro de s rie Fachperson Vor und Nachname Expert name surname Sp cialiste pr nom et nom The product s is sold in their original...

Page 60: ...e Provider s r l Tel 33 488 788 900 Tel 02 83623612 39 E Mail servicekaiser uspitaly it 13106 Rousset Cedex France 46 127238 USP Via T Tasso 5 20825 Barlassina MB Italy E office eseco at Mail Fax 43 1...

Page 61: ...e receipt In the event of the product components incomplete missing and or requirement for their replacement please contact your dealer We reserve the right to make changes in design or manufacturing...

Page 62: ......

Page 63: ...erantwortung f r die eventuellen Irrt mer und Druckfehler und beh lt sich das Recht vor ohne Ank ndigung im Design und bei der Einrichtung die notwendigen nderungen die keinen negativen Einfluss auf d...

Page 64: ...OLAN Haushaltsger te Berlin Germany www kaiser olan de...

Reviews: