background image

 EN 


INSTALLATION INSTRUCTIONS


INSTALLATION 

 
Unhampered access to all control units as well as 
duly ventilation of the kitchen are primary 
installation requirements. 


Before using your new appliance, make sure to fit 
it properly. By fixing the adjustable feet in a proper 
position, you can keep the upper surface strictly 
horizontally and, thus, avoid backlash. For this 
purpose, take out the drawer at the bottom. 
 
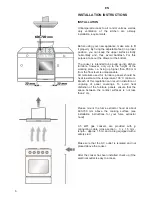
The cooker is intended to be build up into kitchen 
furniture, however, only up to the height of the 
working plate, i.e. fixing up higher than 850 mm 
from the floor level is unreasonable. 
All materials used for furniture panels should be 
heat resistant at the temperature 100°C minimum. 
Breach of this regulation can result in distortion or 
ungluing of panel coverings. To avoid heat 
distortion of the furniture panels, ensure that the 
space between the contact surfaces is not less 
than 2 cm. 


Please mount the fume extractor hood at about 
600-700 mm above the cooking surface (see 
installation instructions for your fume extractor 
hood). 
 
 
3,5 kWt gas cookers are provided with a 
connecting cable (cross-section – 3 x 1,5 mm

2

length – approx. 1,5 m) and a plug equipped with a 
safety stud. 
 
 
Make sure that the AC outlet is isolated and not 
placed above the cooker. 
 
 
After the cooker has been installed, check up if the 
electrical outlet is easy to access.  


Summary of Contents for , HGE 60508

Page 1: ...USER MANUAL GEBRAUCHSANWEISUNG ИНСТРУКЦИЯ ПО ОБСЛУЖИВАНИЮ И ЭКСПЛУАТАЦИИ EN DE RU HGG 5 HGE 5 GAS AND GAS ELECTRIC COOKERS GAS UND GAS ELEKTROHERDE ГАЗОВЫЕ И ГАЗО ЭЛЕКТРИЧЕСКИЕ ПЛИТЫ ...

Page 2: ...on and at the same time reduce the consumption of electric energy Proper operation and maintenance provide a longer service life of the unit and make cooking a pleasure The Kaiser cookers fulfill the main norms of safety hygiene and environment protection in correspondence with the EU directives and are certified according to EU norms and standards DIN ISO 9001 ISO 1400 standards of Russia Gosstan...

Page 3: ...dass unsere Geräte die der Gegenstand der vorliegenden Bedienungsanleitung sind sind ausschließlich für den häuslichen Gebrauch vorbestimmt ɍȼȺɀȺȿɆɕɃ ɉɈɄɍɉȺɌȿɅɖ ɛɥɚɝɨɞɚɪɢɦ ȼɚɫ ɡɚ ɩɪɢɨɛɪɟɬɟɧɢɟ ɧɚɲɟɣ ɬɟɯɧɢɤɢ Ɇɵ ɭɜɟɪɟɧɵ ɱɬɨ ȼɵ ɫɞɟɥɚɥɢ ɩɪɚɜɢɥɶɧɵɣ ɜɵɛɨɪ Ⱦɚɧɧɵɣ ɩɪɨɞɭɤɬ ɭɞɨɜɥɟɬɜɨɪɹɸɳɢɣ ɫɚɦɵɦ ɜɵɫɨɤɢɦ ɬɪɟɛɨɜɚɧɢɹɦ ɢ ɨɬɜɟɱɚɸɳɢɣ ɦɢɪɨɜɵɦ ɫɬɚɧɞɚɪɬɚɦ ɩɨɡɜɨɥɢɬ ȼɚɦ ɥɟɝɤɨ ɜɨɩɥɨɬɢɬɶ ɜɫɟ ȼɚɲɢ ɤɭɥɢɧɚɪɧɵɟ ɫɩɨɫɨɛɧɨɫɬɢ ɚ...

Page 4: ...s 14 BRIEF DESCRIPTION 18 Location drawing 18 Control panel 20 EQUIPMENT 22 Gas cooking zones control 24 Gas oven control 28 Multifunction electrical oven control 30 Operation functions of the oven 32 Oven 36 Electronic sensor timer Touch control 38 PRACTICAL ADVICE 52 CLEANING AND SERVICING 60 ENVIROMENTAL COMPATIBILITY 70 ...

Page 5: ...nung 39 PRAKTISCHE EMPFEHLUNGEN 53 PFLEGE UND WARTUNG 61 UMWELTVERTRÄGLICHKEIT 71 ɈȽɅȺȼɅȿɇɂȿ ɂɇɋɌɊɍɄɐɂə ɉɈ ɆɈɇɌȺɀɍ 7 ɍɫɬɚɧɨɜɤɚ ɩɥɢɬɵ 7 ɉɨɞɤɥɸɱɟɧɢɟ ɩɥɢɬɵ 9 ɉɪɢɫɩɨɫɨɛɥɟɧɢɟ ɤ ɞɪɭɝɨɦɭ ɬɢɩɭ ɝɚɡɚ 13 ɍɫɥɨɜɢɹ ɛɟɡɨɩɚɫɧɨɫɬɢ 15 ɄɊȺɌɄɈȿ ɈɉɂɋȺɇɂȿ 19 ȼɧɟɲɧɢɣ ɜɢɞ 19 ɉɚɧɟɥɶ ɭɩɪɚɜɥɟɧɢɹ 21 ɈȻɈɊɍȾɈȼȺɇɂȿ 23 ɉɨɥɶɡɨɜɚɧɢɟ ɝɚɡɨɜɨɣ ɩɨɜɟɪɯɧɨɫɬɶɸ 25 ɍɩɪɚɜɥɟɧɢɟ ɪɚɛɨɬɨɣ ɝɚɡɨɜɨɝɨ ɞɭɯɨɜɨɝɨ ɲɤɚɮɚ 29 ɍɩɪɚɜɥɟɧɢɟ ɪɚɛɨɬɨɣ ɦɧɨɝɨɮɭɧɤɰ...

Page 6: ...evel is unreasonable All materials used for furniture panels should be heat resistant at the temperature 100 C minimum Breach of this regulation can result in distortion or ungluing of panel coverings To avoid heat distortion of the furniture panels ensure that the space between the contact surfaces is not less than 2 cm Please mount the fume extractor hood at about 600 700 mm above the cooking su...

Page 7: ...ecker hat Die Netzsteckdose muss mit einem Schutzkontaktdecke versehen und darf nicht über dem Herd angeordnet sein Es ist erforderlich dass die Netzsteckdose für den Benutzer nach dem Aufstellen vom Herd zugänglich ist ɂɇɋɌɊɍɄɐɂə ɉɈ ɆɈɇɌȺɀɍ ɍɋɌȺɇɈȼɄȺ ɉɅɂɌɕ Ʉɭɯɨɧɧɨɟ ɩɨɦɟɳɟɧɢɟ ɞɨɥɠɧɨ ɨɛɥɚɞɚɬɶ ɢɫɩɪɚɜɧɨɣ ɜɟɧɬɢɥɹɰɢɟɣ ɚ ɩɥɢɬɚ ɞɨɥɠɧɚ ɛɵɬɶ ɭɫɬɚɧɨɜɥɟɧɚ ɬɚɤ ɱɬɨɛɵ ɨɛɟɫɩɟɱɢɬɶ ɫɜɨɛɨɞɧɵɣ ɞɨɫɬɭɩ ɩɨɬɪɟɛɢɬɟɥɹ ɤɨ ...

Page 8: ...pe 3 Check up x efficiency of ventilation i e air interchange in the kitchen x leak proof pipe junction x operation efficiency of all control units of the cooker x adjustability of the power line to the protective zero conductor x 4 Provide the User with the installation certificate as well as give instructions concerning operation of the coocker Attention Connection to the gas cylinder or gas pip...

Page 9: ...ɬɜɟɬɫɬɜɭɸɳɢɦ ɫɟɪɬɢɮɢɤɚɬɨɦ 2 Ɉɡɧɚɤɨɦɢɬɫɹ ɫ ɢɧɮɨɪɦɚɰɢɟɣ ɧɚɯɨɞɹɳɟɣɫɹ ɧɚ ɡɚɜɨɞɫɤɨɣ ɬɚɛɥɢɱɤɟ ɩɥɢɬɵ ɨ ɬɢɩɟ ɝɚɡɚ ɧɚ ɤɨɬɨɪɵɣ ɨɧɚ ɧɚɫɬɪɨɟɧɚ ɂɧɮɨɪɦɚɰɢɸ ɫɪɚɜɧɢɬɟ ɫ ɭɫɥɨɜɢɹɦɢ ɩɨɞɚɱɢ ɝɚɡɚ ɜ ɦɟɫɬɟ ɭɫɬɚɧɨɜɤɢ 3 ɉɪɨɜɟɪɢɬɶ x ɷɮɮɟɤɬɢɜɧɨɫɬɶ ɜɟɧɬɢɥɹɰɢɢ ɬ ɟ ɜɨɡɞɭɯɨɨɛɦɟɧɚ ɜ ɩɨɦɟɳɟɧɢɢ x ɩɥɨɬɧɨɫɬɶ ɫɨɟɞɢɧɟɧɢɣ ɝɚɡɨɜɨɣ ɚɪɦɚɬɭɪɵ x ɷɮɮɟɤɬɢɜɧɨɫɬɶ ɞɟɣɫɬɜɢɹ ɜɫɟɯ ɮɭɧɤɰɢɨɧɚɥɶɧɵɯ ɷɥɟɦɟɧɬɨɜ ɩɥɢɬɵ x ɩɪɢɫɩɨɫɨɛɥɟɧɢɟ ɷɥɟɤɬɪɨɩɪɨɜɨɞɤɢ ɤ ɫɨ...

Page 10: ...junctions by insulating teflon tape Overtightening max tightening torque 20 Nm or using glue can result in junction damage and lead to gas leak In plant the gas cooker has been pre adjusted for operating on AC power and single phase current 230 volt 50 hz First check up if the AC outlet complies with the cooker s electric capacity and then plug in The power outlet should have a zero phase Cautions...

Page 11: ...ɢɱɟɫɤɢɣ ɤɨɧɰɟɜɨɣ ɩɚɬɪɭɛɨɤ ɞɥɢɧɨɣ ɦɢɧ 0 5ɦ ɫɨ ɲɥɚɧɝɨɜɵɦ ɤɨɧɰɟɜɵɦ ɩɚɬɪɭɛɤɨɦ 8 x 1ɦɦ ɉɨɞɚɸɳɚɹ ɝɚɡ ɬɪɭɛɚ ɧɟ ɞɨɥɠɧɚ ɤɚɫɚɬɶɫɹ ɦɟɬɚɥɥɢɱɟɫɤɢɯ ɷɥɟɦɟɧɬɨɜ ɡɚɳɢɬɵ ɡɚɞɧɟɣ ɫɬɟɧɵ ɩɥɢɬɵ Ɉɛɪɚɬɢɬɟ ɜɧɢɦɚɧɢɟ ɧɚ ɫɨɯɪɚɧɟɧɢɟ ɩɥɨɬɧɨɫɬɢ ɫɨɟɞɢɧɟɧɢɣ Ɋɟɤɨɦɟɧɞɭɟɬɫɹ ɭɩɥɨɬɧɢɬɶ ɫɨɟɞɢɧɟɧɢɹ ɩɪɢ ɩɨɦɨɳɢ ɭɩɥɨɬɧɹɸɳɟɣ ɥɟɧɬɵ ɢɡ ɬɟɮɥɨɧɚ ɉɟɪɟɬɹɠɤɚ ɛɨɥɶɲɢɦ ɦɨɦɟɧɬɨɦ ɦɚɤɫ 20ɧɦ ɢɥɢ ɢɫɩɨɥɶɡɨɜɚɧɢɟ ɤɥɟɹ ɦɨɠɟɬ ɜɵɡɜɚɬɶ ɩɨɜɪɟɠɞɟɧɢɟ ɫɨɟɞɢɧɟɧɢɹ ɢ ɟɝɨ...

Page 12: ...ith the available type of gas see the table 1 2 To adjust the burners Switch on gas and select Sparing flame For adjustment use a 2 5 mm screw tip 3 To replace the nozzle in the oven See table 1 a to adjust air supply correctly Table 1 Type of gas Burner type diameter ɚ Small Normal Big Oven Natural gas 0 75 1 09 1 24 1 3 3 Liquid gas 0 52 0 67 0 84 0 84 10 Gas supply Adjusting from liquid gas to ...

Page 13: ...ɵ ɝɨɪɟɥɤɚɦɢ ɧɚɫɬɪɨɟɧɧɵɦɢ ɡɚɜɨɞɨɦ ɩɪɨɢɡɜɨɞɢɬɟɥɟɦ ɧɚ ɩɪɢɪɨɞɧɵɣ ɝɚɡ ɢɫɩɨɥɶɡɭɟɦɵɣ ɜ ȼɚɲɟɣ ɫɬɪɚɧɟ Ɍɢɩ ɝɚɡɚ ɭɤɚɡɚɧ ɧɚ ɡɚɜɨɞɫɤɨɣ ɬɚɛɥɢɱɤɟ Ɂɚɜɨɞɫɤɚɹ ɬɚɛɥɢɱɤɚ ɧɚɯɨɞɢɬɫɹ ɧɚ ɡɚɞɧɟɣ ɫɬɟɧɤɟ ɩɥɢɬɵ ɑɬɨɛɵ ɨɬɪɟɝɭɥɢɪɨɜɚɬɶ ɝɚɡɨɜɵɟ ɝɨɪɟɥɤɢ ɩɥɢɬɵ ɫɧɢɦɢɬɟ ɪɭɱɤɢ ɤɪɚɧɨɜ ɑɬɨɛɵ ɨɬɪɟɝɭɥɢɪɨɜɚɬɶ ɝɚɡɨɜɵɟ ɝɨɪɟɥɤɢ ɞɭɯɨɜɤɢ ɧɚɞɨ ɜɵɞɜɢɧɭɬɶ ɞɧɨ ɤɚɦɟɪɵ ɞɭɯɨɜɤɢ ɑɬɨɛɵ ɧɚɫɬɪɨɢɬɶ ɩɥɢɬɭ ɧɚ ɝɨɪɟɧɢɟ ɞɪɭɝɨɝɨ ɬɢɩɚ ɝɚɡɚ ɫɥɟɞɭɟɬ x ɡɚɦɟɧɢɬɶ ɫɨɩɥ...

Page 14: ...n the valve of the gas inlet or gas cylinder before you make sure that the gas burners are switched off x Keep the burners clean The overflown food or residues must be immediately removed after the burners get cold x Don t put pans directly onto the burners x The weight of a pan put on the grid above a burner should not exceed 10 kg the total weight of the pans over the four burners should be max ...

Page 15: ...schen x Eigenwillige Anpassung vom Gasherd an einen anderen Gastyp Verstellung des Herdes sowie Einführung von Änderungen in die Gasversorgungsleitung sind verboten Diese Tätigkeiten dürfen ausschließlich von einem autorisierten Installateur durchgeführt werden ɍɋɅɈȼɂə ȻȿɁɈɉȺɋɇɈɋɌɂ x ɉɨɠɚɥɭɣɫɬɚ ɜɨ ɜɪɟɦɹ ɩɨɥɶɡɨɜɚɧɢɹ ɩɥɢɬɨɣ ɫɥɟɞɢɬɟ ɡɚ ɞɟɬɶɦɢ ɬɚɤ ɤɚɤ ɞɟɬɢ ɧɟ ɡɧɚɸɬ ɩɪɢɧɰɢɩɨɜ ɨɛɫɥɭɠɢɜɚɧɢɹ ɩɥɢɬɵ Ƚɨɪɹɱɢɟ...

Page 16: ...tion gets inflamed immediately cut off the gas supply by turning off the valve of the gas cylinder or the switch which disconnects gas supply x In case of damage air the room disconnect the appliance from the power supply and repair the fault x If the gas leaking out of the nontight junction of the gas cylinder gets inflamed wrap the cylinder with a wet blanket to extinguish the flame and turn off...

Page 17: ...welche mit der Gasart versorgt ist für die Ihr Gasherd werksseitig ausgelegt ist Die Information über die Gasart an die Ihr Gasherd werksseitig angepasst worden ist ist dem Typenschild zu entnehmen Das Typenschild befindet sich auf der Rückwand des Gerätes x ɇɟ ɞɨɩɭɫɤɚɣɬɟ ɤ ɩɥɢɬɟ ɦɚɥɵɯ ɞɟɬɟɣ ɚ ɬɚɤɠɟ ɥɢɰ ɧɟ ɨɡɧɚɤɨɦɥɟɧɧɵɯ ɫ ɪɭɤɨɜɨɞɫɬɜɨɦ ɩɨ ɷɤɫɩɥɭɚɬɚɰɢɢ ɩɥɢɬɵ x Ɉɛɪɚɬɢɬɟ ɜɧɢɦɚɧɢɟ ɧɚ ɦɨɦɟɧɬ ɤɢɩɹɱɟɧɢɹ ɱ...

Page 18: ...trol 4 Knobs of the oven operating functions 5 Pilot light ON OUT yellow 6 Oven door 7 Drawer 8 Oven temperature pilot light red 9 Control panel 10 Electronic timer 11 Timer Depending on the technical equipment different models are provided with different control panels and relevantly arranged operating elements 1 1 2 3 6 7 8 5 2 9 4 10 2 3 6 8 5 2 9 4 11 1 1 7 ...

Page 19: ...iedenen Bedienblenden versehen an denen die Bedienelemente sinnvoll angeordnet sind ɄɊȺɌɄɈȿ ɈɉɂɋȺɇɂȿ ȼɇȿɒɇɂɃ ȼɂȾ ɉɪɢɦɟɪɧɨɟ ɪɚɡɦɟɳɟɧɢɟ ɮɭɧɤɰɢɨɧɚɥɶɧɵɯ ɭɡɥɨɜ 1 Ƚɨɪɟɥɤɢ ɩɥɢɬɵ 2 Ɋɭɱɤɢ ɧɚɝɪɟɜɚɬɟɥɶɧɵɯ ɩɨɥɟɣ 3 Ɋɭɱɤɚ ɬɟɪɦɨɪɟɝɭɥɹɬɨɪɚ ɞɭɯɨɜɤɢ 4 Ɋɭɱɤɚ ɪɟɠɢɦɚ ɪɚɛɨɬɵ ɞɭɯɨɜɤɢ ɪɚɛɨɱɢɯ ɮɭɧɤɰɢɣ 5 Ʉɨɧɬɪɨɥɶɧɚɹ ɥɚɦɩɨɱɤɚ ɪɚɛɨɬɵ ɩɥɢɬɵ ɠɟɥɬɚɹ 6 Ⱦɭɯɨɜɨɣ ɲɤɚɮ 7 ȼɵɞɜɢɠɧɨɣ ɹɳɢɤ 8 Ʉɨɧɬɪɨɥɶɧɚɹ ɥɚɦɩɨɱɤɚ ɬɟɦɩɟɪɚɬɭɪɵ ɞɭɯɨɜɤɢ ɤɪɚɫ...

Page 20: ...ic sensor timer 1 Knobs of gas burners 2 Knob of the oven temperature control 3 Knob of the oven operating functions 4 Control light ON OFF yellow 5 Oven operation Control light red 6 Timer if available 7 Digital programming device 8 Button 9 Button Function selection 10 Button 1 4 2 6 3 1 5 1 2 1 4 5 7 3 8 9 10 ...

Page 21: ...eitwecker falls vorhanden 7 Digitale Zeitschaltuhr 8 Drucktaste 9 Betriebdrucktaste 10 Drucktaste ɉȺɇȿɅɂ ɍɉɊȺȼɅȿɇɂə ɉɚɧɟɥɢ ɭɩɪɚɜɥɟɧɢɹ ɦɨɞɟɥɟɣ XL 500 ɫ ɦɢɧɭɬɧɢɤɨɦ ɉɚɧɟɥɢ ɭɩɪɚɜɥɟɧɢɹ ɦɨɞɟɥɟɣ XL 500 ɫ ɫɟɧɫɨɪɧɵɦ ɷɥɟɤɬɪɨɧɧɵɦ ɩɪɨɝɪɚɦɦɢɪɭɸɳɢɦ ɭɫɬɪɨɣɫɬɜɨɦ 1 Ɋɭɱɤɢ ɭɩɪɚɜɥɟɧɢɹ ɝɚɡɨɜɵɦɢ ɝɨɪɟɥɤɚɦɢ 2 Ɋɭɱɤɚ Ɍɟɪɦɨɪɟɝɭɥɹɬɨɪɚ ɞɭɯɨɜɤɢ 3 Ɋɭɱɤɚ Ɋɟɠɢɦ ɪɚɛɨɬɵ ɞɭɯɨɜɤɢ ɢɥɢ Ɉɫɜɟɳɟɧɢɟ ɞɭɯɨɜɤɢ 4 Ʉɨɧɬɪɨɥɶɧɚɹ ɥɚɦɩɨɱɤɚ ȼɤɥ ȼɵɤɥ ...

Page 22: ...ft Ø180 mm 1 2 kW 3 Knob of the gas burner behind right 1 8 kW 4 Knob of the gas burner in front right 2 8 kW HGE 50508 1 Knob of the gas burner in front left 1 0 kW 2 Knob of the gas burners behind left 1 8 kW 3 Knob of the gas burner behind right 1 8 kW 4 Knob of the gas burner in front right 2 8 kW HGE 50306 1 Knob of the gas burner in front left 1 0 kW 2 Knob of the electrical cooking zone beh...

Page 23: ...odifikationen ɈȻɈɊɍȾɈȼȺɇɂȿ ȼȺɊɈɑɇȺə ɉɈȼȿɊɏɇɈɋɌɖ ɋ ȽȺɁɈȼɕɆɂ ȽɈɊȿɅɄȺɆɂ HGG 50501 HGG 50511 HGG 50521 HGG 50531 1 Ɋɭɱɤɚ ɭɩɪɚɜɥɟɧɢɹ ɝɚɡɨɜɨɣ ɝɨɪɟɥɤɨɣ ɩepeɞɧɹɹ ɥɟɜɚɹ 1 0 ɤȼɬ 2 Ɋɭɱɤɚ ɭɩɪɚɜɥɟɧɢɹ ɝɚɡɨɜɨɣ ɝɨɪɟɥɤɨɣ ɡɚɞɧɹɹ ɥɟɜɚɹ 1 8 ɤȼɬ 3 Ɋɭɱɤɚ ɭɩɪɚɜɥɟɧɢɹ ɝɚɡɨɜɨɣ ɝɨɪɟɥɤɨɣ ɡɚɞɧɹɹ ɩɪɚɜɚɹ 1 8 ɤȼɬ 4 Ɋɭɱɤɚ ɭɩɪɚɜɥɟɧɢɹ ɝɚɡɨɜɨɣ ɝɨɪɟɥɤɨɣ ɩɟɪɟɞɧɹɹ ɩɪɚɜɚɹ 2 8 ɤȼɬ HGE 50301 HGE 50302 1 Ɋɭɱɤɚ ɭɩɪɚɜɥɟɧɢɹ ɝɚɡɨɜɨɣ ɝɨɪɟɥɤɨɣ ɩ...

Page 24: ...are provided with the system of electrical ignition operated by means of knobs To switch on a gas burner x Press the corresponding knob of the selected burner against the stop and turn it to the left up to the position strong gas supply x Keep the switch pressed till the burner ignites x After the burner has ignited let the knob go and select the required flame volume e g sparing flame x To switch...

Page 25: ...gedrückt gehalten werden damit der Gasausflussschutz anspringen kann ɉɈɅɖɁɈȼȺɇɂȿ ȽȺɁɈȼɈɃ ɉɈȼȿɊɏɇɈɋɌɖɘ ɉɪɟɠɞɟ ɱɟɦ ɩɪɢɫɬɭɩɢɬɶ ɤ ɩɟɪɜɨɦɭ ɢɫɩɨɥɶɡɨɜɚɧɢɸ ɫɥɟɞɭɟɬ x ɨɡɧɚɤɨɦɢɬɶɫɹ ɫ ɪɭɤɨɜɨɞɫɬɜɨɦ ɢ ɭɫɥɨɜɢɹɦɢ ɛɟɡɨɩɚɫɧɨɫɬɢ ɨɛɫɥɭɠɢɜɚɧɢɹ x ɭɞɚɥɢɬɶ ɭɩɚɤɨɜɨɱɧɵɣ ɦɚɬɟɪɢɚɥ ɨɩɨɪɨɠɧɢɬɶ ɜɵɞɜɢɠɧɨɣ ɹɳɢɤ ɜɵɦɵɬɶ ɤɚɦɟɪɭ ɞɭɯɨɜɤɢ ɫ ɰɟɥɶɸ ɭɫɬɪɚɧɟɧɢɹ ɤɨɧɫɟɪɜɢɪɭɸɳɢɯ ɜɟɳɟɫɬɜ x ɩɪɨɜɟɪɢɬɶ ɷɮɮɟɤɬɢɜɧɨɫɬɶ ɮɭɧɤɰɢɨɧɢɪɨɜɚɧɢɹ ɤɥɚɩɚɧɨɜ ɭɫɬ...

Page 26: ...me Remember that the diameter of the pan s bottom should be bigger than the diameter of flame in the burner Pans should be covered with lids For effective cooking the utensil s diameter should be 2 5 3 times bigger that that of the burner Thus following diameters correspond to the available burner types x Small 90 mm to 150 mm x Normal 160 mm to 220 mm x Strong 200 mm to 240 mm The utensils height...

Page 27: ...t einem Durchmesser von 160 bis zu 220 mm x für den großen Brenner ein Geschirr mit einem Durchmesser von 200 bis zu 240 mm Die Höhe des Geschirrs sollte nicht größer sein als sein Durchmesser ɉɪɚɜɢɥɶɧɨ ɨɬɪɟɝɭɥɢɪɨɜɚɧɧɵɟ ɝɨɪɟɥɤɢ ɢɦɟɸɬ ɩɥɚɦɹ ɫɜɟɬɥɨɝɨɥɭɛɨɝɨ ɰɜɟɬɚ ɫ ɨɬɱɟɬɥɢɜɨ ɨɛɨɡɧɚɱɟɧɧɵɦ ɜɧɭɬɪɟɧɧɢɦ ɤɨɧɭɫɨɦ ɇɚɫɬɪɨɣɤɚ ɩɥɚɦɟɧɢ ɡɚɜɢɫɢɬ ɨɬ ɭɫɬɚɧɨɜɤɢ ɩɨɥɨɠɟɧɢɹ ɪɭɱɤɢ ɝɨɪɟɥɤɢ ɛɨɥɶɲɨɟ ɩɥɚɦɹ ɦɚɥɟɧɶɤɨɟ ɩɥɚɦɹ ɷɤ...

Page 28: ... time is necessary for the control sensing element to get warmed up and thus activate the protective system If the burner does not ignites within 10 sec repeat the procedure 1 min later again i e after the oven has been ventilated To switch on the oven x Press the knob 1 oven temperature control against the stop turn it to the left and select the required temperature x Observe the flame in the ove...

Page 29: ...5 anlegen und den Drehregler noch ca 3 Sekunden lang nach dem Aufflammen hineingedrückt halten Falls die Flamme erlischt ist die Tätigkeit nach 3 Sekunden zu wiederholen ɍɉɊȺȼɅȿɇɂȿ ɊȺȻɈɌɈɃ ȽȺɁɈȼɈȽɈ ȾɍɏɈȼɈȽɈ ɒɄȺɎȺ Ⱦɭɯɨɜɤɢ ɭɫɬɚɧɨɜɥɟɧɧɵɟ ɜ ɤɭɯɨɧɧɵɯ ɩɥɢɬɚɯ ɜ ɡɚɜɢɫɢɦɨɫɬɢ ɨɬ ɬɢɩɚ ɩɥɢɬɵ ɨɛɥɚɞɚɸɬ ɪɚɡɥɢɱɧɵɦɢ ɪɚɛɨɱɢɦɢ ɮɭɧɤɰɢɹɦɢ ȼ ɡɚɜɢɫɢɦɨɫɬɢ ɨɬ ɪɟɚɥɢɡɢɪɭɟɦɨɣ ɪɚɛɨɱɟɣ ɮɭɧɤɰɢɢ ɦɨɠɧɨ ɩɨɥɶɡɨɜɚɬɶɫɹ ɨɛɨɪɭɞɨɜɚɧɢɟɦ ...

Page 30: ...utomatic programmer 4 which enables to run the oven in automatical half automatical or manual cycle After the selected oven temperature has been reached the red control light goes out If it is necessary to put the dish into a pre heated oven do it after the red control light has gone out The red control light can also be on if the knob is set in the position to illuminate the oven In this position...

Page 31: ...r Zeitschaltuhr ɍɉɊȺȼɅȿɇɂȿ ɊȺȻɈɌɈɃ ɆɇɈȽɈɎɍɇɄɐɂɈɇȺɅɖɇɈȽɈ ɗɅȿɄɌɊɂɑȿɋɄɈȽɈ ȾɍɏɈȼɈȽɈ ɒɄȺɎȺ ɍɩɪɚɜɥɟɧɢɟ ɪɟɠɢɦɨɦ ɪɚɛɨɬɵ ɞɭɯɨɜɨɝɨ ɲɤɚɮɚ ɨɫɭɳɟɫɬɜɥɹɟɬɫɹ ɩɨɜɨɪɨɬɨɦ ɪɭɱɟɤ ɜɵɛɨɪɚ ɪɟɠɢɦɚ ɪɚɛɨɬɵ 1 ɢ ɬɟɪɦɨɪɟɝɭɥɹɬɨɪɚ 2 ɞɭɯɨɜɤɢ ɭɫɬɚɧɨɜɥɟɧɧɵɯ ɧɚ ɩɚɧɟɥɢ ɭɩɪɚɜɥɟɧɢɹ ɤɭɯɨɧɧɨɣ ɩɥɢɬɵ Ƚɪɚɮɢɱɟɫɤɢɟ ɨɛɨɡɧɚɱɟɧɢɹ ɭɫɬɚɧɨɜɥɟɧɧɵɟ ɪɹɞɨɦ ɫ ɪɭɱɤɚɦɢ ɭɩɪɚɜɥɟɧɢɹ ɩɨɤɚɡɵɜɚɸɬ ɜɵɛɪɚɧɧɵɟ ɩɚɪɚɦɟɬɪɵ ɪɚɛɨɬɵ ɞɭɯɨɜɤɢ Ⱦɥɹ ɨɬɤɥɸɱɟɧɢɹ ɞɭɯɨɜɤɢ ɭɫɬɚɧɨɜ...

Page 32: ...t air inside the oven thus creating uniform heat In this way cooking time is much shorter than usually This method is perfect for cooking dishes on more than one shelf especially if the food is of different kind fish meat etc DEFROSTING By selecting one of the fan cooking functions and setting the temperature control at zero the fan enables cold air to circulate inside the oven In this way frozen ...

Page 33: ...e von oben eingeschoben Den Backofen 5 Minuten vorheizen Den Drehregler Temperaturregler auf Temperaturen von 50 bis 200 einstellen ɊȺȻɈɑɂȿ ɎɍɇɄɐɂɂ ȾɍɏɈȼɈȽɈ ɒɄȺɎȺ ɈȻɕɑɇɈȿ ɉɊɂȽɈɌɈȼɅȿɇɂȿ Ʉɥɚɫɫɢɱɟɫɤɚɹ ɫɢɫɬɟɦɚ ɩɪɢ ɤɨɬɨɪɨɣ ɩɪɢɦɟɧɹɟɬɫɹ ɜɟɪɯɧɢɣ ɢɥɢ ɧɢɠɧɢɣ ɧɚɝɪɟɜ ɩɪɢɝɨɞɧɚ ɞɥɹ ɩɪɢɝɨɬɨɜɥɟɧɢɹ ɬɨɥɶɤɨ ɨɞɧɨɝɨ ɛɥɸɞɚ Ȼɥɸɞɚ ɞɨɥɠɧɵ ɩɨɦɟɳɚɬɶɫɹ ɜ ɞɭɯɨɜɤɭ ɩɨ ɜɨɡɦɨɠɧɨɫɬɢ ɥɢɲɶ ɩɨɫɥɟ ɞɨɫɬɢɠɟɧɢɹ ɡɚɞɚɧɧɨɣ ɬɟɦɩɟɪɚɬɭɪɵ ɬ ɟ ɤ...

Page 34: ... the outer surface of the oven exceeds 60 C If you set up the oven temperature at 200 C the fan starts in 10 min It switches off automatically after the temperature of the outer surface of the oven has fallen below 60 C After the oven heated up to 200 C has been switched off the fan stops in approx 30 min MECHANICAL TIMER To use the device turn the knob 1 clockwise as far as it will go and set the...

Page 35: ...nenbeleuchtung bleibt während des Betriebes vom Backofen aktiv Wenn Sie nach Zubereitung Ihr Gericht kontrollieren möchten stellen Sie den Drehregler Backofenbetriebsart 2 in die Position Licht falls vorhanden ȼȿɊɌȿɅ ɇɟɤɨɬɨɪɵɟ ɞɭɯɨɜɤɢ ɨɛɨɪɭɞɨɜɚɧɵ ɜɟɪɬɟɥɨɦ ɩɪɢɜɨɞɢɦɵɦ ɜɨ ɜɪɚɳɟɧɢɟ ɷɥ ɦɨɬɨɪɨɦ Ȼɥɚɝɨɞɚɪɹ ɜɟɪɬɟɥɭ ɜɨɡɦɨɠɧɚ ɜɪɚɳɚɬɟɥɶɧɚɹ ɨɛɠɚɪɤɚ ɛɥɸɞ ɜ ɞɭɯɨɜɤɟ ɋɥɭɠɢɬ ɝɥɚɜɧɵɦ ɨɛɪɚɡɨɦ ɞɥɹ ɨɛɠɚɪɤɢ ɞɨɦɚɲɧɟɣ ɩɬɢ...

Page 36: ...u can use a wire shelf or backing tray and place them at the optimal operating level I to IV within the oven PREPARING THE FOOD TO BE COOKED IN THE SPIT Keep to the following procedure x Spear the food on the handle of the spit 3 and fix it by means of forks 4 x Screw on handle 5 if required x Arrange the spit frame 9 at level III in the oven x Shift the end of the spit 3 into the drive coupling 8...

Page 37: ...ter Höhe hineinschieben und die Backofentür anlehnen Beim Herausnehmen von Speisen benutzen Sie unbedingt den Handgriff 5 um eine Verbrennung zu vermeiden falls vorhanden ɉɈɅɖɁɈȼȺɇɂȿ ȾɍɏɈȼɕɆ ɒɄȺɎɈɆ ȼ ɧɟɫɤɨɥɶɤɨ ɩɪɨɫɬɵɯ ɞɜɢɠɟɧɢɣ ȼɵ ɦɨɠɟɬɟ ɧɚɱɚɬɶ ɩɪɨɰɟɫɫ ɩɪɢɝɨɬɨɜɥɟɧɢɹ x Ɋɭɱɤɨɣ 2 ɪɟɠɢɦɚ ɪɚɛɨɬɵ ɞɭɯɨɜɤɢ ɜɵɛɟɪɢɬɟ ɠɟɥɚɟɦɵɣ ɪɟɠɢɦ ɩɪɢɝɨɬɨɜɥɟɧɢɹ ɇɟ ɨɬɧɨɫɢɬɫɹ ɤ ɝɚɡɨɜɨɣ ɞɭɯɨɜɤɟ x Ɋɭɱɤɨɣ 1 ɬɟɪɦɨɪɟɝɭɥɹɬɨɪɚ ɜɵɛɟɪ...

Page 38: ...preparation 3 appears on the display x By pressing keys 4 or 5 or you can set the time After a few seconds the set time is confirmed by the acustic signal and the figures stop to flash The required time can be also set afterwards Therefore you have to x Press the keys 4 and 5 or simultaneously for 3 seconds The time is set as described if available 3 1 4 5 2 Important If you set the time anew prev...

Page 39: ...oben beschrieben reguliert falls vorhanden ɋȿɇɋɈɊɇɈȿ ɗɅȿɄɌɊɈɇɇɈȿ ɉɊɈȽɊȺɆɆɂɊɍɘɓȿȿ ɍɋɌɊɈɃɋɌȼɈ Touch control ɉɪɢ ɩɟɪɜɨɦ ɜɤɥɸɱɟɧɢɢ ɱɚɫɨɜ ɧɚɱɢɧɚɸɬ ɦɢɝɚɬɶ ɫɢɦɜɨɥɵ 1 AUTO ɢ 0 00 ɍɫɬɚɧɨɜɤɚ ɬɟɤɭɳɟɝɨ ɜɪɟɦɟɧɢ ɑɬɨɛɵ ɭɫɬɚɧɨɜɢɬɶ ɬɟɤɭɳɟɟ ɜɪɟɦɹ x ɇɚɠɦɢɬɟ ɧɚ ɫɪɟɞɧɸɸ ɤɧɨɩɤɭ 2 ɜ ɬɟɱɟɧɢɟ 3 ɯ ɫɟɤɭɧɞ ɇɚ ɞɢɫɩɥɟɟ ɩɨɹɜɢɬɫɹ ɫɢɦɜɨɥ ɉɪɢɝɨɬɨɜɥɟɧɢɟ 3 x ɋ ɩɨɦɨɳɶɸ ɤɧɨɩɨɤ ɜɵɛɨɪɚ 4 ɢɥɢ 5 ɢɥɢ ɭɫɬɚɧɨɜɢɬɟ ɠɟɥɚɟɦɨɟ ɜɪɟɦɹ ɑɟɪɟɡ ɧɟɫɤɨɥɶ...

Page 40: ...he display x Press the keys 3 or 4 or to set the countdown time and wait for a few seconds After a moment the countdown timer starts the countdown and the current time of day and the symbol countdown timer 5 appear The end of the countdown is indicated by the acustic signal a double tone with the interval of 2 seconds At the same time the symbol countdown timer 5 flashes x To switch off the timer ...

Page 41: ...ignalton mit dem Intervall von 2 Sekunden und blinkt das Symbol Kurzzeitwecker 5 x Um den Kurzzeitwecker auszuschalten eine beliebige Taste drücken Das Symbol Kurzzeitwecker 5 erlischt ɗɥɟɤɬɪɨɧɧɵɣ ɦɢɧɭɬɧɢɤ ɗɥɟɤɬɪɨɧɧɵɣ ɦɢɧɭɬɧɢɤ ɪɚɛɨɬɚɟɬ ɧɚɡɚɜɢɫɢɦɨ ɨɬ ɞɪɭɝɢɯ ɮɭɧɤɰɢɣ ɂɦ ɦɨɠɧɨ ɩɨɥɶɡɨɜɚɬɶɫɹ ɞɚɠɟ ɟɫɥɢ ɞɭɯɨɜɤɚ ɜɵɤɥɸɱɟɧɚ ɑɬɨɛɵ ɜɤɥɸɱɢɬɶ ɦɢɧɭɬɧɢɤ x ɇɚɠɦɢɬɟ ɧɚ ɫɪɟɞɧɸɸ ɤɧɨɩɤɭ 1 ɜ ɬɟɱɟɧɢɟ 3 ɯ ɫɟɤɭɧɞ ɇɚ ɞɢɫɩɥɟɟ...

Page 42: ...r on the display alternately and symbol 3 AUTO flashes x Use keys 4 or 5 or to set the required cooking time A few seconds later the countdown of the cooking time starts Symbol 6 AUTO appears on the display to confirm the successful setting The current time appears again The end of the countdown is indicated by a double acustic signal at intervals of 2 seconds The flashing symbols inform you that ...

Page 43: ...zu informieren dass alle Vorgänge im Backofen abgeschaltet sind x Um den Signalton auszuschalten eine beliebige Taste drücken Der Vorgang wird durch Erlöschen der Symbole bestätigt ɍɫɬɚɧɨɜɤɚ ɩɪɨɞɨɥɠɢɬɟɥɶɧɨɫɬɢ ɩɪɢɝɨɬɨɜɥɟɧɢɹ Ⱦɭɯɨɜɤɚ ɞɨɥɠɧɚ ɚɜɬɨɦɚɬɢɱɟɫɤɢ ɨɬɤɥɸɱɢɬɶɫɹ ɩɨ ɢɫɬɟɱɟɧɢɢ ɠɟɥɚɟɦɨɝɨ ɩɪɨɦɟɠɭɬɤɚ ɜɪɟɦɟɧɢ ɉɪɟɠɞɟ ɱɟɦ ɡɚɞɚɬɶ ɩɪɨɞɨɥɠɢɬɟɥɶɧɨɫɬɶ ɩɪɢɝɨɬɨɜɥɟɧɢɹ ȼɵ ɞɨɥɠɧɵ ɭɫɬɚɧɨɜɢɬɶ ɪɟɠɢɦ ɪɚɛɨɬɵ ɞɭɯɨɜɤɢ ɢ ...

Page 44: ...ng the choose keys 4 or 5 or you set the wanted end of the preparation After a few seconds the program is activated Symbol 6 AUTO appears on the display to confirm the successful setting The current time appears again After the set end time is reached a double tone with the interval of 2 seconds sounds and the symbols flash to inform you that all processes in the oven are switched off x Press any ...

Page 45: ...cken Sie eine beliebige Taste Der Vorgang wird durch Erlöschen der Symbole bestätigt ɍɫɬɚɧɨɜɤɚ ɜɪɟɦɟɧɢ ɨɤɨɧɱɚɧɢɹ ɩɪɢɝɨɬɨɜɥɟɧɢɹ Ⱦɭɯɨɜɤɚ ɞɨɥɠɧɚ ɚɜɬɨɦɚɬɢɱɟɫɤɢ ɨɬɤɥɸɱɢɬɶɫɹ ɜ ɡɚɪɚɧɟɟ ɡɚɞɚɧɧɨɟ ɜɪɟɦɹ ɉɪɟɠɞɟ ɱɟɦ ɡɚɞɚɬɶ ɜɪɟɦɹ ɨɤɨɧɱɚɧɢɹ ɪɚɛɨɬɵ ȼɵ ɞɨɥɠɧɵ ɭɫɬɚɧɨɜɢɬɶ ɪɟɠɢɦ ɪɚɛɨɬɵ ɞɭɯɨɜɤɢ ɢ ɬɟɦɩɟɪɚɬɭɪɭ ɩɪɢɝɨɬɨɜɥɟɧɢɹ ɫɦ ɪɚɡɞɟɥ ɉɨɥɶɡɨɜɚɧɢɟ ɞɭɯɨɜɵɦ ɲɤɚɮɨɦ x ɇɚɠɦɢɬɟ ɧɚ ɫɪɟɞɧɸɸ ɤɧɨɩɤɭ 1 ɜ ɬɟɱɟɧɢɟ 3 ɯ ɫɟɤɭɧɞ x ɇɚɠɦɢɬ...

Page 46: ...o functions is arbitrary You can first program the cooking time 1 and then the end of cooking time 2 or the other way round Example You would like to start cooking a dish 30 minutes before you get home so that it will be ready by your arrival at 12 55 Before you set the cooking time and the end of the cooking time you should select the oven function 3 ant the temperature see chapter Multifunction ...

Page 47: ...htzubereitung 4 ein in unserem Beispiel 30 Minuten Dafür muss die gewünschte Betriebsdauer programmiert werden siehe Kapitel Einstellen der Betriebsdauer ɍɫɬɚɧɨɜɤɚ ɜɪɟɦɟɧɢ ɩɪɨɞɨɥɠɢɬɟɥɶɧɨɫɬɢ ɢ ɨɤɨɧɱɚɧɢɹ ɩɪɢɝɨɬɨɜɥɟɧɢɹ ȼɵ ɦɨɠɟɬɟ ɤɨɦɛɢɧɢɪɨɜɚɬɶ ɮɭɧɤɰɢɢ ɜɪɟɦɟɧɢ ɩɪɢɝɨɬɨɜɥɟɧɢɹ ɢ ɜɪɟɦɟɧɢ ɨɤɨɧɱɚɧɢɹ ɩɪɢɝɨɬɨɜɥɟɧɢɹ ɡɚɞɚɜɚɹ ɠɟɥɚɟɦɨɟ ɜɪɟɦɹ ɜɤɥɸɱɟɧɢɹ ɢ ɜɵɤɥɸɱɟɧɢɹ ɞɭɯɨɜɤɢ Ɍɚɤɢɦ ɨɛɪɚɡɨɦ ȼɵ ɦɨɠɟɬɟ ɡɚɩɪɨɝɪɚɦɦɢɪɨɜɚɬɶ ...

Page 48: ...ime plus the cooking time in our example 12 45 i e plus 30 minutes x Set the required end time by key 3 A few seconds later this time will be registrated 4 in our example 12 55 i e we have put off the end time for 10 minutes The oven is in a standby mode now The current day time is displayed 5 in our example 12 15 In our example the oven should switch on at 12 25 6 with the functions Grill Hot air...

Page 49: ... Grill Thermozirkulation eingeschaltet und um 12 55 ausgeschaltet werden gemäß Ihrer Programmierung ɇɚ ɞɢɫɩɥɟɟ ɩɨɹɜɢɬɫɹ ɫɢɦɜɨɥ 1 AUTO ɩɨɞɬɜɟɪɠɞɚɸɳɢɣ ɭɫɩɟɲɧɨɟ ɩɪɨɝɪɚɦɦɢɪɨɜɚɧɢɟ ɩɪɨɞɨɥɠɢɬɟɥɶɧɨɫɬɢ ɩɪɢɝɨɬɨɜɥɟɧɢɹ ɚ ɬɚɤɠɟ ɜɟɪɧɺɬɫɹ ɩɨɤɚɡɚɧɢɟ ɬɟɤɭɳɟɝɨ ɜɪɟɦɟɧɢ Ɍɟɩɟɪɶ ɡɚɩɪɨɝɪɚɦɦɢɪɭɣɬɟ ɠɟɥɚɟɦɨɟ ɜɪɟɦɹ ɨɤɨɧɱɚɧɢɹ ɩɪɨɰɟɫɫɚ ɩɪɢɝɨɬɨɜɥɟɧɢɹ ɫɦ ɪɚɡɞɟɥ ɍɫɬɚɧɨɜɤɚ ɜɪɟɦɟɧɢ ɨɤɨɧɱɚɧɢɹ ɩɪɢɝɨɬɨɜɥɟɧɢɹ ɇɚ ɞɢɫɩɥɟɟ ɩɨɹɜɢɬɫɹ ɜɪɟɦɹ...

Page 50: ...taneously The dot which separates the hours from the minutes flashes x Press the middle key 3 The flashing symbol 4 appears ton1 loud sound If you prefer to select middle sound ton2 or low sound ton3 x Press key 5 again To save the selected volume x Press the middle key 6 4 1 2 5 6 3 ...

Page 51: ...hlen möchten x Die Wahltaste 5 erneut drücken Um die gewählte Lautstärke zu speichern x Die mittlere Taste 6 drücken ɍɫɬɚɧɨɜɤɚ ɝɪɨɦɤɨɫɬɢ ɩɪɟɞɭɩɪɟɞɢɬɟɥɶɧɨɝɨ ɫɢɝɧɚɥɚ ɑɬɨɛɵ ɭɫɬɚɧɨɜɢɬɶ ɝɪɨɦɤɨɫɬɶ ɩɪɟɞɭɩɪɟɞɢɬɟɥɶɧɨɝɨ ɫɢɝɧɚɥɚ x ɇɚɠɦɢɬɟ ɨɞɧɨɜɪɟɦɟɧɧɨ ɧɚ ɤɧɨɩɤɢ ɜɵɛɨɪɚ 1 ɢ 2 ɢ Ɂɚɦɢɝɚɟɬ ɫɪɟɞɧɹɹ ɬɨɱɤɚ ɪɚɡɞɟɥɹɸɳɚɹ ɱɚɫɵ ɢ ɦɢɧɭɬɵ x Ɂɚɬɟɦ ɧɚɠɦɢɬɟ ɧɚ ɫɪɟɞɧɸɸ ɤɧɨɩɤɭ 3 ɉɨɹɜɢɬɫɹ ɦɢɝɚɸɳɚɹ ɧɚɞɩɢɫɶ 4 ton1 ɝɪɨɦɤɢɣ ɬɨɧ ȿɫɥɢ...

Page 52: ...e baking dishes made of black plate or golden plated metal are recommended The above mentioned baking cups and dishes have a better heat conductivity which results in reduced baking time and energy saving x Bake pastry and cakes in a pre heated oven x The oven is to be thoroughly pre heated if you bake heavy cakes which have a big mass and rise weakly For cakes that rise quickly use a slightly pre...

Page 53: ... der Backofenabschaltung sollte das Gebäck noch 5 Minuten drin bleiben ɉɊȺɄɌɂɑȿɋɄɂȿ ɋɈȼȿɌɕ Ɋɟɤɨɦɟɧɞɭɟɦɵɟ ɪɟɠɢɦɵ ɩɪɢɝɨɬɨɜɥɟɧɢɹ ɉɪɟɞɥɚɝɚɟɦɵɟ ɪɟɠɢɦɵ ȼɵ ɦɨɠɟɬɟ ɧɚɣɬɢ ɬɚɤɠɟ ɧɚ ɜɧɭɬɪɟɧɧɟɦ ɫɬɟɤɥɟ ɞɜɟɪɢ ɞɭɯɨɜɤɢ ɗɬɢ ɫɢɦɜɨɥɵ ɥɢɲɶ ɨɛɪɚɡɧɨ ɩɨɤɚɡɵɜɚɸɬ ɤɚɤɢɟ ɬɢɩɵ ɩɢɳɢ ɦɨɝɭɬ ɛɵɬɶ ɩɪɢɝɨɬɨɜɥɟɧɵ ɜ ɬɨɦ ɢɥɢ ɢɧɨɦ ɪɟɠɢɦɟ ɑɬɨɛɵ ɩɨɡɧɚɬɶ ɦɧɨɝɨɝɪɚɧɧɨɫɬɶ ɷɬɨɣ ɞɭɯɨɜɤɢ ɧɟ ɛɨɣɬɟɫɶ ɷɤɫɩɟɪɢɦɟɧɬɢɪɨɜɚɬɶ ɫɨ ɜɫɟɦɢ ɮɭɧɤɰɢɹɦɢ ɨɩɢɪɚɹɫɶ...

Page 54: ...mperature Temperatur C Ɍɟɦɩɟɪɚɬɭɪɚ ɋ Baking time min Backzeit min ȼɪɟɦɹ ɦɢɧ Cakes in cups and dishes Formgebäck ȼɵɩɟɱɤɚ ɜ ɮɨɪɦɚɯ Meringue Schaumgebäck Ȼɟɡɟ 2 3 80 100 60 70 Sand paste Sandkuchen ɉɟɫɨɱɧɚɹ ɛɚɛɚ 2 3 160 180 40 70 Yeasted dough Hefekuchen Ⱦɪɨɠɠɟɜɚɹ ɛɚɛɚ 2 3 170 180 50 60 Tart Torte Ɍɨɪɬ 2 3 160 180 30 50 Sponge cake Biskuitkuchen Ȼɢɫɤɜɢɬ 2 3 160 180 10 25 Shortcrust for fruit tart Mür...

Page 55: ...ɭɟɬɫɹ ɜɵɩɟɱɤɚ ɧɚ III ɭɪɨɜɧɟ ɫɧɢɡɭ ɞɭɯɨɜɤɢ ɚ ɜ ɫɥɭɱɚɟ ɨɞɧɨɜɪɟɦɟɧɧɨɣ ɜɵɩɟɱɤɢ ɧɚ ɞɜɭɯ ɭɪɨɜɧɹɯ ɪɟɤɨɦɟɧɞɭɸɬɫɹ ɭɪɨɜɧɢ II ɢ IV Baking parameters for fan cooking Table 2 Backparameter bei Nutzung der Heißluft Tabelle 2 ɉɚɪɚɦɟɬɪɵ ɜɵɩɟɱɤɢ ɫ ɬɟɪɦɨɰɢɪɤɭɥɹɰɢɟɣ Ɍɚɛɥɢɰɚ 2 Kind of dough Gebäckart Ɍɢɩ ɬɟɫɬɚ Temperature C Temperatur C Ɍɟɦɩɟɪɚɬɭɪɚ ɋ Baking time min Backzeit min ȼɪɟɦɹ ɦɢɧ Cakes in cups and dishes For...

Page 56: ...able 3 those with hot air circulation in Table 4 Note The given parameters refer to roasting on the grid If you use closed pans select the temperature 200 C Remember to turn over the joint as soon as the half of the selected cooking time has passed Roasting bigger meat joints is more effective Baste the joint with gravy while roasting It is advisable to place a plate of water at the lowest level b...

Page 57: ...en Die in diesem Kapitel dargestellten Parameter hinsichtlich des Backens und des Bratens können Sie aufgrund eigener Erfahrungen verbessern ɀɚɪɟɧɢɟ ɢ ɬɭɲɟɧɢɟ ɦɹɫɚ Ɋɟɤɨɦɟɧɞɭɟɬɫɹ ɫɥɟɞɭɸɳɟɟ x ɠɚɪɟɧɢɟ ɢ ɬɭɲɟɧɢɟ ɜ ɞɭɯɨɜɤɟ ɛɥɸɞ ɦɚɫɫɨɣ ɩɪɟɜɵɲɚɸɳɟɣ 1 ɤɝ Ɇɟɧɶɲɢɟ ɩɨɪɰɢɢ ɫɥɟɞɭɟɬ ɩɨɞɝɨɬɨɜɢɬɶ ɧɚ ɜɚɪɨɱɧɨɣ ɩɨɜɟɪɯɧɨɫɬɢ x ɜ ɫɥɭɱɚɟ ɠɚɪɟɧɢɹ ɦɹɫɚ ɧɚ ɪɟɲɟɬɤɟ ɪɟɤɨɦɟɧɞɭɟɬɫɹ ɭɫɬɚɧɨɜɤɚ ɧɚ ɫɚɦɨɦ ɧɢɡɤɨɦ ɭɪɨɜɧɟ ɩɨɞ ɪɟɲɟɬɤɨɣ...

Page 58: ...50 5 6 Juicy roastbeef Roastbeef saftig Ɋɨɫɬɛɢɮ ɫɨɱɧɵɣ pre heated oven erhitzter Backofen ɪɚɡɨɝɪɟɬɚɹ ɞɭɯɨɜɤɚ 3 4 225 250 6 8 Well done Roastbeef Roastbeef angebraten Ɋɨɫɬɛɢɮ ɩɨɞɪɭɦɹɧɟɧɵɣ pre heated oven erhitzter Backofen ɪɚɡɨɝɪɟɬɚɹ ɞɭɯɨɜɤɚ 3 4 225 250 10 11 Pork Schweinefleisch ɋɜɢɧɢɧɚ 2 3 150 170 30 120 Veal Kalbfleisch Ɍɟɥɹɬɢɧɚ 2 3 150 170 45 120 Lamb Lammfleisch Ȼɚɪɚɧɢɧɚ 2 3 150 170 90 120 Gam...

Page 59: ...gattung ȼɢɞ ɦɹɫɚ Level Höhe Ɋɚɛ ɭɪɨɜɟɧɶ Grill time min Grillzeit min ȼɪɟɦɹ ɦɢɧ 1st side 1 Seite 1 ɫɬɨɪɨɧɚ 2nd side 2 Seite 2 ɫɬɨɪɨɧɚ Pork chop Schweinskotelett ɋɜɢɧɚɹ ɤɨɬɥɟɬɚ 4 5 8 10 6 8 Pork minced schnitzel Schweinschnitzel ɋɜɢɧɨɣ ɲɧɢɰɟɥɶ 3 4 8 10 6 8 Cooked beef Gekochtes Rindfleisch Ɉɬɜɚɪɧɨɟ ɝɨɜɹɠɶɟ ɦɹɫɨ 3 4 10 12 6 8 Sausages Würstchen Ʉɨɥɛɚɫɤɢ 4 5 8 10 6 8 Barbeque Schaschlik ɒɚɲɥɵɤɢ 4 5 7 ...

Page 60: ...d oven surfaces and baking trays Do not use chlorine based products acids or abrasive products to clean the enamel surfaces of the oven Self cleaning catalytic panels The Kaiser smooth walled ovens are provided with inner self cleaning catalytic panels 1 The fine pored enamel coating of the panels is highly ecological At the oven temperature above 200 C the enamel coating catalyzes grease and oil ...

Page 61: ...odukten gereinigt werden falls vorhanden ɈȻɋɅɍɀɂȼȺɇɂȿ ɂ ɍɏɈȾ Ⱦɭɯɨɜɨɣ ɲɤɚɮ ȼɧɭɬɪɟɧɧɢɟ ɫɬɟɧɤɢ ɞɭɯɨɜɤɢ ɩɨɤɪɵɬɵ ɜɵɫɨɤɨɤɚɱɟɫɬɜɟɧɧɨɣ ɥɟɝɤɨɨɱɢɳɚɸɳɟɣɫɹ ɷɦɚɥɶɸ Ɉɱɟɧɶ ɝɥɚɞɤɚɹ ɩɨɜɟɪɯɧɨɫɬɶ ɩɪɨɬɢɜɨɞɟɣɫɬɜɭɟɬ ɩɨɹɜɥɟɧɢɸ ɧɚ ɫɬɟɧɤɚɯ ɞɭɯɨɜɤɢ ɨɫɬɚɬɨɱɧɵɯ ɡɚɝɪɹɡɧɟɧɢɣ ɢ ɨɱɟɧɶ ɛɵɫɬɪɨ ɢ ɩɪɨɫɬɨ ɨɱɢɳɚɟɬɫɹ Ⱥɧɬɢɤɢɫɥɨɬɧɨɟ ɫɜɨɣɫɬɜɨ ɷɬɨɣ ɷɦɚɥɢ ɩɨɡɜɨɥɹɟɬ ɞɨɥɝɨɫɪɨɱɧɨ ɢ ɤɚɱɟɫɬɜɟɧɧɨ ɢɫɩɨɥɶɡɨɜɚɬɶ ȼɚɲɭ ɞɭɯɨɜɤɭ ɑɢɫɬɢɬɟ ɞɭɯɨɜɤɭ ɩɨɫɥɟ ɤɚ...

Page 62: ...des provide convenient and practical access to every level enable you to check up and take out the food from any tray thus saving the heat in the oven and preserving the food on the other trays hot A special anti tilt system guarantees safety against overturning even if the telescopic guides are fully withdrawn The maximum load amounts to 15 kg You can easily dismantle the telescopes in order to c...

Page 63: ...immten Einrastung schließen x die Tür nach oben und nach außen anheben und herausnehmen 4 Um die Tür wieder einzubauen x die Scharniere wieder einsetzen und dann die zwei Hebel in Schließstellung bringen falls vorhanden kann zusätzlich im Handel bestellt werden ɉɪɨɬɜɢɧɶ ɫ ɚɧɬɢɩɪɢɝɚɪɧɵɦ ɩɨɤɪɵɬɢɟɦ ȺȺȼ ɇɨɜɵɟ ɩɪɨɬɜɧɢ ɩɥɢɬ XL 500 ɫ ɚɧɬɢɩɪɢɝɚɪɧɵɦ ɩɨɤɪɵɬɢɟɦ ȺȺȼ ɢɡɝɨɬɨɜɥɟɧ ɧɚ ɨɫɧɨɜɟ ɧɨɜɟɣɲɢɯ ɬɟɯɧɨɥɨɝɢɣ ɗɬ...

Page 64: ...x to prevent damage put a cloth into the oven x screw out the glass cover of the light x screw out the old bulb and replace it with the new one x adjust the glass cover and remove the cloth x connect the appliance to the mains electricity supply Fan filter In case your oven is equipped with the net filter which protects the fan from the drops of fat take out the filter every time you use the oven ...

Page 65: ...seinen sichtbaren Griff und ziehen Sie ihn nach oben 4 Um den Filter wieder einzubauen sind seine Anzapfungen in die Ausschnitte der Luftführung hineinzuschieben ɋɧɹɬɢɟ ɜɧɭɬɪɟɧɧɟɝɨ ɫɬɟɤɥɚ ɋ ɷɬɨɣ ɰɟɥɶɸ ɫɥɟɞɭɟɬ ɜɵɜɢɧɬɢɬɶ ɜɢɧɬ 1 ɢ ɨɬɤɪɵɬɶ ɩɥɚɫɬɦɚɫɫɨɜɵɟ ɡɚɳɟɥɤɢ 2 ɪɚɫɩɨɥɨɠɟɧɧɵɟ ɜ ɜɟɪɯɧɢɯ ɭɝɥɚɯ ɞɜɟɪɰɵ Ɂɚɬɟɦ ɫɬɟɤɥɨ ɫɥɟɞɭɟɬ ɜɵɞɜɢɧɭɬɶ ɫɨ ɜɬɨɪɨɝɨ ɛɥɨɤɢɪɭɸɳɟɝɨ ɷɥɟɦɟɧɬɚ ɢ ɜɵɧɭɬɶ ɉɨɫɥɟ ɨɱɢɫɬɤɢ ɫɬɟɤɥɨ ɫɥɟɞɭɟɬ ɜ...

Page 66: ...rized organisation to order the servicing Some simple faults can be repaired by the user in correspondence with the recommendations in the present operating instructions Some troubles and faults can occur occasionally during the usage of the appliance The user can repair some of the faults on his or her own by following the recommendations introduced in the Table below Before contacting the custom...

Page 67: ...ɪɚɧɬɢɢ ɩɨ ɤɪɚɣɧɟɣ ɦɟɪɟ ɨɞɢɧ ɪɚɡ ɜ ɞɜɚ ɝɨɞɚ ɫɥɟɞɭɟɬ ɩɨɪɭɱɢɬɶ ɫɟɪɜɢɫɧɨɦɭ ɰɟɧɬɪɭ ɩɪɨɜɟɞɟɧɢɟ ɬɟɯɧɢɱɟɫɤɨɝɨ ɨɫɦɨɬɪɚ ɩɥɢɬɵ x ɭɫɬɪɚɧɹɬɶ ɨɛɧɚɪɭɠɟɧɧɵɟ ɧɟɢɫɩɪɚɜɧɨɫɬɢ ɉɪɢɦɟɱɚɧɢɟ ȼɫɟ ɪɟɦɨɧɬɵ ɢ ɨɩɟɪɚɰɢɢ ɩɨ ɪɟɝɭɥɢɪɨɜɤɟ ɞɨɥɠɧɵ ɩɪɨɢɡɜɨɞɢɬɶɫɹ ɫɟɪɜɢɫɧɵɦ ɰɟɧɬɪɨɦ ɢɥɢ ɦɨɧɬɺɪɨɦ ɨɛɥɚɞɚɸɳɢɦ ɫɨɨɬɜɟɬɫɬɜɭɸɳɟɣ ɤɜɚɥɢɮɢɤɚɰɢɟɣ ɑɬɨ ɞɟɥɚɬɶ ɟɫɥɢ ȼ ɫɥɭɱɚɟ ɥɸɛɨɣ ɧɟɢɫɩɪɚɜɧɨɫɬɢ ɫɥɟɞɭɟɬ x ɨɬɤɥɸɱɢɬɶ ɜɫɟ ɷɥɟɦɟɧɬɵ ɩɥɢɬɵ ɧɚɝɪɟɜɚɬɟɥɶɧɭɸ ɩɨɜɟ...

Page 68: ...n of the stream supply Set the current time on the display again The oven light doesn t go on Disturbance in power supply Fault in the lamp Check the protection device of your home conduction Replace if defective Check if the lamp of the oven light is faultless If not replace The control lights don t go on Disturbance in power supply Fault in the lamp Check the protection device of your home condu...

Page 69: ...fehlerhaft ersetzen An den Kundendienst wenden Die Uhr geht vor oder nach Zu niedrige Spannung im Netz des Hauses Die Spannung im Netz prüfen Falls notwendig die Spannung stabilisieren ɉɪɨɛɥɟɦɵ ȼɨɡɦɨɠɧɵɟ ɩɪɢɱɢɧɵ Ɋɟɲɟɧɢɹ ȼȺɀɇɈ ȿɫɥɢ ɧɟɫɦɨɬɪɹ ɧɚ ɪɟɤɨɦɟɧɞɚɰɢɢ ɩɪɨɛɥɟɦɭ ɧɟ ɭɞɚɥɨɫɶ ɭɫɬɪɚɧɢɬɶ ɨɛɪɚɬɢɬɶɫɹ ɜ ɋɟɪɜɢɫɧɭɸ ɫɥɭɠɛɭ ɉɥɢɬɚ ɧɟ ɪɚɛɨɬɚɟɬ ɇɚɪɭɲɟɧɢɟ ɷɥɟɤɬɪɨɫɧɚɛɠɟɧɢɹ ɉɟɪɟɪɵɜ ɜ ɩɨɞɚɱɟ ɬɨɤɚ ɉɪɨɜɟɪɢɬɶ ɩɪɟɞɨɯɪ...

Page 70: ...endly way Recycled materials used for further packaging save raw materials and reduce waste volume Disposing of old appliances The symbol on the appliance or on its packaging indicates that this appliance may not be treated as household waste Instead it shall be handed over to the authorized collecting centre for recycling old electrical and electronic appliances By ensuring this appliance is disp...

Page 71: ...uhr oder dem Geschäft in dem Sie das Produkt gekauft haben ɈɏɊȺɇȺ ɈɄɊɍɀȺɘɓȿɃ ɋɊȿȾɕ ȼ ɤɚɱɟɫɬɜɟ ɜɤɥɚɞɚ ɜ ɨɯɪɚɧɭ ɨɤɪɭɠɚɸɳɟɣ ɫɪɟɞɵ ɜɫɹ ɞɨɤɭɦɟɧɬɚɰɢɹ ɤ ɷɬɨɦɭ ɭɫɬɪɨɣɫɬɜɭ ɛɵɥɚ ɧɚɩɟɱɚɬɚɧɚ ɧɚ ɨɬɛɟɥɟɧɧɨɣ ɧɟ ɫɨɞɟɪɠɚɳɟɣ ɯɥɨɪɚ ɢɥɢ ɧɚ ɩɪɢɝɨɞɧɨɣ ɤɨ ɜɬɨɪɢɱɧɨɣ ɩɟɪɟɪɚɛɨɬɤɟ ɛɭɦɚɝɟ ɂ ɩɪɢ ɢɡɝɨɬɨɜɥɟɧɢɢ ɭɩɚɤɨɜɤɢ ɛɵɥ ɫɞɟɥɚɧ ɚɤɰɟɧɬ ɧɚ ɫɨɛɥɸɞɟɧɢɟ ɧɨɪɦ ɩɨ ɨɯɪɚɧɟ ɨɤɪɭɠɚɸɳɟɣ ɫɪɟɞɵ Ɉɧɚ ɬɚɤɠɟ ɦɨɠɟɬ ɛɵɬɶ ɜɬɨɪɢɱɧɨ ɩɟɪɟɪɚɛɨɬɚɧɚ ɩɨɫ...

Page 72: ...ɢ ɧɟɩɪɚɜɢɥɶɧɨɣ ɭɫɬɚɧɨɜɤɨɣ ɧɟɛɪɟɠɧɵɦ ɨɛɪɚɳɟɧɢɟɦ ɢɥɢ ɩɥɨɯɢɦ ɭɯɨɞɨɦ ɩɨɞɤɥɸɱɟɧɢɟɦ ɤ ɧɟɩɪɚɜɢɥɶɧɨɦɭ ɧɚɩɪɹɠɟɧɢɸ ɩɢɬɚɧɢɹ ɢɫɩɨɥɶɡɨɜɚɧɢɟɦ ɧɟɪɟɤɨɦɟɧɞɨɜɚɧɧɵɯ ɱɢɫɬɹɳɢɯ ɢ ɦɨɸɳɢɯ ɫɪɟɞɫɬɜ ɧɟɫɨɛɥɸɞɟɧɢɟɦ ɩɪɢɥɚɝɚɟɦɨɣ ɢɧɫɬɪɭɤɰɢɢ ɩɨ ɷɤɫɩɥɭɚɬɚɰɢɢ ɢɥɢ ɟɫɥɢ ɢɡɞɟɥɢɟ ɩɨɞɜɟɪɝɚɥɨɫɶ ɪɟɦɨɧɬɭ ɢɥɢ ɤɨɧɫɬɪɭɤɬɢɜɧɵɦ ɢɡɦɟɧɟɧɢɹɦ ɧɟɭɩɨɥɧɨɦɨɱɟɧɧɵɦɢ ɥɢɰɚɦɢ ɢɥɢ ɟɫɥɢ ɭɞɚɥɟɧ ɧɟ ɪɚɡɛɨɪɱɢɜ ɢɥɢ ɢɡɦɟɧɟɧ ɫɟɪɢɣɧɵɣ ɧɨɦɟɪ ɢɡɞɟɥɢɹ 2 ɇɚ ɢɡɞɟɥɢɹ ɷɤɫɩɥ...

Page 73: ...ɨɛɪɚɳɚɬɶɫɹ ɬɨɥɶɤɨ ɜ ɚɜɬɨɪɢɡɢɪɨɜɚɧɧɵɟ ɫɟɪɜɢɫɧɵɟ ɰɟɧɬɪɵ ɉɨɞɪɨɛɧɚɹ ɢɧɮɨɪɦɚɰɢɹ ɨɛ ɭɩɨɥɧɨɦɨɱɟɧɧɵɯ ɧɚ ɨɛɫɥɭɠɢɜɚɧɢɟ ɢ ɪɟɦɨɧɬ ɫɟɪɜɢɫɧɵɯ ɰɟɧɬɪɚɯ ɩɪɢɥɚɝɚɟɬɫɹ ɨɬɞɟɥɶɧɵɦ ɫɩɢɫɤɨɦ Ɇɵ ɫɨɯɪɚɧɹɟɦ ɡɚ ɫɨɛɨɣ ɩɪɚɜɨ ɜɧɨɫɢɬɶ ɢɡɦɟɧɟɧɢɹ ɜ ɤɨɧɫɬɪɭɤɰɢɸ ɢɥɢ ɬɟɯɧɨɥɨɝɢɸ ɢɡɝɨɬɨɜɥɟɧɢɹ Ɍɚɤɨɜɵɟ ɢɡɦɟɧɟɧɢɹ ɧɟ ɜɥɟɤɭɬ ɨɛɹɡɚɬɟɥɶɫɬɜ ɩɨ ɢɡɦɟɧɟɧɢɸ ɢɥɢ ɭɥɭɱɲɟɧɢɸ ɪɚɧɟɟ ɜɵɩɭɳɟɧɧɵɯ ɢɡɞɟɥɢɣ ɈɌɆȿɌɄȺ Ɉ ɉɊɈȾȺɀȿ Ƒ ɗɥɟɤɬɪɢɱɟɫɤɚɹ ɩɥɢɬɚ Ƒ ɏɨɥɨɞɢɥɶɧɢɤ...

Page 74: ...10 79 ɭɥ Ɍɪɚɤɬɨɪɧɚɹ ɞ 8 16 ȼɨɥɝɨɝɪɚɞ ɂɉ Ɇɚɧɚɯɨɜɚ Ʌ Ɋ ɬɟɥ 8442 23 41 36 ɩɪ ɤɬ Ʌɟɧɢɧɚ ɞ 58 17 ȼɨɥɝɨɞɨɧɫɤ ɂɉ Ɋɹɝɭɡɨɜ ɬɟɥ 6 06 61 ɭɥ Ƚɨɪɶɤɨɝɨ 81 21 ɂɉ ɂɛɪɚɝɢɦɨɜ Ɇ Ⱥ ɬɟɥ 8639 25 29 29 ɭɥ Ʉɚɪɥɚ Ɇɚɪɤɫɚ ɞ 30 18 ȼɨɥɠɫɤɢɣ ɈɈɈ Ɏɢɪɦɚ Ɇɢɪ ɜɢɞɟɨ 1 ɬɟɥ 8443 56 60 22 ɭɥ Ⱦɪɭɠɛɵ 21 19 ȼɨɪɤɭɬɚ Ɇɋ ɋɟɪɜɢɫ ɐɟɧɪ ɭɥ Ɍɢɦɚɧɫɤɚɹ ɞ 8ɚ 20 ȼɨɪɨɧɟɠ ɈɈɈ Ɍɟɯɧɨɩɪɨɮɫɟɪɜɢɫ ɬɟɥ 4732 46 31 79 56 74 61 ɭɥ ɉɪɨɫɩɟɤɬ Ɍɪɭɞɚ ɞ 91 ɋɉ ɫɟɪɜɢɫ ...

Page 75: ...ɜɚ ɞ 21 ɨɮ 440 62 ɉɟɬɪɨɡɚɜɨɞɫɤ ɑɉ ɏɨɪɲɭɧɨɜ ɬɟɥ 8142 70 23 42 ɭɥ Ɇɭɪɦɚɧɫɤɚɹ ɞ 25Ȼ 63 ɉɫɤɨɜ ɈɈɈ ɆɢɧɢɆɚɤɫ ɬɟɥ 8112 72 13 90 Ɋɢɠɫɤɢɣ ɩɪ ɞ 49 64 ɉɹɬɢɝɨɪɫɤ ɂɉ ɋɨɤɨɥɨɜ ɂ ȼ ɬɟɥ 87933 33 97 97 ɩɪ ɬ Ʉɚɥɢɧɢɧɚ 19 ɂɉ ɑɟɪɧɹɜɫɤɢɣ ȿ ȼ ɬɟɥ 8793 33 17 29 ɭɥ 1 ɚɹ ɇɚɛɟɪɟɠɧɚɹ ɞ 32 ɤɨɪ 4 65 Ɋɚɞɭɠɧɵɣ ɂɉ Ɇɢɯɚɣɥɨɜ ɇ ɇ ɬɟɥ 34668 26 0 26 5 ɣ ɦɢɤɪɨɪɚɣɨɧ ɞ 29 66 Ɋɨɫɬɨɜ ɧɚ Ⱦɨɧɭ ɈɈɈ Ⱥɛɪɢɫ ɉɥɸɫ ɬɟɥ 863 244 35 90 ɩɪ Ȼɭɞɟɧɨɜɫɤɢɣ 7...

Page 76: ... 54 42 98 32 Ʉɨɦɦɭɧɢɫɬɢɱɟɫɤɢɣ ɩɪ ɤɬ ɞ 21 ɂɉ ɒɭɛɢɧ ɬɟɥ 4242 27 41 49 55 33 98 ɭɥ ȿɫɟɧɢɧɚ ɞ 5 91 əɤɭɬɫɤ Ⱥɋɐ Ȼɵɬ ɋɟɪɜɢɫ ɬɟɥ 4112 43 99 66 31 05 67 ɭɥ ɋ ɏɚɥɬɭɪɢɧɚ 45 92 əɪɨɫɥɚɜɥɶ ɁȺɈ Ɏɢɪɦɚ ɌȺɍ ɬɟɥ 4852 266 537 Ɇɨɫɤɨɜɫɤɢɣ ɩɪ ɬɨ ɞ 1Ⱥ ɫɬɪ 5 ...

Page 77: ...ɱɟɫɤɢɣ 22 12 14 Ʉɪɚɦɚɬɨɪɫɤ ɋɐ ɇɨɪɞ ɋɟɪɜɢɫ ɬɟɥ 06264 5 92 71 8 90 49 ɭɥ ɘɛɢɥɟɣɧɚɹ 70 ɋɐ ɗɤɫɩɟɪɬ ɋɟɪɜɢɫ ɬɟɥ 06264 7 21 01 ɭɥ 19 ɉɚɪɬɫɴɟɡɞɚ 54 ɋɐ ɗɥɶɦɚ ɋɟɪɜɢɫ ɬɟɥ 06264 5 93 89 5 90 07 ɛɭɥ Ʉɪɚɦɚɬɨɪɫɤɢɣ 3 15 Ʉɨɪɨɫɬɟɧɶ ɋɐ ȿɜɪɨɫɟɪɜɢɫ ɬɟɥ 063 875 69 39 096 504 16 46 ɭɥ Ɉɤɬɹɛɪɶɫɤɚɹ 68 16 Ʉɪɟɦɟɧɧɚɹ ɋɐ ɉɊȿɆɖȿɊ ɬɟɥ 06454 2 26 28 ɩɥ Ʉɪɚɫɧɚɹ 1 17 Ʉɪɟɦɟɧɱɭɝ ɋɐ Ⱥɬɥɚɧɬ ɬɟɥ 05366 2 40 33 ɭɥ ɐɸɪɸɩɵ 35 18 Ʉɭɡɧɟɰɨɜɫɤ...

Page 78: ...ɥ ɋɨɜɟɬɫɤɚɹ 28 46 Ɏɟɨɞɨɫɢɹ ɋɐ ɎɈɄɋɄɊɕɆɋȿɊȼɂɋ ɬɟɥ 06562 3 12 84 ɭɥ Ȼɚɡɚɪɧɚɹ 4 47 ɏɚɪɶɤɨɜ ɋɉ Ɍɪɚɧɫɟɪɜɢɫ ɬɟɥ 057 714 24 72 758 85 63 ɭɥ ɂɜɚɧɨɜɚ 24 ɋɐ Ʉɚɫɤɚɞ ɋɟɪɜɢɫ ɬɟɥ 057 712 51 81 734 97 24 ɭɥ ɉɨɥɬɚɜɫɤɢɣ ɲɥɹɯ 3 ɇȿɈ ɬɟɥ 057 763 09 12 763 02 89 Ʉɨɰɚɪɫɤɚɹ 43 ɋɐ Ɉɫɶɦɚɱɤɨ ɬɟɥ 057 758 10 39 758 10 40 ɭɥ ȼɟɪɧɚɞɫɤɨɝɨ 2 ɋɐ ȾɂɋȺ ɋȿɊȼɂɋ ɬɟɥ 057 343 87 39 099 777 89 74 ɩɟɪ 23 Ⱥɜɝɭɫɬɚ 1 48 ɏɟɪɫɨɧ ɋɐ ɇɨɪɞ ɋɟɪɜɢɫ...

Page 79: ...schüre enthaltene Ungenauigkeiten die auf Druckfehler zurückzuführen sind und behält sich das Recht vor an ihren Produkten alle für notwendig erachten Änderungen anzubringen ohne die wesentlichen Eigenschaften zu Beeinflussen Ɏɢɪɦɚ ɢɡɝɨɬɨɜɢɬɟɥɶ ɧɟ ɧɟɫɟɬ ɧɢɤɚɤɨɣ ɨɬɜɟɬɫɬɜɟɧɧɨɫɬɢ ɡɚ ɜɨɡɦɨɠɧɨ ɫɨɞɟɪɠɚɳɢɟɫɹ ɜ ɷɬɨɣ ɛɪɨɲɸɪɟ ɧɟɬɨɱɧɨɫɬɢ ɤɨɬɨɪɵɟ ɦɨɝɭɬ ɛɵɬɶ ɫɥɟɞɫɬɜɢɟɦ ɨɩɟɱɚɬɨɤ ɬɢɩɨɝɪɚɮɢɢ ɢ ɫɨɯɪɚɧɹɟɬ ɡɚ ɫɨɛɨɣ ...

Page 80: ...OLAN Haushaltsgeräte Berlin Germany www kaiser olan de COD 2 0 3 00 96 ...

Reviews: