background image

INDEX

POWER SOURCES........................................................... 1
    OPERATING ON BATTERY............................................... 1
    OPERATING ON AC ADAPTOR........................................ 2
POWER INDICATION....................................................... 3
BATTERY CHARGE........................................................... 3
CLOCK FUNCTION..........................................................4
    SET THE CLOCK...........................................................4
    SELECT TIME MODE......................................................5
MW STEP 9K/10K SELECTION.............................................5
TURN ON / OFF THE UNIT.................................................. 6
    POWER ON / OFF........................................................ 6
    AUTO TURN ON /OFF   ..................................................6
    SLEEP......................................................... ...............6
BAND SELECTION.......................................................... .7
METER BAND................................................................. 7
LOCAL / DX SWITCH........................................................7
PAGE FUNCTION............................................................8
TUNING INTO STATIONS................................................... 8
    MANUAL TUNING........................................................ 8
    AUTO SCAN TUNING.................................................... 9
    SPEED CHANGE TUNING............................................ 10
    DIRECT FREQUENCY ENTRY......................................... 11
    MEMORY SCAN TUNING............................................. 13
PRESET STATIONS...........................................................14
    RANDOM PRESET.......................................................14

Summary of Contents for KA1102

Page 1: ... SELECT TIME MODE 5 MW STEP 9K 10K SELECTION 5 TURN ON OFF THE UNIT 6 POWER ON OFF 6 AUTO TURN ON OFF 6 SLEEP 6 BAND SELECTION 7 METER BAND 7 LOCAL DX SWITCH 7 PAGE FUNCTION 8 TUNING INTO STATIONS 8 MANUAL TUNING 8 AUTO SCAN TUNING 9 SPEED CHANGE TUNING 10 DIRECT FREQUENCY ENTRY 11 MEMORY SCAN TUNING 13 PRESET STATIONS 14 RANDOM PRESET 14 ...

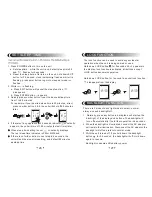
Page 2: ... the lid of compartment OPERATING ON BATTERY Disconnect external power source before operating on battery power BATTERY REPLACEMENT 1 When the sound becomes weak and distorted and battery power indicates replace batteries immediately otherwise will turn to then the unit will shut off automatically 2 All memories station presets are permanently stored However when the batteries are removed the cloc...

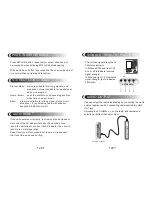
Page 3: ...r is divided into 4 levels Full Medium Exhausted auto shut off Lower POWER INDICATION BATTERY CHARGE When battery power indicates from to the unit will shut off automatically While the unit is on if appears in the display when using rechargeable batteries batteries need to be charged 3 1 Install three AA rechargeable batteries with correct polarity 2 onnect the other side securely to DC Jack Plug ...

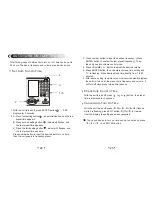
Page 4: ...ot leave fully charged batteries unused for a long time CHECK CURRENT TIME 1 When the unit is off current time indicates in the display 2 When the unit is on hold down EXIT button about 0 5 second to display current time 3 seconds 5 SELECT TIME MODE 9 Press button 1 or 2 1 Disconnect the AC adaptor remove the batteries till nothing appears in the display 2 About 30 seconds later connect theAC adap...

Page 5: ...urning on the unit The unit will automatically turn off when the set time reaches Volume is controlled by press VOL or VOL button Volume indicator indicates the volume level DIGITAL VOLUME CONTROL Increase Decrease VOL 7 BAND SELECTION Press FM button to select FM band Press MW button to select MW band Press SW button to select SW band METER BAND In SW or FM band set LOCAL DX switch to a proper po...

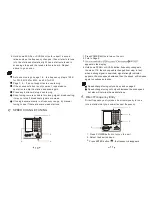
Page 6: ... S STRENGTH FM ST FM ST MONO PLL FM STEREO MW SW DUAL CONVERSION SYNTHESIZED WORLD RECEIVER 190 Ö Ç Ä Ü ä µ ç Ö Ø µ Í Ò ô Ð Å º Å Ç È Ö Ê 2 ENTER EXIT M LOCK FM BASS MW SW METER SSB 190MEMORY ATS Ê Ö Ë Ñ Ë 1 3 4 2 Auto Scan Tuning 1 Press POWER button to turn on the unit 2 Select desired band select page from 1 6 3 Set scan method to STEP by press SCAN button till STEP appears in the display 9 9 T...

Page 7: ...Ü ä µ ç Ö Ø µ Í Ò ô Ð Å º Å Ç È Ö Ê 2 ENTER EXIT M LOCK FM BASS MW SW METER SSB 190MEMORY ATS 1 3 2 4 Speed change tuning only can be used on page 9 Speed change tuning not only will increase the scan speed but also will not miss the weak stations 1 Press POWER button to turn on the unit 2 Turn to Page 9 3 till appears in the display 4 Hold down SCAN or SCAN button frequency changes in the step of...

Page 8: ...s number 1 then press ENTER button 100 00MHz will display Quickly Input from the display for 6 seconds 4 Press the number button with complete frequency the unit will tune into the entered frequency Ç Ò ä µ ç Ì 1 Set the scan method to MEM by press till MEM appears in the display 2 Press SCAN or SCAN repeatedly to display the desired preset number Memory Scan Tuning If you remember the preset page...

Page 9: ... ST MONO PLL FM STEREO MW SW DUAL CONVERSION SYNTHESIZED WORLD RECEIVER 190 Ö Ç Ä Ü ä µ ç Ö Ø µ Í Ò ô Ð Å º Å Ç È Ö Ê 2 ENTER EXIT M LOCK FM BASS MW SW METER SSB 190MEMORY ATS 4 Press the desired number from 1 6 while P is flashing 5 Press M LOCK button M flashes for 5 seconds 6 Press a preset number from 1 19 to memorize the station The corresponding number constant indicates in the display 12 If...

Page 10: ...ress page button then press number 0 goes to page 0 3 Select desired band 4 Press SCAN button till STEP If you don t want to start scan from current frequency press Enter button to input start frequency Check if there is already a preset number press SCAN or SCAN button to clear it the scanned stations will be stored from no 1 otherwise the scanned stations will be preset after that number 7 Hold ...

Page 11: ...e satisfied to you 19 COPY FUNCTION All stored stations on Page 0 can be copied to other page If copy to page 7 9 please note the band must be constant 1 Turn to Page 0 make sure there are stations stored 2 Press button P P will flash 3 seconds page number 0 disappears 3 While P is flashing press number 0 0 will flash for 3 seconds 4 While 0 is flashing press the page number you want to copy to 5 ...

Page 12: ... 190 Ö Ç Ä Ü ä µ ç Ö Ø µ Í Ò ô Ð Å º Å Ç È Ö Ê 2 ENTER EXIT M LOCK FM BASS MW SW METER SSB 190MEMORY ATS 1 2 4 5 3 21 MUSIC NEWS LINE OUT SSB FINE P9 On page 0 the preset number order will be adjusted automatically when a preset station is deleted If a preset station on page1 9 is deleted the deleted preset number is blank It can be used on next preset RECEIVING SSB CW 1 Turn on the unit 2 Press P...

Page 13: ...SW METER SSB 190MEMORY ATS 1 20 2 3 23 You have to go to the next step in 6 seconds or the unit will exit from the beep setting and return to clock mode The beep volume is not controlled by digit volume button If the preset time is not changed or cancelled the beeper beeps at the preset time everyday If power is too weak beep function does not work The beep sound will cover the broadcast if the un...

Page 14: ...Å º Å Ç È Ö Ê 2 ENTER EXIT M LOCK FM BASS MW SW METER SSB 190MEMORY ATS 1 5 2 3 4 25 Check Auto Turn On Time With the unit turned off press or button the preset time is displayed for 3 seconds Cancel Auto Turn On Time With the unit turned off press or or flashes while it is flashing press EXIT button or is cleared from the display the setting has been cancelled 1 1 2 2 3 3 3 Press number button to...

Page 15: ...sleep time setting and default 99 minutes as sleep time SET SLEEP TIME MHz ST 97 10 60 FM VOL M P MEM 8 7 POWER MHz ST 97 10 99 FM VOL M P MEM 8 7 6 0 27 LOCK FUNCTION The lock function can be used to avoid any accidental operation when the unit is being carried or used Hold down LOCK button for 2 seconds till appears in the display lock function is activated all buttons except LOCK button become ...

Page 16: ...ction off 29 AUDIO OUTPUT SIGNAL STRENGTH FM STEREO MUSIC NEWS LINE OUT SSB FINE P9 DEGEN DE511 REC DIGITAL VOICE RECORDER PLAY PAUSE DELETE STOP FORWARD BACKWARD MODE FOL SET TIME REP Line out jack The unit has signal strength and FM stereo indicator In MW and SW band light 1 2 3 4 on or off to indicate received signal strength In FM band light 1 2 3 indicates signal strength light 4 indicates FM...

Page 17: ...while driving or cycling it can also be potentially dangerous to play your earphones at high volume while walking especially at pedestrian crossing Notes On Earphones USING FOLDING STAND Earphone Jack MU SIC NE WS LINE OU T SS B FI NE P9 31 MW Reception Ferrite antenna inside the unit functions as MW antenna it is strongly effected by the reception direction When listening to MW broadcast rotate t...

Page 18: ...ER EXIT M LOCK FM BASS MW SW METER SSB 190MEMORY ATS 33 CAUTIONS Avoid exposure to temperature extremes direct sunlight moisture sand dust or mechanical shock Should anything go wrong with the radio please remove the batteries and have the unit checked by qualified personnel before operating it any further Use only power sources specified in this manual When the unit is not being used for a long p...

Page 19: ...1m 9 170 9 995 MHz 25m 11 510 12 155 MHz 22m 13 510 13 905 MHz 19m 15 010 15 705 MHz 16m 17 260 18 105 MHz 13m 21 410 21 955 MHz 11m 25 610 26 100 MHz 1 Frequency Range 8 Dimensions Approx 143 X 88 X 28 5mm 9 Mass Approx 280g excl Battery 6 Speaker D66mm 7 External Earphone D3 5mm 5 Power Supply Battery 3 AA batteries External power DC in 6V 300mA Recharing Time 1 9 Hours 3 Noise LimitSensitivity ...

Reviews: