background image

5

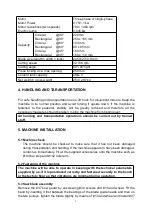
Motor

Motor Power

Motor revolutions (two speeds)

Electric pump

Three-phase or single-phase

0.75/1.1 kw

700 / 1400 rpm

0.045 kw

Capacity

Circular

@90°

Rectangular

@90°

Circular

@60°

Rectangular

@60°

Circular

@45°

Rectangular

@45°

220mm

250 x 155 mm

100 mm

80 x 95 mm

160 mm

160 x 110 mm

Blade size (length × width × thick)

2450×27×0.9 mm

Cutting speed

32 / 66 rpm

Cutting angle

60°/ 45°right

Piece locking vice: max opening

250 mm

Coolant tank capacity

liters 3

Net weight / gross weight

254 / 287 kg

4. HANDLING AND TARANSPORTATION

For safe handling and transportation use a lift truck for movement indoors. Keep the

machine in its normal position and avoid turning it upside down. If the machine is

fastened to the pedestal, stability will be greatly reduced and therefore all the

necessary measures should be taken to stop the machine from tipping over.

All handing and transportation operations should be carried out by trained

staff.

5. MACHINE INSTALLATION

5.1 Machine check

The machine should be checked to make sure that it has not been damaged

during transportation and handing. If the machine appears to have been damaged,

contact us immediately. Fit all the supplied accessories onto the machine such as

#104 bar stop and #142 roller arm.

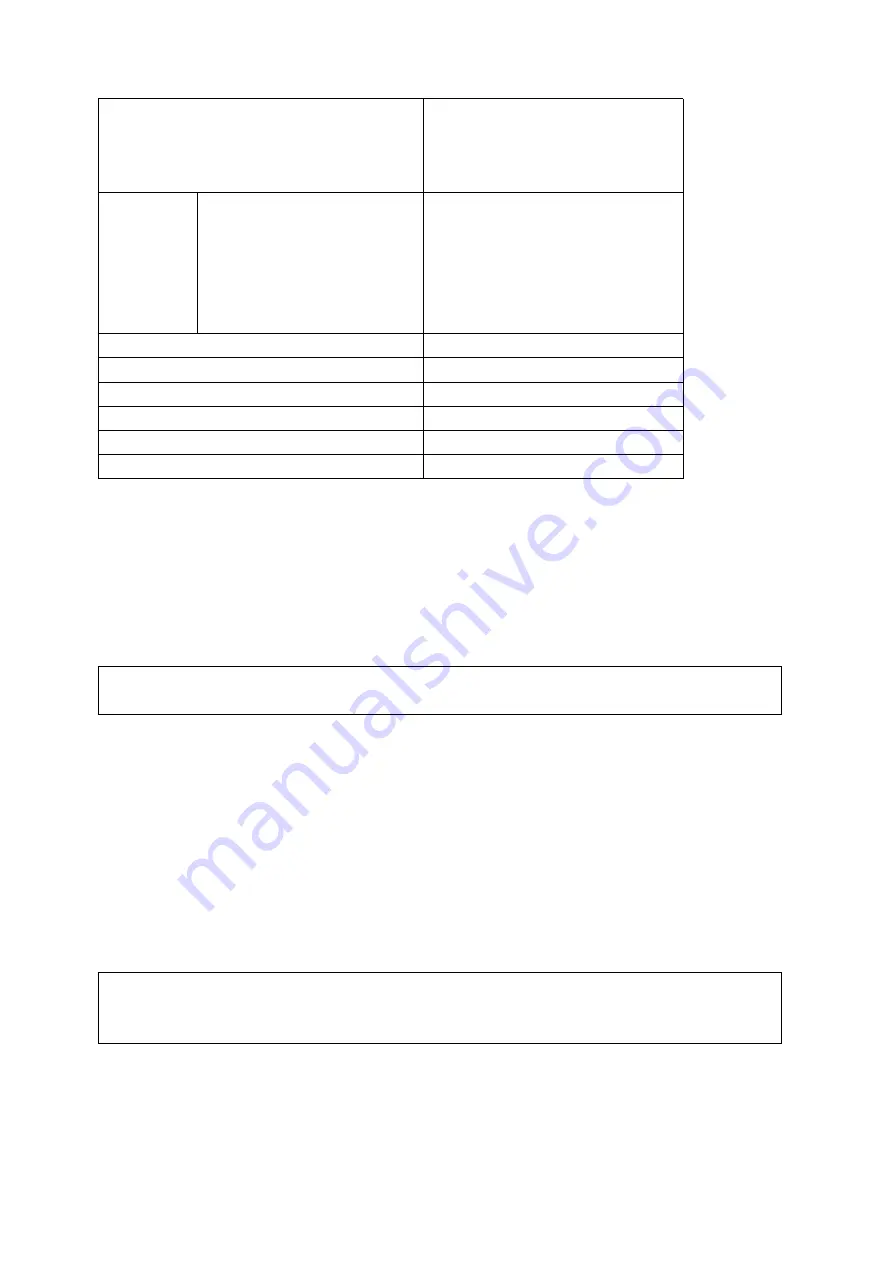
5.2 Fastening of the machine

The machine will be able to operate in keeping with the technical parameters

supplied by us, if it is positioned correctly and fastened securely to the bench

or the factory floor so that vibrations are minimal during operation.

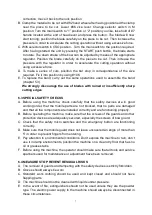
5.3 Saw blade assembly

Remove the #37 bow guard by unscrewing #38 screws and #1 hand wheel. Fit the

band by inserting it first between the bearings of the blade guide heads and then on

the two pulleys, tighten the blade slightly by means of #1 hand wheel and install #37

Summary of Contents for BS-106G

Page 1: ...0 METAL CUTTING BAND SAW MODEL BS 106G Assembly Operating manual...

Page 2: ...s of the machine 4 3 Main technical date 4 4 Handling and transportation 5 5 Machine installation 5 5 1 Machine check 5 5 2 Fastening of the machine 5 5 3 Saw blade assembly 5 5 4 Electrical connectio...

Page 3: ...assistance to the operator has been high lighted The Operating instructions are an integral part of the machine and should be consulted before during and after the start up of machine and whenever els...

Page 4: ...ing like shirts with sleeves that are too long gloves that are too big bracelets chains or any other objects that could get caught in the machine during operation Tie back long hair K Keep the area fr...

Page 5: ...ws the cutting movement to advance manually or by falling The coolant pump is fitted to the machine base The main switch is located on the front panel The choice of one of the two motor rotation speed...

Page 6: ...ures should be taken to stop the machine from tipping over All handing and transportation operations should be carried out by trained staff 5 MACHINE INSTALLATION 5 1 Machine check The machine should...

Page 7: ...heel to avoid the slackening of the band B Check that the hand indicates the required cutting angle vice scale C Make sure that the bow and the vice are locked by means of 136 lock handle D With the m...

Page 8: ...ges 6 3 SPECIAL SAFETY CHECKS A Before using the machine check carefully that the safety devices are in good working order that the mobile parts are not blocked that no parts are damaged and that all...

Page 9: ...itioned the nearest possible to the piece to be cut Check every 3 months the existing tolerance between the blade guides making sure that it does not exceed the blade thickness of one tenth of a milli...

Page 10: ...on the band saw machine identical to the machine to which these operation instructions refer has given the following results ACOUSTIC RADIATION PRESSURE 1 LAeq 83 2 dB A 2 LAeq 90 6 dB the maximum acc...

Page 11: ...Press block 1 57 Blade guide eccentric bush 2 19 Hex cap bolt M6X30 2 57 1 Nut M8 1 20 Bolt M8X25 4 57 2 Bolt M8X30 1 21 Bolt M6X30 4 57 3 Nut M8 1 22 Bearing 608 2Z 4 57 4 Bolt M8x25 1 23 Blade guide...

Page 12: ...seat 1 92 Upper vice 1 131 Washer 4 93 Vice plate 1 132 Bolt M10X25 4 94 Bolt M8X20 2 133 Ring 3 55 x 288 1 95 Bolt M8X25 3 134 Bolt M6X10 1 96 Nut 8 3 135 Link axis 1 97 Wedge plate 1 136 Bench lever...

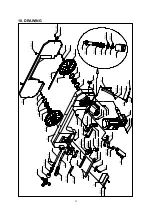
Page 13: ...2 27 2 12 11 6 9 8 7 6 5 4 3 12 2 1 57 4 57 3 57 2 57 1 54 2 54 1 2 68 67 2 66 2 65 22 4 21 4 20 4 19 6 16 2 15 2 39 2 38 2 37 36 35 34 33 32 2 31 29 2 30 28 26 2 25 24 4 23 4 48 47 46 2 44 43 42 41 4...

Page 14: ...148 2 152 4 153 4 142 146 4 144 4 143 4 145 151 102 2 101 4 99 100 4 110 5 108 109 98 97 96 3 95 3 94 2 93 92 87 85 91 90 89 2 83 88 86 84 82 81 112 113 115 116 117 127 2 123 126 125 2 124 120 80 118...

Page 15: ...14 11 ELECTRIC DRAWING...

Page 16: ...This manual is only for your reference Owning to the continuous improvement changes may be made at any time with no obligation on the part of machine And please note the local voltage for operating m...

Reviews: