background image

USER MANUAL STARTER 


 TRANSLATED FROM ORIGINAL VERSION: EDITION 1 

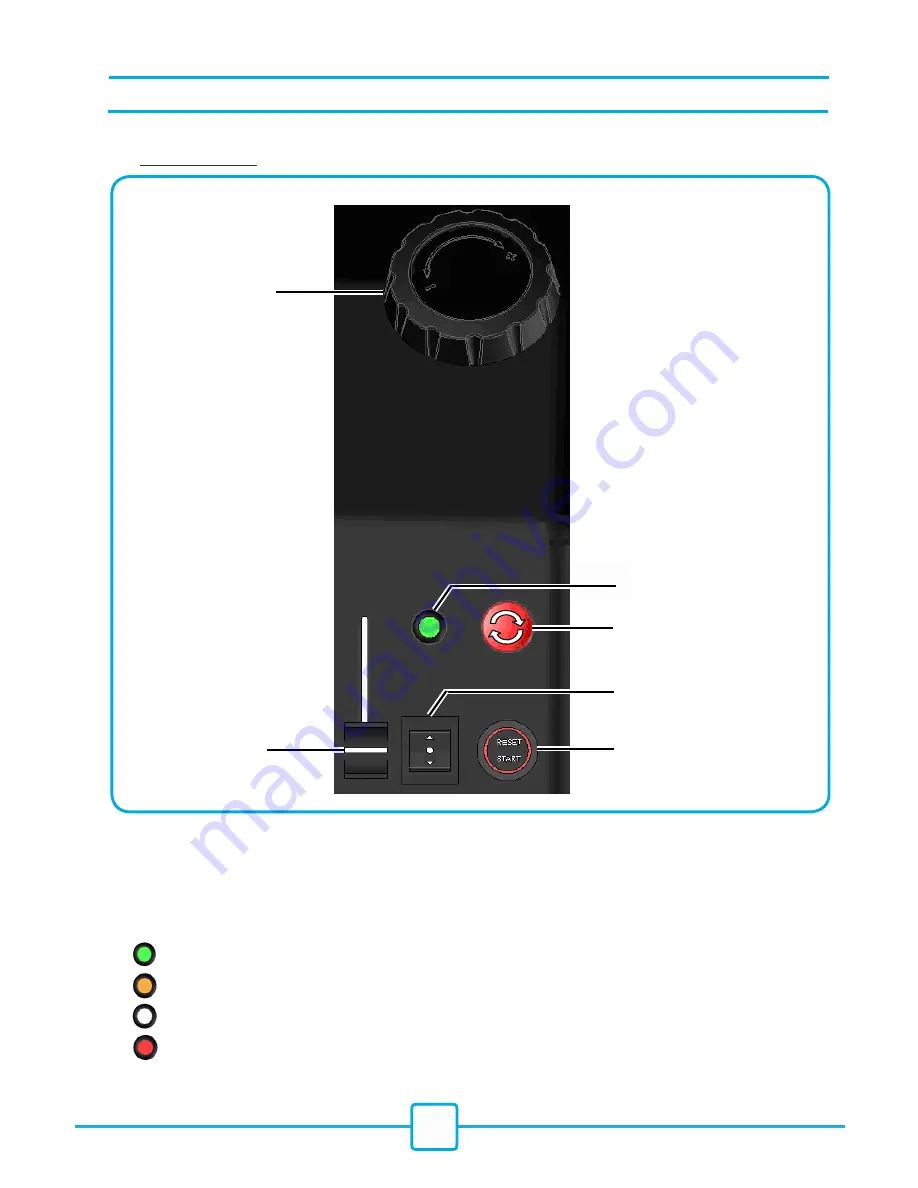
4. COMPONENTS OF THE LAMINATOR, CONTROL BOARD


4.2  Control board


A

  Handle for roller elevation and pressure 

adjustment of the upper roller 


B

  Speed adjustment 


C

  LED indicator for the machine working mode 


-    

 : GREEN : Forward 


-    

 : ORANGE : Reverse 


-    

 : OFF : stop 


-    

 : RED : Machine safety activated 


   D

  Emergency switch 


E

  Working mode selection switch 


   - Forward 


   - Stop 


   - Reverse 


F

  Safety reset 


Summary of Contents for Starter 1080

Page 1: ...USER MANUAL STARTER 1 TRANSLATED FROM ORIGINAL VERSION EDITION 1 STARTER 1080 1400 1600 USER MANUAL...

Page 2: ...quality control in the successive steps of its manufacture this laminator has been produced in our factory to fulfill all your production requirements for many years This laminator will allow you to...

Page 3: ...ents and recommendations 5 1Switching on the laminator 5 2Speed adjustment forward stop reverse 5 3Roller pressure adjustment 5 4Film tension adjustment 5 5User safety 5 6Switching off the machine 6 A...

Page 4: ...fects of materials or manufacturing the company which sold the instrument will repair it on site or in its premises There is no warranty other than the one mentioned above The rollers of the laminator...

Page 5: ...a and the user will secure it in position by locking the castors on the stands in order to avoid any unexpected move while working 2 2 Unpacking the laminator Remove the carton crate Accessories film...

Page 6: ...ne close to water Leave a large enough working area in front and behind the machine Do not spill water on the machine the supply lead or the electric socket Do not use the machine if the supply lead i...

Page 7: ...le ctr iqu e V r ifi er q u e La tension de votre machine correspond celle de votre r seau lectrique L alimentation de la machine n cessite la mise disposition d un socle de prise cou La ligne d alim...

Page 8: ...ntrol board A Handle for roller elevation and pressure adjustment of the upper roller B Speed adjustment C LED indicator for the machine working mode GREEN Forward ORANGE Reverse OFF stop RED Machine...

Page 9: ...only be driven by using the foot pedal Connect the foot switch jack plug to the back of the machine Rep 13A Forward Make sure that the machine is ready to work after checking the safety status If nece...

Page 10: ...ach the required nip You can read an indication about the nip in mm on the graduated scale on the right side of the machine Rep 21 according to the thickness indicator Rep 22 Turning the handle clockw...

Page 11: ...shafts For a perfect lamination result the film without folds should be in contact with the roller It is recommended to avoid unnecessary tension on the film Only tests will enable you to set the rig...

Page 12: ...p F to start operating the machine By listening carefully the user may hear a clic corresponding to his pressing on the reset button 5 6 Switching off the machine The rollers are among the master comp...

Page 13: ...rn on the machine ref 5 6 Remove the feeding tray Rep 14 If the machine is installed on a stand you can store the feeding tray Rep 14 on the base of the stand below the machine while installing the me...

Page 14: ...position A of the machine film release paper facing up Place the shaft with the carton mandrel on position B of the machine 5 Centre the film reel on the shaft using the graduated measurement 6 Centre...

Page 15: ...ide facing toward you 8 Stick the release paper onto the cardboard mandrel using an adhesive tape gun 10 Installing the double side adhesive or the waste paper on the lower shaft Insert a self blockin...

Page 16: ...el on the shaft using the graduated measurement 13 Stick the paper onto the adhesive film 14 Use a thin board carton pvc metal to insert paper and film between the rollers Take the upper roller down i...

Page 17: ...to achieve For pressure adjustment recommendation please refer to 7 1 Install the feeding tray Rep 14 2 If the machine is installed on a stand you can store the feeding tray Rep 14 on the base of the...

Page 18: ...ne adhesive side of the application tape facing toward the user 4 Centre the reel on the shaft using the graduated measurement 5 Raise the upper roller refer to 5 3 Tear off the application tape towar...

Page 19: ...pe 8 Lower the upper roller refer to 5 3 and adjust pressure based on the width of the print and regarding our pressure adjustment recommendations refer to 7 1 1 On the adhesive back side of the print...

Page 20: ...e refer to 5 3 based on the width of the board and regarding our pressure adjustment recommendations refer to 7 1 while laying the print on the surface of the upper roller Remove the release paper fro...

Page 21: ...ll from dust and damage To mount it onto the machine please refer to the assembly instruction delivered with the kit The removable paper guide can be installed on the feeding tray to make the insertio...

Page 22: ...S B Electrical laminated prints rewinder Optional and only to be mounted on the stand Refer to D below Usefull for processing long print runs it can be mounted on the back of the machine To mount it o...

Page 23: ...ecommended to start with a lower speed when feeding the prints through the roller to make sure the operation is fine and then increase the speed based on your application Medium pressure Print width b...

Page 24: ...suel Stand Soap and water Cleaning the rollers should be done when the upper roller is up the machine switched off and the feeding tray removed Do not leave the rollers under pressure for long period...

Page 25: ...68 x 972 x 532 58 x 30 5 x19 5 Weight machine machine stand 78 Kg 91 Kg 171 200 lbs 105 Kg 119 Kg 231 261 lbs 114 Kg 129 Kg 251 284 lbs Height of the working table with stand without stand 99 5 cm 31...

Page 26: ...ise emitted during operation is lower than 70 dB The print folds or waves during lamination The print is fed too quickly The print has not been fed flat Paper too light or not dry enough Hold the prin...

Page 27: ...teur Motor foot switch control MP292103 LED indicatrice du fonctionnement machine LED for operation information MP843602 LED affichage pression LED for pressure MP843602 Interrupteur inverseur Forward...

Reviews: