Kalamazoo Outdoor Gourmet® 1.800.868.1699 www.KalamazooGourmet.com
180° MARTINI BAR AND IT’S CONTENTS
Each 180° Martini Bar comes with the following:
•
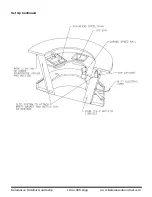
Curved speed rail for convenient storage of frequently used bottles (packaged separately)
•
Curved glass hanging rack underneath the countertop (comes secured to bar)
•
Stainless steel waste basket (packaged separately)
•
Stainless steel bottle bin (packaged separately)
•
Removable cap catcher to hold bottle caps (packaged separately)
•
Ice bin with cover (packaged separately)
•
Sink with faucet with hot and cold water connections (comes secured to bar)
•
Outdoor rated rope lighting (comes secured to bar)
•
Two 110 V outlets (comes secured to bar)
PLEASE MAKE SURE THAT EVERYTHING IS INCLUDED INSIDE YOUR BAR BEFORE UNPACKING.
UNPACKING
1.
Remove the packaging material surrounding the unit.
2.
Use a #2 type Phillips head screwdriver to remove the screws in the five wooden boards securing the
bar to the wooden skid.
3.
Carefully lift the bar off the skid and set onto level ground. (ONLY lift the bar by the diamond-tread
base plate.)
SET UP
The 180° Martini Bar was designed for outdoor use. The quality of stainless steel used in your Martini Bar
does not rust or fade. Kalamazoo Outdoor Gourmet
®
does recommend covering the bar when not in use
to help reduce the amount of cleaning needed. Locate the bar on
level and stable
ground.
The 180° Martini Bar includes several accessories that need to be assembled onto the unit.
- The curved speed rail attaches to the main shelf. Simply slide the keyholes on the speed rail
over the corresponding supports on the front of the shelf.
-
The cap catcher attaches to the rear of the bar underneath the bottle cap remover cutout on the right
hand side.
-
The ice bin sets into the center opening on the main shelf.
-
Plug rope lighting in to one of the 110 V outlets inside the bar.
-
Plug the main power cord into an on-site outlet to power bar outlets.
To properly plumb the water lines of your 180° Martini Bar, contact a professional plumber
.
-
Review the separate manual inside the water filter box for installation and any future replacements of
the filter.


