Installation and Operation Manual
0150-0133
5-4
Revision B
The keyboard-multiplexer link may be idle for many reasons. For example, the RS-485
communication link may have been broken, the controlling keyboard may have lost power or be
malfunctioning, or the operator may have forgotten to disconnect the controlling CBR-KB3 from the
multiplexer.
When a multiplexer does not detect any commands from its controlling CBR-KB3 keyboard for more
than 30 minutes, it will send a disconnect message to the CBR-KB3 keyboard, and then the
multiplexer disconnects itself from the keyboard.
If it detects the
disconnect
message from the multiplexer, the CBR-KB3 then disconnects also, and
the display shows:
Standing by...
5.3 Network Interfacing
Manual Polling Of The Network
During power up, the CBR-KB3 polls the network to see which units are connected and are available.
It can happen that units are added to or removed from the network, after the CBR-KB3 has been
powered up, and after it has polled the network.
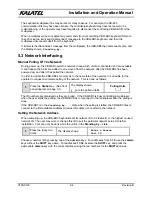
In order to update the CBR-KB3’s memory as to the new state of the network, it is possible for the
operator to request a complete polling of the network. This is done as follows:
1.
Press the
Global
key. (See front
panel diagram on page 3-1).
The display shows:
(_ _)
are the polled unit #s
Polling Units
(_ _)
The ID numbers are displayed as they are polled. If the CBR-KB3 is busy controlling a multiplexer
when the user starts the polling, the CBR-KB3 tries to reconnect to that multiplexer after the polling is
done.
If the CBR-KB3 is in the
Standing by ...
state when the polling is started, the CBR-KB3 tries to
connect to the first available multiplexer (lowest ID number) connected to the network.
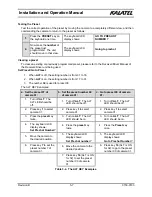
Setting the Network Address
When powering up, the CBR-KB3 Keyboard sets its network ID to 32 (default), or the highest unused
network ID. The user may wish to change this ID to suit the particular network setup for his/her
installation. This can only be done while the unit is in the
Standing by ...
state.
1.
Press the
#
key two
times.
The display shows:
Enter a Source
Unit ID ...
Choose a network ID by pressing one of the
numeric
keys. For addresses from
1-16
, use the
camera
keys without the
SHIFT
key active. For addresses
17-32
, activate the
SHIFT
key, and press the
appropriate
camera
key with the correct address using the red numbers for the
SHIFT
ed values.
Summary of Contents for CBR-KB3
Page 4: ...Installation and Operation Manual 0150 0133 iv Revision B This page intentionally left blank ...
Page 6: ...Installation and Operation Manual 0150 0133 vi Revision B This page intentionally left blank ...
Page 10: ...Installation and Operation Manual 0150 0133 1 4 Revision B This page intentionally left blank ...
Page 12: ...Installation and Operation Manual 0150 0133 2 2 Revision B This page intentionally left blank ...
Page 37: ...Installation and Operation Manual Revision B 7 3 0150 0133 ...


