background image

16

1034790D  / January 2001

KTD-400  Controller  Keypad  Installation  and  Operation  Manual

Pan/Tilt/Zoom Receiver
Programming

Receiver Site Select

The following steps outline the receiver setup procedure.  Beginning at the normal operating
display, proceed as follows:

Each receiver offers mode of operation choices, many of which can be programmed using
a KTD-400 series keypad. It can also store preset position information if applicable.

Accessing the Receiver Setup Menus (Steps 1-3)

Step 1)

Press and hold the 

set

 key until the following display appears:

Enter the access code 

9

5

1

seq

. The display will automatically advance

to the next menu.

Step 2)

Press 

2

. The first receiver programming menu will appear:

Receiver Setup (Steps 4-15)

Step 3)

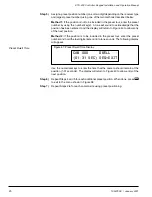
Using the numerical keys, enter the receiver site to be programmed. The display
will automatically advance to the next menu.

Step 4)

Press  

1

 to begin receiver setup. The display will automatically advance to the

first setup menu.

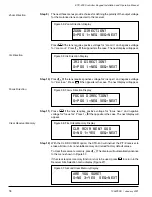
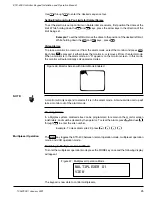
Figure 24: Normal Operating Display

CAMERA 000
MONITOR 01

Figure 25: Code Entry Display

CAMERA 000    (CODE)
MONITOR 01    (----)

Figure 26: First Menu Display

1=SWTCH 2=PTZ 3=ALRM
4=CYBER     SEQ=EXIT

Figure 27: Receiver Site Selection Display

ENTER RECEIVER SITE
NUMBER 000  SEQ=EXIT

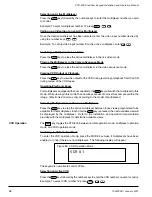
Figure 28: Receiver Setup Menu Display

1=SETUP 2=PRESETS
            SEQ=EXIT

Summary of Contents for KTD-400

Page 1: ...KTD 400 Controller Keypad Installation and Operation Manual...

Page 2: ...ice Kalatel in keeping pace with technological advances is a company of product innovation Therefore it is difficult to ensure that all information provided is entirely accurate and up to date Kalatel...

Page 3: ...ceiver Programming 16 Accessing the Receiver Setup Menus 16 Receiver Setup 16 Setting Electronic Auto Pan Limits 19 P T Z Receiver Preset Position Programming 19 Operation 21 Key Layouts 21 Key Functi...

Page 4: ...ing up a Video Input on an Active Multiplexer 26 Switching a Multiplexer to Live Video 26 Placing the Active Multiplexer in the Camera Sequence Mode 26 Viewing VCR Output or Playback 26 Operating Elec...

Page 5: ...ctionality of both versions remains the same except for DTMF compatibility If you are using a KTS 41A switcher in your KTD 400 system you will need to order a DTMF Upgrade Kit item number 1034782 Inst...

Page 6: ...6 1034790D January 2001 KTD 400 Controller Keypad Installation and Operation Manual...

Page 7: ...tion KTD 300R KTD 400 Setting Description Digiplex P T Z and VCR control only Multiplexer control only Factory setting Digiplex P T Z multiplexer and VCR control Controlling a Robot MV96 multiplexer w...

Page 8: ...Modular Phone Box Connections Standard Digiplex Control Figure 5 KTD 300R Terminal Strip Connections Standard Digiplex Control Digiplex System Connections Wiring the KTD 400 and 300R to control a sta...

Page 9: ...t The LCD window will briefly display keypad setting information and then it will enter the operating mode Powering Up KTS 41 System Control Wiring the KTD 300R to control a KTS 41A system involves co...

Page 10: ...10 1034790D January 2001 KTD 400 Controller Keypad Installation and Operation Manual...

Page 11: ...lex systems the KTD 311 Software Download Package can be used to easily download camera titles For new installations these instructions should be followed in the order in which they are presented Ifan...

Page 12: ...multiplexer number and largest VCR number in the system maximum entries are cameras 511 moni tors 64 multiplexers 64 VCRs 64 The keys can be used to switch between columns Once all entries are made th...

Page 13: ...selection of different models of multiplexers Use the keys to scroll through the list The models are listed in alphabetical order After selecting the appropriate multiplexer press seq to advance to th...

Page 14: ...itcher output 12 To enable the monitor to be addressed as Monitor 1 subtract 1 from 12 and enter the result 11 as the monitor offset Matrix Switcher Number Monitor Number Offset 12 1 11 In this partic...

Page 15: ...e 23 First Menu Display 1 SWTCH 2 PTZ 3 ALRM 4 CYBER SEQ EXIT Step 1 Press and hold the set key until the following display appears Figure 21 Normal Operating Display CAMERA 000 MONITOR 01 From this m...

Page 16: ...ars Enter the access code 9 5 1 seq The display will automatically advance to the next menu Step 2 Press 2 The first receiver programming menu will appear Receiver Setup Steps 4 15 Step 3 Using the nu...

Page 17: ...event that receiver power is lost the receiver can be programmed to resume auto pan once power is restored If the receiver is to auto pan when power is restored press 1 If not press 0 The display will...

Page 18: ...ay will appear Step 11 Press 0 if the lens requires positive voltage for focus near and negative voltage for focus far Press 1 if the opposite is the case The next display will appear Step 12 With the...

Page 19: ...urposes Step 1 Access the receiver setup menu as explained on page 13 The first receiver programming menu will appear as shown below Step 3 Press 2 The display will automatically advance to the next m...

Page 20: ...40 to allow entry of the next position Method 2 If the position is to be included in the preset tour enter the preset number and hold the last digit entered until a tone sounds The following display...

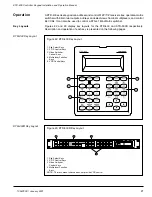
Page 21: ...Matrix switcher Figures 42 and 43 display key layouts for the KTD 400 and KTD 300R respectively Description and operation of each key is presented on the following pages KTD 400 Key Layout KTD 400R K...

Page 22: ...os in lower right window of current view also used in setup of motion detection areas Used to select an active multiplexer or VCR Toggles between a full screen view and a 2x view of the selected video...

Page 23: ...BACK Reverse Decrease recording speed Increase recording speed rev spd spd Toggles between selected views Reserved for future development Used by some multiplexer types to restore full view VCR Contro...

Page 24: ...he function keys for control The preset option referred to in this chapter will function only if activated during setup NOTE To activate a camera s preset tours or ShadowTour select the desired camera...

Page 25: ...SettingElectronicAutoPanLimitsforKalatelDomes Video Alarms Clearing Alarms In a Digiplex system alarmed sites can be programmed to remain on the monitor screen indefinitely and must be cleared by the...

Page 26: ...ovided with the multiplexer to determine available views Switching a Multiplexer to Live Video Calling up a Video Input on an Active Multiplexer Example To call up video input number 9 on the active m...

Page 27: ...the package s Technical Support Kalatel offers 24 hr technical support 7 days a week Call 800 469 1676 6 a m 5 p m PST Mon Fri 541 740 3589 all other times limited support Fax 541 752 9096 available 2...

Reviews: