


3. Wait until the home screen appears.
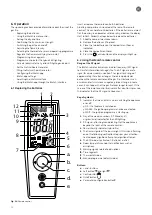
6.11 Activating/deactivating the hybrid LED lighting
and adjusting the lighting intensity
If the gas fire is equipped with hybrid LED lighting, it will be
automatically activated as soon as the fire is turned on. The
number of horizontal bars at the bottom of the screen indicate
the level of brightness of the LED lights. LED lighting can also be
activated when the fire is not on. Carry out the following steps to
activate only the LED lighting:
1. Press
to turn on the screen.
2. Press the right button until “P1, P2 or P3” appears in the
centre of the screen.
3. Press
to activate the LED lighting or
increase its intensity.
4. Press
to deactivate the LED lighting or decrease its
intensity.
6.12 Setting the Natural Spark Generator
If the gas fire is equipped with a Natural Spark Generator, lifelike
sparks will be produced when it is alight. The higher the flames,
the more sparks there are. The gas fire must be alight for some
time before the Natural Spark Generator can produce sparks. This
is why the appliance only activates the Natural Spark Generator
after it has been operating for 10 minutes. The user can set a time
interval with the remote control. The last Natural Spark Generator
programme selected is saved when the gas fire is turned off.
Carry out the following steps to set the time interval:
1. Press the forward right button
to access the Natural
Spark Generator programme.
2. At the top of the screen, the word “SP0” (or another
previously-set value) will appear in the display.
3. Press the + or - buttons to change the Natural Spark
Generator programme. (SP0 t/m SP8).
4. Briefly press
to exit the menu.
Settings:
SP0 = Natural Spark Generator is switched off; no sparks
SP1 = 1 spray of sparks per hour.
SP2 = 2 sprays of sparks per hour.
SP3 = 3 sprays of sparks per hour.
SP4 = 4 sprays of sparks per hour.
SP5 = 5 sprays of sparks per hour.
SP6 = 6 sprays of sparks per hour.
SP7 = 10 sprays of sparks per hour.
SP8 = random sprays of sparks, one per minute
6.13 Fill the Natural Spark Generator
The Natural Spark Generator system contains a cartridge of
powder (Natural Spark Powder) on delivery. Use the instruction
delivered with bthe new powder for refilling the Natural Spark
Generator.
increments of 0.5°C.
6. Confirm by pressing the (centre button).
7. “TECO” (temperature ECO) will now appear in the display.
TECO is the minimum temperature between the time
segments. This minimum temperature will be maintained all
day with the exception of the set time segments.
8.
Set the desired temperature with the + or - buttons at
increments of 0.5°C.
9. Confirm by pressing the (centre button).
10. Press the right button
, so that a flashing time in hours
and minutes appears in the top left-hand corner, while “ON
1” appears in the middle of the display (this is the first “on”
time).
11. Use the + and - buttons to set the first “on” time at
increments of 15 minutes.
12. Confirm by pressing the centre button
if you are happy
with the time.
13. “OFF 1” will then appear (this is the first “Out” time).
14. Use the + and - buttons to set the first “out” time, at
increments of 15 minutes.
15. Confirm by pressing the
button.
16. Programme the other times in the three segments in this
way; should you not require all time segments, these other
segments should be set at identical switch-on times.
17. Press P to exit the programme.
18. The
and
icons on the remote control indicate that the
time segments have been programmed.
6.10 Programme choice for the hybrid LED lighting
If the gas fire is equipped with a hybrid LED lighting function, it
is possible to vary the lighting effects. The different parameters
controlling the LED lighting allow the oscillation, intensity and
colour to be set. In every programme, selection of the word
“AUTO” provides the highest and clearest lighting intensity.
Table: LED programme
Programme
Reacts to
Light clear variation
P1
Setting AUTO and
Modulating between
high and low
10% to 90%, fading
reddish LED colour.
P2
Setting AUTO and
Modulating between
high and low
10% to 90%, yellowish
and reddish LED
colour, alternately on
the left and right-hand
sides of the appliance.
P3
Setting AUTO and
Modulating between
high and low
Combination between
Programme P1 en P2
Carry out the following steps to adjust the LED lighting
programme:
1. Press the right button
until a “P1, P2 or P3” appears in the
middle of the display.2. Press a number of times until the
2. Press a number of times until the desired “P”
programme is displayed.
25
Summary of Contents for G Series
Page 1: ...Installation instructions BALANCED FLUE GAS FIRES DON T COMPROMISE EN...
Page 2: ......
Page 4: ...4...
Page 43: ...1 4 6 7 5 2 3 43...
Page 45: ...1 3 2 5 4 6 7 8 8 7 45...
Page 47: ...1 9 4 7 3 8 5 6 2 10 47...
Page 49: ...5 1 2 3 7 4 6 8 10 9 9 49...
Page 51: ...4 5 3 6 1 1 51...
Page 52: ...7 2 7 7 2 2 8 52...
Page 54: ...4 5 2 1 1 3 54...
Page 55: ...9 8 6 7 1 55...
Page 57: ...5 6 7 8 3 2 2 1 57...
Page 58: ...9 4 4 8 58...
Page 60: ...5 2 9 6 2 1 4 3 60...
Page 61: ...7 7 10 11 8 61...
Page 63: ...1 7 7 3 4 6 2 7 63...
Page 64: ...2 4 4 5 5 8 64...
Page 66: ...7 4 5 6 1 8 9 66...
Page 67: ...3 3 11 2 10 10 12 67...
Page 69: ...1 2 6 6 8 8 9 7 7 4 With gas type G30 log 4 to be placed at extreme right 3 4 5 11 69...
Page 72: ...10 2 1 9 11 3 3 4 5 5 7 6 72...
Page 73: ...13 12 12 12 8 73...
Page 76: ...3 1 6 5 4 2 13 76...
Page 77: ...14 7 10 11 8 12 12 Other side Divide 15 cryptonite and 16 ash 77...
Page 80: ...3 4 5 7 1 3 4 5 6 1 4 5 1 3 4 1 3 2 1 2 3 1 3 1 2 4 5 1 6 2 6 7 14 12 11 11 3 80...
Page 81: ...3 4 5 7 8 1 3 4 7 9 10 8 3 4 5 6 7 8 1 3 4 5 6 7 8 1 3 4 5 6 7 1 9 10 8 15 13 81...
Page 84: ...4 3 5 2 3 4 5 1 2 3 4 5 1 1 2 3 4 1 1 2 1 1 1 2 1 1 1 1 1 2 3 4 5 6 6 1 1 1 14 11 84...
Page 94: ...94...
Page 95: ...95...
Page 96: ...Gelo rveldweg 21 5951 DH Belfeld info kalfire nl KALFIRE COM DON T COMPROMISE REF V01 2019 EN...


