


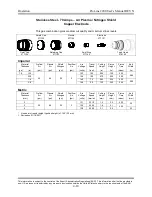

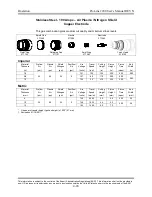
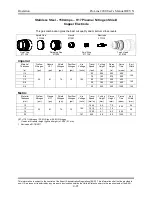

Operation
ProLine 2200 User’s Manual REV N
This information is subject to the controls of the Export Administration Regulations [EAR]. This information shall not be provided to
non-U.S. persons or transferred by any means to any location outside the United States contrary to the requirements of the EAR.
4-6
Making a Cut
Once the unit has been properly set up and the x/y machine and height control systems
have been properly configured, perform the following steps to cut with the system:
1. Use the x/y machine control to apply a start signal to the system. Upon the reception
of a cycle start signal, the following sequence will take place:
•
Two second gas preflow
•
High frequency starting circuit energized
•
Pilot arc initiation
•
Transferred arc (cutting arc) established
•
Motion output relay energized after Pierce Delay timer complete
2. Upon removal of the cycle start signal, the following sequence will take place:
•
Cutting arc extinguished
•
Motion output relay deenergized
•
Gas postflow
Consumable Life
Use the following guidelines to maximize consumable parts life:
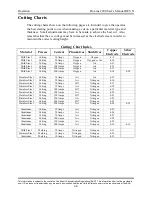
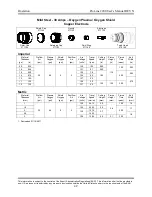
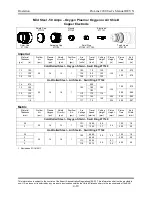
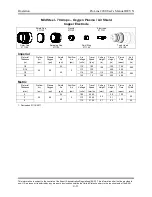
1. Use the recommended pierce height given in the cutting charts. A pierce height that
is too low will allow molten metal that is ejected during the piercing process to
damage the shield cap and nozzle. A pierce height that is too high will cause the pilot
arc time to be excessively long and will cause nozzle damage.
2. Make sure the arc extinguishes properly at the end of each cut. Program the lead-out
such that the arc is not lost before the lead-out is complete. The arc must remain
transferred to the workpiece throughout the turn-off sequence. A “popping” noise
can be heard if the arc extinguishes abnormally.
3. Make sure the torch does not touch the plate while cutting. Shield cap and nozzle
damage will result.
4. Use a chain cut when possible. Starting and stopping the torch is much more
detrimental to the consumables than making a continuous cut.


