background image

Advanced Functions

9

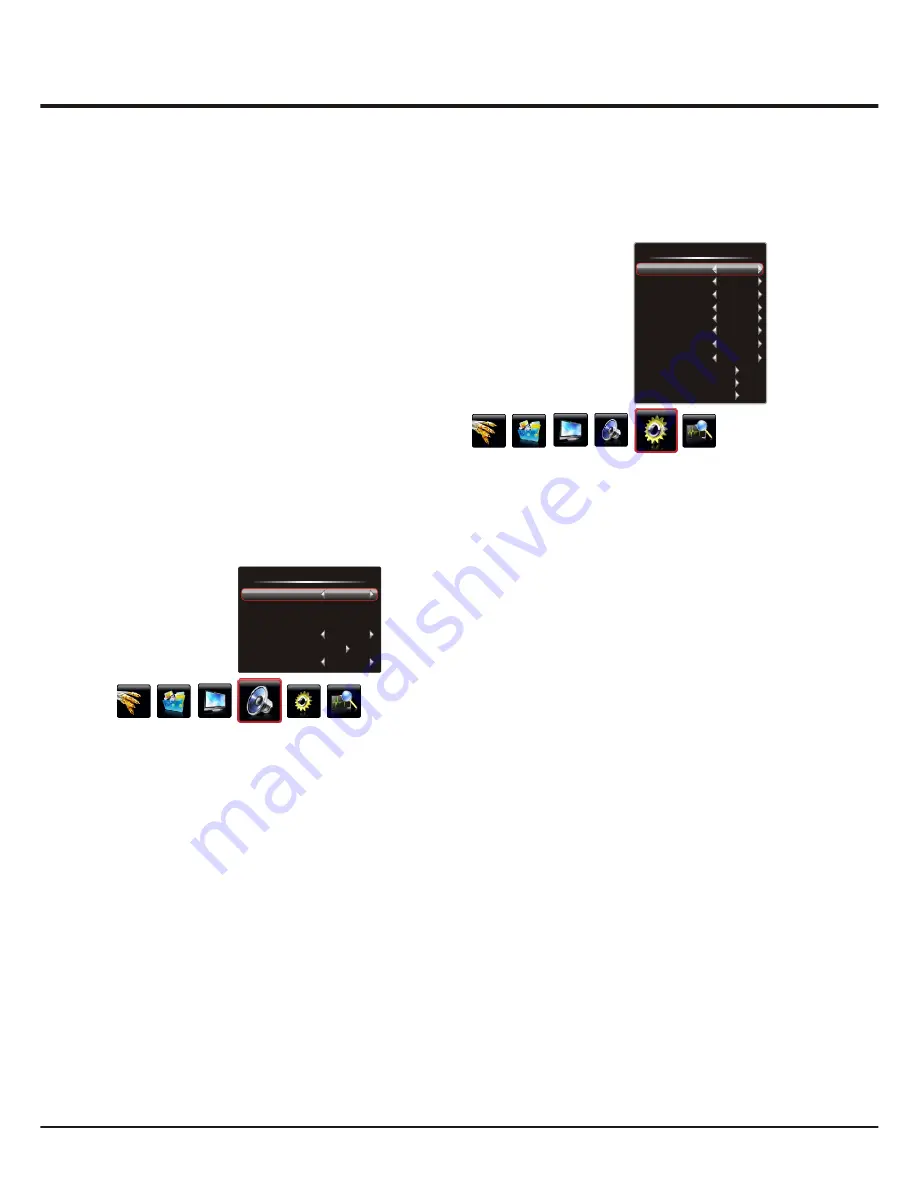
Adjusting the Sound

Display the menu by pressing the 

Menu

 button. Press 

the left or right direction button to select the 

Sound

 icon 

and press the

 or down direction or 

OK

 button to display

 up


the 

Sound

 menu. The 

Sound

 options are as below: 

Sound Mode:

 use the

direction or 

OK 

 right

 button 

to 

display the selectable options,  then press the up or down 
direction button to scroll 

through the sound preset settings: 

Stereo

Music

News

Movie

 and 

Personal

.

Balance

: use the 

 direction button to balance 

left or right

the sound between the left and right speakers.

Smart Volume:

 turns on this option to keep the same 

sound level for all channels. 

Scene:

 use the

direction or 

OK


 right


button to display the 

selectable options, then press the up or down direction 
button to scroll 

 the scene preset setting: 

DeskTop

,


through

HangUp

.

Sound EQ: 

adjusts the audio frequency settings. Select 

the 

Sound EQ

 option, then press the right direction or 

OK

button to enter, then press the up or down direction button
to select an option and press the left or right direction  
button to adjust. 


Note

: If the 

Sound EQ

 is adjusted, the 

Sound Mode

 will

   automatically switch to 

Personal

.


Color Temp:

 adjusts the color temperature of the picture. 

Use the

direction or 

OK


through 

.

Natural Light 

:

 turns on this option to adjust the 

brightness of the backlight according to the content of the 
inputted signal automatically, so as to optimize the picture 
quality and decrease the power consumption.


:

 turns on this option to adjust the

contrast automatically. 

Tint

adjusts the balance between the red and green 

levels.


button to display the 

selectable options, then press the up or down direction 
button to scroll 

the color settings: 

Cool

 for a 

more blue palette of picture colors; 

Normal

; and 

Warm


for a more red palette of picture colors

Dynamic Contrast

 right

Press 

Menu

 to return or 

Exit

 to close the menu.

Smart Switch

:

 press the left or right direction button

to select a desired setting: 

Switch

Display

 and 

Off

.

    Switch:

 if an equipment, e.g. a DVD player, has been 

    connected to the sockets on the TV set and turned on, 
    e.g. AV1 sockets, the TV set will switch to that signal 
    source automatically (AV1 for this example). 
    

:

 if an equipment, e.g. a DVD player, has been 

Display

    connected to the sockets on the TV set and turned on, 
    e.g. AV1 sockets, the TV set will display a prompt 
    message on the screen. You can select OK to switch to 
    that signal source (AV1 for  this example) or Cancel to 
    ignore the prompt.

    Off: 

disables the Smart Switch function.


Note:

  For HDMI source, the smart switch function is 

    available only when using a HDMI cable to connect the 
    equipment which turned on. And the smart switch function
    is not available for AV2 source, because AV2 shares video
    (Y/VIDEO) and audio sockets with YPBPR.

Function Settings

Display the menu by pressing the 

Menu

 button. Press the

left or right direction button to select the 

Setting

 icon 

and press the up or down direction or 

OK

 button to display

the 

Setting

 menu.

 The 

Setting

 options are as below: 

Note:

 Some options may be not available for certain 

signal sources.

Note: 

Tint is available to be adjusted only when the 

system of the video signal is NTSC.

MTS: 

 left or right

Press 

Menu

 to return or 

Exit

 to close the menu.

use the

direction 

available MTS settings: 

Stereo

Mono

 or 

SAP

 in TV mode.


button to select the 

DNR (Dynamic Noise Reduction)


Improves the quality 

of the picture in the case of poor reception. Press the left 
or right direction button to toggle among 

Middle

High, 

Low

 and 

Off

.


Light Sensor: 

press the left or right direction button to

select 

On

 or 

Off

. When 

On

 is selected, the unit is in power 

saving mode and can automatically adjust the backlight 
according to the intensity of ambient light, the 

Back Ligh

t

option in 

Picture

 menu is not adjustable, the 

Natural Light


in 

Picture

 menu is automatically set to Off and not 

adjustable. When 

Off

 is selected, the 

Back Light

 and 

Natural Light

 options in 

Picture

 menu will restore to the 

user's setting.

Sound

Stereo

0

DeskTop 

On

Mono

Sound Mode

Balance

Scene

Sound EQ

Smart Volume

MTS

Setting

DNR
Light Sensor
Smart Switch
Startup Setting
Language
Color System

Watch Time Limit
Time Setting 
Restore to Default

Middle

Off
Off

Default

English

Auto

CC Mode

CC Option

CC OFF

CC1

Summary of Contents for K-LED39FHDN

Page 1: ......

Page 2: ...Tv LED 39 K LED39FHDN K LED39FHDS...

Page 3: ...l ctrica a la persona El signo de exclamaci n dentro de un tri ngulo equil tero es para alertar la presencia de funcionamiento y mantenimiento servicio en la literatura de usuario que acompa a al apar...

Page 4: ...Cuando se utiliza un carro tenga cuidado al mover la combinaci n carro aparato para evitar lesiones por vuelco 13 Desenchufe este aparato durante tormentas el ctricas o cuando no se use por largos pe...

Page 5: ...puesta a tierra del cable de entrada a una unidad de descarga de la antena tama o de los conectores de tierra la ubicaci n de la unidad de descarga de antena conexi n a electrodos de tierra y requisit...

Page 6: ...o Cap tulo 2 Funcionamiento General Encendido Apagado AjusteAutom tico de canales Sinton a de un canal Omisi n de un canal Cap tulo 3 Funciones avanzadas Ajuste de la imagen Ajuste del sonido Configur...

Page 7: ...ar y ajustar el producto Ajuste los controles que est n cubiertos en este manual de instrucciones ya que el ajuste incorrecto de otros controles puede provocar da os Si esto sucede desenchufe el apara...

Page 8: ...siga las indicaciones de seguridad siguientes Compruebe que la pared puede soportar el peso del aparato deTV y soporte de pared de montaje Siga las instrucciones de montaje suministrado con el soporte...

Page 9: ...de funci n y bot n de encendido del televisor pueden variar seg n el modelo deTV CONEXIONES Nota La ubicaci n y los nombres de los conectores en el televisor pueden variar seg n el modelo de TV y no t...

Page 10: ...mpuesto ConexionesYPbPr entrada Las conexiones YPbPr pueden ser utilizadas para conectar un dispositivo que tiene conexiones de v deo por componentes tales como un reproductor de DVD Las conexiones de...

Page 11: ...n No es compatible Sale del sistema de men s Aumenta o disminuye el volumen del televisor Acceder a la modalidad de televisi n Acceder al modo USB Analiza arriba o hacia abajo a trav s de la lista act...

Page 12: ...cable de energ a a la toma de corriente Su aparato de TV s lo debe ser conectado a una fuente de CA No debe estar conectado a una fuente de la CC Si el enchufe se desconecta del cable no bajo ninguna...

Page 13: ...roceso presione el bot n Men Los canales ya se encuentran ser n almacenados 5 Los canales est n dispuestos en un orden pre establecido Consulte las secciones siguientes si desea ajustar o saltar un ca...

Page 14: ...riginal y natural Nota algunos opciones pueden ser no seleccionable para fuentes de se al determinadas Pulse la flecha de direcci n derecha o el bot n OK para confirmar Nota Se recomienda utilizar el...

Page 15: ...ierdo y derecho Volumen inteligente se activa esta opci n para mantener el mismo nivel de sonido para todos los canales Escena utilizar la direcci n derecha o el bot n OK para mostrar las opciones sel...

Page 16: ...jemplo un reproductor de DVD se ha conectado a una entrada del televisor y se encendi por ejemplo en AV1 el televisor pasar a la fuente de la se al de forma autom tica AV1 para este ejemplo Pantalla s...

Page 17: ...subt tulos aparece siempre que est disponible CC Silencio Muestra la informaci n de subt tulos cuando est n disponibles siempre que el sonido del televisor se silencia pulsando el bot n MUTE Los subt...

Page 18: ...activado la hora de apagado no es ajustable Tiempo de apagado pulse la izquierda derecha arriba abajo la direcci n para ajustar la hora de apagado Tiempo de reposo establece un per odo de tiempo tras...

Page 19: ...erecha Posici n V vertical ajusta la posici n de la imagen hacia arriba o hacia abajo Ajuste de reloj ajusta la sincronizaci n del reloj de la imagen Fase ajusta la imagen si hay parpadeo de las letra...

Page 20: ...TOS 1 Seleccione Foto a continuaci n pulse el bot n derecho o OK para introducir el dispositivo USB 2 Pulse el bot n de direcci n izquierda o derecha para seleccionar el s mbolo USB y presione el bot...

Page 21: ...autom tica Nota Esta funci n s lo est disponible cuando las im genes y la m sica se encuentra de forma sincr nica en la carpeta principal de la memoria USB 3 Pulse Salir para volver a la carpeta prin...

Page 22: ...es 8 Para algunos dispositivos USB con fuente de energ a tales como discos duros de gran tama o MP4 etc sugiere su uso con conexi n a la energ a el ctrica para evitar que se apague el dispositivo Los...

Page 23: ...ebe con otro canal El control remoto no funciona 1 Cambie las pilas 2 Las bater as no est n instaladas correctamente 3 El cable de energ a no est conectado No hay imagen sonido normal 1 Ajuste el bril...

Page 24: ...terior exterior 2 Compruebe la conexi n de la antena 3 Sintonice el canal 4 Pruebe con otro canal Un error de radiodifusi n podr a suceder Encendido Aparecen puntos negros o rayas horizontales se agit...

Page 25: ...Los gr ficos utilizados en estas instrucciones son solamente una representaci n Cuando el televisor esta boca abajo no coloque la pantalla sobre bordes afilados para evitar que se raye la pantalla Si...

Page 26: ...ithin an equilateral triangle is intended to alert the user to the presence of uninsulated dangerous voltage within the product s enclosure that may be of sufficient magnitude to constitute a risk of...

Page 27: ...ity All televisions must comply with recomm ended international global safety standards for tilt and stability properties of its cabinet design Do not compromise these design standards by applying exc...

Page 28: ...ower Cord and Signal Cable Use Environment Cleaning Hanging the TV Set on the Wall Buttons on the TV Sockets Remote Control Functions Switching on Switching off Automatic Channel Set up Fine Tuning a...

Page 29: ...set near damp and cold areas Protect the set from overheating Keep the set away from direct sunlight Apparatus shall not be exposed to dripping or splashing and no objects filled with liquids such as...

Page 30: ...els the POWER button is not available Buttons on the TV Note The location and names of the function buttons and power button on the TV may vary according to TV model SOURCE button Press to select sign...

Page 31: ...e number of USB sockets on the TV may vary according to TV model SPDIF SPDIF socket output The SPDIF socket can be used to connect a compatible digital audio receiver YPBPR component sockets input Y V...

Page 32: ...If the Scale is set to Zoom in Picture menu the left right direction button can also be used to zoom out in the picture when no menu is displayed on the screen OK Confirms your selection MUTE Reduces...

Page 33: ...ting an external aerial or other equipment fitted 4 When powered on the TV will be turned on directly If the power indicator lights up the TV set is in standby mode Press the button on the remote cont...

Page 34: ...a channel Advanced Functions Chapter 3 Adjusting the Picture The menus for adjusting the picture are used to obtain the best picture setting according to your preference the type of programme you are...

Page 35: ...D player has been connected to the sockets on the TV set and turned on e g AV1 sockets theTV set will switch to that signal source automatically AV1 for this example if an equipment e g a DVD player h...

Page 36: ...to page 12 for specific instructions left or right or down Note The LOGO1 item is only available when capturing a picture and if selecting LOGO1 the TV will automatically display the captured picture...

Page 37: ...to return or Exit to close the menu Note This function is only available in PC mode Geometry Auto Adjust H Position V Position AD Clock Phase 50 50 0 60 USB Functions Playing Movie 1 Select Movie Sho...

Page 38: ...auto play Note This function is only available when the pictures and music are synchronously located in the USB root catalog 3 Press Exit to return the USB root catalog Attention and Frequently Asked...

Page 39: ...Saving and E Picture Enhance Picture icons 2 Press the left or right direction button to select an icon and press the up direction or OK button to display the corresponding menu 3 Press Menu or DEMO...

Page 40: ...interference Blank screen in VGA mode Perhaps the TV can not recognize the resolution set by the PC Suggest to change to the best resolution or other standard resolutions of the Windows system Snowy...

Page 41: ......

Reviews: