103
EN
Plumbing system connection
In order to achieve the test report results, please load the performance parameters retained
by the manufacturer and the qualified technician. They will use these parameters once verified
that, during the installation, it is possibile to reproduce the laboratory conditions.
The connection of the Hydro Insert to the plumbing system must be
made ONLY by specialized personnel who are capable of carrying
out installation properly, in compliance with current standards in the
country of installation. The manufacturer will not be held responsible
for damage to persons or things in the event of failed operation if the aforementio-
ned warning is not complied with. anti-condensation valve must be installed in the
return flow. It is mandatory to install an anti-condensate valve on the return of the
system, set at 60 ° C. The valve isn’t a standard Hydro Insert component and it isn’t
delivered with the Hydro Insert.
Closed vessel system
This product has been designed and built to work with
closed vessel systems. In general, the closed vessel
system has the following expansion
as the expansion
vessel pre-loaded
. In addition to the expansion device,
the closed vessel system must be provided in accordance
with current Italian UNI 10412-2 (2009) by:
•
safety valve
•
thermostat control of the circulator
•
device alarm sounds
•
temperature Indicator
•
pressure indicator
•
audio alarm
•
automatic adjustment
•
safety thermostat with manual reset
•
circulation system
Directions for use
If the installation of the Hydro Insert provides interaction
with another existing system complete with a heater (gas
Hydro Insert, gas Hydro Insert, oil Hydro Insert, etc..)
consult qualified personnel who can then answer the
compliance of the system, as envisaged by the law in
force.
Flushing the system
In accordance with the UNI-CTI 8065 is strongly
recommended to wash the entire system before
connecting it in order to get rid of residues and
deposits.
After flushing the system to protect it against corrosion
and deposits, it is recommended the use of inhibitors.
Upstream from the Hydro Insert, always install shutters
so as to disconnect it from the plumbing system should it
be necessary to move it, or when it requires routine and/
or special maintenance. Connect the Hydro Insert using
hoses so that the Hydro Insert is not too strictly connected
to the system, and to allow slight movement.
These are as helpful as the supply and return piping
system if the heating system is on a higher floor than the
Hydro Insert.
The exhaust pipe pressure is connected temporarily to a
carafe or a funnel to avoid, in case of overpressure, that
the water gush bathrooms and the structure and the floor.
Filling the Hydro Insert funding of sanitary kit
Once all the water connections, proceed to check pressure
seal by filling the Hydro Insert. During this operation, any
air in the system is released from the
automatic vent
valve
.
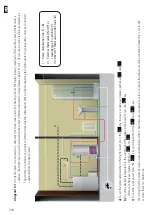
C
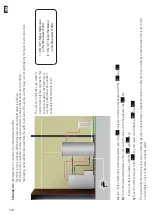
Connection diagram for Hydro Insert
The pressure relief valve (C) must always be connected
to a water drain pipe. The tube must be capable of
withstanding high temperature and pressure.
Summary of Contents for Cloe 17B
Page 47: ...45 IT Cod 001111 NOTE...
Page 48: ...46 IT Cod 001111 NOTE...
Page 93: ...137 EN NOTES Cod 001111...
Page 94: ...138 EN NOTES Cod 001111...
Page 140: ...92 ES Cod 001111 NOTAS...

