47
GB
1
CLEANING BY THE TECHNICAL
Check every year
Clean the combustion chamber
Cleaning the metal parts
To clean the metal parts of the stove, use a soft cloth
dampened with water.
Never clean the metal parts with alcohol, thinners,
petrol, acetone or other degreasing substances. If
such substances are used, our company declines any
responsibility.
Eventual variations in the colour of the metal parts can be
caused by an incorrect use of the stove.
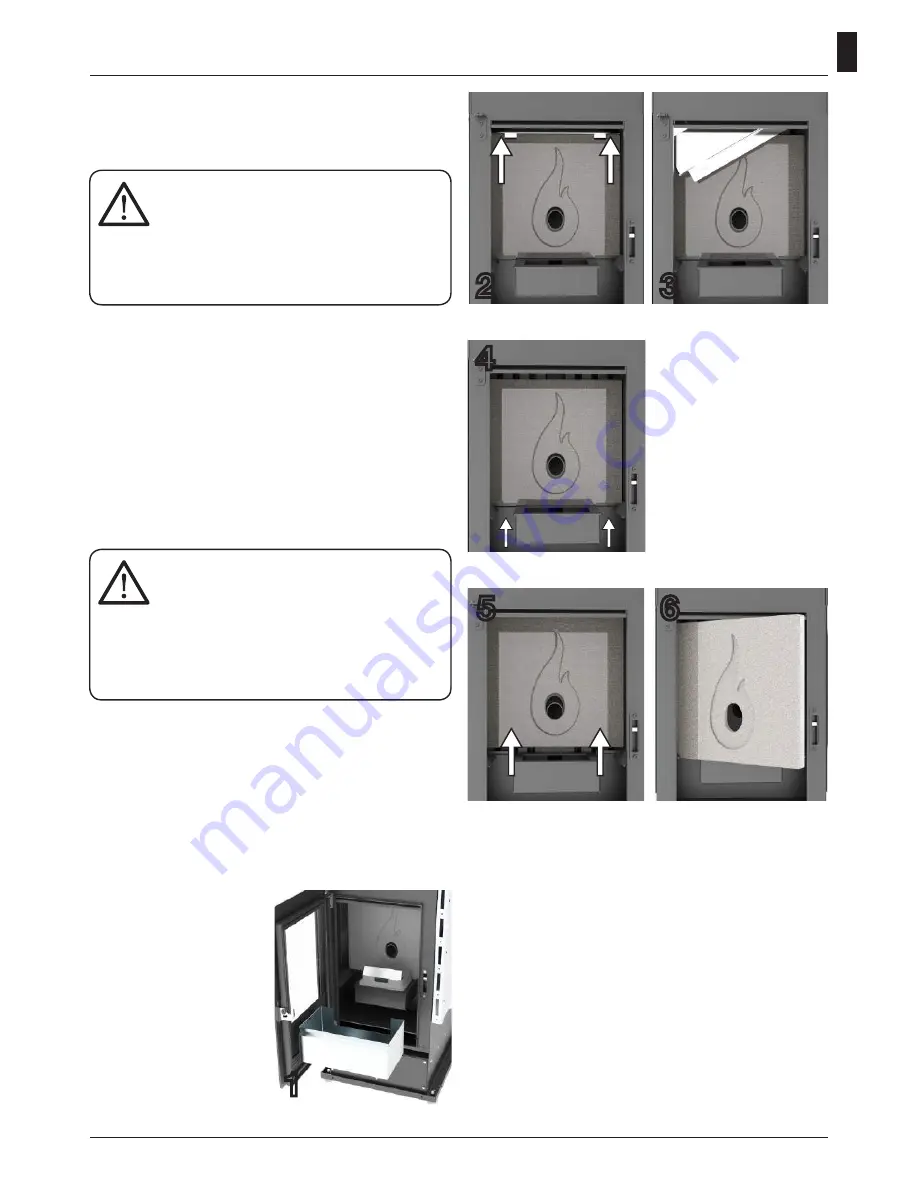
When the stove is cold,
please join the following
procedure: open the door
and pull the ash tray out and
remove the brazier. (photo 1)
Remove the mounting of
the refractory pushing it up-
wards and then pull it out
from the combustion cham-
ber. (photo 2)
Turn and tilt it to remove it.
(photo 3)
With a vacuum cleaner to clean the refractory material
and the walls of the combustion chamber, in particular the
front wall in which are located the heat exchanger pipes,
(photo 9) the bottom of the chamber combusione and the
compartment that is located below the ash box. (photo 8)
Also clean the brazier and the ash box.
After completing the cleaning, replace the refractory, its
attachment, the ash drawer and finally the brazier.
The use of aggressive detergents or thin-
ners can damage the surfaces of the
stove.
Before using any detergent it is advisable to try it
on a small section out of sight or contact the Au-
thorized Assistance Centre for information regard-
ing the product.
It is necessary to daily clean the brazier
and often clean the ash box.
The lack of cleanliness can prevent the
starting of the stove, causing damages to the stove
itself and to the environment (possible emission of
unbrunt material and soot).
Do not re-use the pellet possibly remained in the
brazier due to no starting-up.
2
3
Now push the refractory up-
wards (photo 4 + photo 5),
rotate (photo 6) and remove
it from the combustion
chamber.
When handling the refrac-
tory take care not to break
it, it is very fragile.
4
5
6
Cleaning the surfaces
To clean the surfaces, use a rag dampened with water or
with water and a neutral detergent.
Summary of Contents for Denia 14
Page 1: ...INSTALLER USER MANUAL For Denia 14 14D Mia 16 16D...
Page 28: ...55 GB NOTES...
Page 29: ...56 GB NOTES...


