background image

www.KALORIK.com 

CMM 39732 - 200528 


chopper lid (also with a counter clockwise twisting motion) 

 make 

sure beforehand that the blades are completely stopped - 


Carefully remove the blade 

 handle with caution because it is 

sharp! 


Remove the processed food from the bowl. 

Note:

 remember to use for no longer than 1 minute of continuous motor 

use. The motor must then be rested for 10 minutes. Keep food quantity 
to process under 1 lb. (450g). 

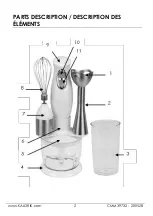
HOW TO USE WITH THE WHISK ATTACHEMENT 


Make sure the motor block is disconnected from the power outlet. 


Insert the stainless-steel whisk (8) gently on its base (7), until you hear 
a click sound, indicating that the whisk is securely inserted. 


Screw the whisk assembly (7) + (8) onto the screw thread at the 
bottom of the motor unit. For this, hold the motor block and turn the 
whisk assembly counter clockwise until it locks in. Gentle pressure by 
hand will ensure that the whisk assembly is fully tightened on to the 
motor unit. 


Put the ingredients into a suitable container such as a tall mixing 
bowl, cooking pan or mixing cup. Do not overfill, to avoid splashing 
when the motor is switched on. 


Plug the appliance into a wall outlet. 


Put the whisk vertically into the ingredients before pressing one of 
the switches. This will prevent splashing when the motor is switched 
on. 


Switch on motor by 

choosing “Speed I“or “Speed II” and blend, but 

remember to use for no longer than 1 minute of continuous motor 
use. The motor must then be rested for 10 minutes. 

GET MORE OUT OF YOUR PRODUCT 


Browse Chef-created recipes specifically made for your Kalorik 
product. Visit our website 

www.kalorik.com

 to see our extensive recipe 

library and start cooking. Sign up for the Kalorik email mailing list to 
receive special offers and recipes, and connect with us on social 
media for daily inspiration.


Summary of Contents for CMM 39732

Page 1: ...MULTIUSE 3 IN 1 STICK MIXER SET 3 EN 1 BATIDORA USO M LTIPLE SET MIXEUR 3 EN 1 MULTI USAGES EN 4 ES 12 FR 21 CMM 39732 120V 60Hz 200W...

Page 2: ...www KALORIK com 2 CMM 39732 200528 PARTS DESCRIPTION DESCRIPTION DES L MENTS...

Page 3: ...Cuchilla de acero inoxidable 2 Varilla desmontable 3 Vaso 4 Vaso de la picadora con cuchilla de acero inoxidable 5 Tapa de la picadora 6 Soporte de los accesorios 7 Base pie batidor 8 Batidor de acer...

Page 4: ...liance to the nearest authorized service facility for examination repair or electrical or mechanical adjustment 8 The use of accessory attachments not recommended by the appliance manufacturer may cau...

Page 5: ...arefully Keep hands and utensils out of the unit while operating to prevent the possibility of severe personal injury and or damage to the product or property SAVE THESE INSTRUCTIONS HOUSEHOLD USE ONL...

Page 6: ...he KB indicates a maximum continuous motor usage time In general this appliance is used using a pulse pattern so the real maximum usage time is actually much longer than the KB indicated on the rating...

Page 7: ...e on a secure dry level surface HOW TO USE WITH THE CHOPPER BOWL Make sure the motor block is disconnected from the power outlet Place the chopping blade on the center pin inside the chopper bowl 4 ha...

Page 8: ...assembly counter clockwise until it locks in Gentle pressure by hand will ensure that the whisk assembly is fully tightened on to the motor unit Put the ingredients into a suitable container such as...

Page 9: ...nder the tap but do not immerse in water NEVER IMMERSE THE MOTOR UNIT IN WATER OR ANY LIQUID STORAGE To store all the accessories and the unit cleanly and safely please proceed as follows Assemble the...

Page 10: ...rising from a buyer s or user s misuse of the product negligence failure to follow KALORIK instructions noted in the user s manual use on current or voltage other than that stamped on the product wear...

Page 11: ...omer Service Department for the address of our authorized KALORIK Service Center When sending the product please include a letter explaining the nature of the claimed defect If you have additional que...

Page 12: ...o ha sido da ado en cualquier manera El aparato debe ser llevado al fabricante o a un centro de servicio autorizado para ser comprobado y reparado o ajustado mec nicamente o el ctricamente 8 El uso de...

Page 13: ...cadora especialmente cuando se quita de la taza se vac a el recipiente y se procede a su limpieza Las cuchillas est n muy afiladas 2 Retire siempre la cuchilla del recipiente antes de vaciarlo 3 No qu...

Page 14: ...la p gina 2 3 TIEMPO DE UTILIZACI N Este aparato no es para usos profesionales Es necesario realizar paradas a intervalos regulares No realizar esas paradas podr a da ar el motor Para una utilizaci n...

Page 15: ...ca la varilla del aparato verticalmente dentro del vaso donde se encuentran los ingredientes antes de presionar uno de los interruptores Velocidad I o Velocidad II Esto evitar salpicaduras cuando el m...

Page 16: ...la derecha Coloque y bloquee el cuerpo motor 9 en la tapa de la picadora con un suave movimiento giratorio hacia la derecha Enchufe el aparato Pulse el interruptor 10 u 11 para que empiece a funciona...

Page 17: ...st en marcha Enciende el motor escogiendo Velocidad I o Velocidad II y bata Nunca utilice el aparato durante m s de 1 minuto de manera continua Despu s es necesario efectuar pausas de 10 minutos OBTEN...

Page 18: ...idad de una forma limpia y segura proceda de la siguiente forma Monte la picadora como se explica en el apartado modo de empleo con la picadora Coloque el soporte de los accesorios 6 centrado en la ta...

Page 19: ...i n por parte del comprador o del usuario o una negligencia al no respeto del manual de instrucciones KALORIK o una utilizaci n en un circuito el ctrico cuyo voltaje es diferente al que figura en el p...

Page 20: ...ALORIK exclusivo m s pr ximo Si env a el producto le rogamos a adan una carta explicando la naturaleza del defecto Si tiene preguntas adicionales por favor llame al Servicio al Consumidor v ase abajo...

Page 21: ...vant de le nettoyer ou de le d placer 7 Ne laissez pas l appareil sans surveillance quand il est sous tension 8 Ne faites pas fonctionner l appareil si son cordon ou sa fiche est endommag ou si l appa...

Page 22: ...aleur GARDEZ CES INSTRUCTIONS USAGE DOMESTIQUE UNIQUEMENT INSTRUCTIONS POUR LES FICHES AVEC MISE A LA TERRE Cet appareil est quip d une fiche et d un cordon permettant la mise la terre Dans le cas d u...

Page 23: ...eil Assurez vous que le commutateur de mise sous tension 1 soit en position teinte et que le bouton de r glage de la temp rature 4 trouver en position 0 Branchez l appareil sur une prise de courant To...

Page 24: ...ux 3 s allume puis va s allumer et s teindre alternativement une fois la temp rature atteinte et r gul e par le thermostat ATTENTION La surface m tallique devienne brulante Ne touchez pas la plaque de...

Page 25: ...l refroidisse compl tement avant de le nettoyer Essuyez l appareil l aide de papier absorbant ou d un chiffon doux Pour nettoyer la plaque vitroc ramique veuillez utiliser un nettoyant con u pour plaq...

Page 26: ...e remplacement est envoy c est la garantie restante du produit originel qui s appliquera La pr sente garantie ne s applique pas aux d fauts dus une mauvaise utilisation de la part de l acheteur ou de...

Page 27: ...ternet www KALORIK com ou appelez notre d partement Service Client le pour obtenir l adresse du service apr s vente KALORIK agr Si vous envoyez le produit veuillez y joindre une lettre expliquant la n...

Page 28: ...175 NW 49th Avenue Miami Gardens FL 33014 USA Toll Free Num ro Gratuit 1 888 521 TEAM 1 888 KALORIK www KALORIK com User manual content and recipes courtesy of Team International Group Do not reproduc...

Reviews: