background image


17 

USK MS 1 - 080211 


Conecte el aparato a la red. 


Mantenga firmemente el bloque motor y pulse el interruptor 
encendido/apagado. Aconsejamos a que pulse el interruptor de 
forma intermitente.  


Asegúrese de que la cuchilla está del todo sumergida antes de 
empezar a mezclar para evitar salpicaduras.  


No saque nunca el aparato del liquido antes de la parada 
completa de la cuchilla. 


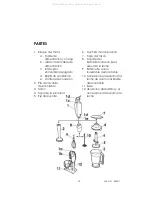
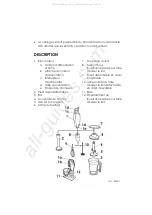
UTILIZACIÓN DE LA PICADORA 

(Bloque motor, picadora 

y tazón) 


Ponga el eje en el fondo del tazón asegurándose de que está 
correctamente posicionado.   


Ponga la cuchilla de la picadora en el eje. 


Introduzca los ingredientes en el tazón. Corte los ingredientes 
duros (por ejemplo zanahorias, queso o carne) antes de 
introducirlos en el tazón. NO LLENE EN EXCESO EL TAZÓN. 


Agarre el bloque motor, acople la tapa de la picadora en la 
contera de conexión del bloque motor y gírela en el sentido de 
las agujas del reloj hasta que quede bloqueada. Asegúrese de 
que está bien fijada. 


Luego ponga la tapa de la picadora en el tazón y asegúrese de 
que está correctamente posicionada en el eje de la cuchilla.  


Tenga el tazón en una mano y el bloque motor en la otra. 


Pulse el interruptor. 


No quite NUNCA el bloque motor o la tapa de la picadora antes 
de la parada completa de la cuchilla.  


Utilice la tapa de la picadora, la cuchilla, el eje y su soporte 
exclusivamente con el tazón original.  


All manuals and user guides at all-guides.com

Summary of Contents for USK MS 1

Page 1: ...Stick mixer Batidora de varilla Mixer plongeant USK MS 1 120 V 200W www KALORIK com All manuals and user guides at all guides com a l l g u i d e s c o m...

Page 2: ...or electrical or mechanical adjustment 8 The use of accessory attachments not recommended by the appliance manufacturer may cause injuries 9 Do not use outdoors 10 Do not let cord hang over edge of ta...

Page 3: ...not properly fit into the outlet at first reverse it If it still does not fit contact a competent qualified electrician Do not attempt to modify the plug in any way For appliances equipped with a stan...

Page 4: ...d Vents e Bayonet connector 2 Detachable metal leg 3 Jug 4 Lid of the chopper 5 Axle unit 6 Chopper blade 7 Lid 8 Whisk Frother body 9 Removable stainless steel whisk 10 Removable stainless steel fro...

Page 5: ...eel whisk from the whisk frother body and wash in warm soapy water wipe the whisk body with a damp cloth and dry thoroughly Wash the stainless steel frother in warm soapy water and allow to dry thorou...

Page 6: ...the motor unit with your other hand Press the on off button NEVER remove the motor unit and lid of the chopper from the jug until the blade has stopped spinning Only use the lid of the chopper blade...

Page 7: ...the information at the end of this instruction booklet for recipe information and operating guidelines To remove the frother for cleaning grab the frother and firmly tug from the body While using the...

Page 8: ...imum quantity Maximum operating time Container Milk 9 fl oz 1 125 cups 250ml 5 seconds Tall glass CARE AND CLEANING YOUR PRODUCT 1 Motor unit Do NOT immerse the motor unit in water or any other liquid...

Page 9: ...Lid Wash the lid in warm soapy water Allow to dry thoroughly 8 Whisk Frother body Wipe the whisk frother body with a damp cloth 9 Removable whisk Wash the removable stainless steel whisk in warm soap...

Page 10: ...aining warranty of the original product This warranty does not apply to any defect arising from a buyer s or user s misuse of the product negligence failure to follow KALORIK instructions noted in the...

Page 11: ...website at www KALORIK com or call our Customer Service Department for the address of the nearest authorized KALORIK Service Center If you send the product please include a letter explaining the natu...

Page 12: ...arado o ajustado mec nicamente o el ctricamente 6 Desenchufe el aparato siempre que no lo use o antes de limpiarlo 7 No toque las partes en movimiento 8 El uso de accesorios que no sean los recomendad...

Page 13: ...l aparato est desenchufado 17 No a ada nada en el recipiente cuando el aparato est funcionando 18 Compruebe que el recipiente est correctamente posicionado antes de poner el aparato en marcha 19 Aseg...

Page 14: ...los aparatos provistos con un enchufe cl sico basta con insertar el enchufe en la toma de corriente INSTRUCCIONES DEL CABLE El cable de alimentaci n del aparato es un cable corto a fin de disminuir el...

Page 15: ...i de la varilla desmontable 3 Taz n 4 Tapa de la picadora 5 Eje del soporte 6 Cuchilla de la picadora 7 Tapa del taz n 8 Soporte del batidor accesorio para espumar la leche 9 Batidor de acero inoxidab...

Page 16: ...a picadora con un pa o suave h medo Pase el pie de la batidora por agua y limpie la cuchilla con un pa o h medo y seque todo con cuidado Quite el batidor de acero inoxidable del soporte y l mpielo con...

Page 17: ...n el taz n Corte los ingredientes duros por ejemplo zanahorias queso o carne antes de introducirlos en el taz n NO LLENE EN EXCESO EL TAZ N Agarre el bloque motor acople la tapa de la picadora en la c...

Page 18: ...base UTILIZACI N DEL ACCESORIO PARA ESPUMAR LA LECHE bloque motor soporte del batidor accesorio para espumar la leche y accesorio para espumar la leche desmontable Agarre el bloque motor acople el sop...

Page 19: ...ORA Preparaci n Cantidad m xima Tiempo de utilizaci n m ximo Recipiente Chocolate 3 5 oz 0 75 taza 100g 15 segundos Taz n Queso rallado 4 oz 1 taza 125g 5 segundos Taz n Cebolla cruda picada media 5 o...

Page 20: ...utilizaci n m ximo indicado en el cuadro CONSEJOS DE UTILIZACI N del manual de instrucciones Pase las superficies del aparato con un trapo seco o ligeramente h medo Compruebe regularmente que el cable...

Page 21: ...del batidor con un pa o h medo 9 Batidor desmontable de acero inoxidable Lave el batidor desmontable con agua caliente y detergente S quelo con cuidado 10 Accesorio para espumar la leche desmontable d...

Page 22: ...se env a un producto de reemplazamiento se aplicar la garant a que queda del producto original Esa garant a no se aplica a los defectos debidos a una mala utilizaci n por parte del comprador o del ut...

Page 23: ...r al servicio post venta KALORIK lo m s pr ximo Visite nuestro sitio internet www KALORIK com o llame al Servicio al Consumidor para obtener la direcci n del Servicio post venta KALORIK exclusivo lo m...

Page 24: ...le faire v rifier ou r parer ou ajuster lectriquement ou m caniquement 8 L utilisation d accessoires non recommand s par le fabricant pr sente des risques d incendie d lectrocution ou de blessure 9 N...

Page 25: ...une prise polaris e une des deux tiges m talliques est plus longue que l autre Pour r duire le risque de choc lectrique cette prise ne peut tre introduite que d une seule fa on dans la fiche murale S...

Page 26: ...rille de ventilation e Embout de connexion 2 Pied mixer d tachable 3 Bol 4 Couvercle du hachoir 5 Axe sur son support 6 Lame du hachoir 7 Couvercle du bol 8 Support pour fouet accessoire pour faire mo...

Page 27: ...ez le pied mixer sous l eau courante et nettoyez ensuite le couteau avec un chiffon humide et s chez soigneusement Retirez le fouet en acier inoxydable du support pour fouet accessoire pour faire mous...

Page 28: ...hachoir sur l axe Ajoutez les ingr dients dans le bol Certains ingr dients durs par exemple des carottes du fromage ou de la viande doivent tre coup s avant de les mettre dans le bol NE REMPLISSEZ PA...

Page 29: ...ement pr vu cet effet dans la base UTILISATION DE L ACCESSOIRE POUR FAIRE MOUSSER LE LAIT Bloc moteur support pout fouet accessoire pour faire mousser le lait et accessoire pour faire mousser le lait...

Page 30: ...upe 3 3 pintes 6 5 tasses 1 5 litres 30 secondes Casserole HACHOIR Pr paration de Quantit maximale Temps d utilisation maximal R cipient Chocolat 3 5 oz 0 75 tasse 100g 15 secondes Bol Fromage 4 oz 1...

Page 31: ...tableau CONSEILS D UTILISATION du mode d emploi Nettoyez les surfaces de l appareil avec un chiffon sec ou l g rement humide V rifiez r guli rement l tat du cordon d alimentation 2 Pied mixer d tachab...

Page 32: ...oyez le support avec un chiffon humide 9 Fouet d tachable en acier inoxydable Nettoyez le avec de l eau chaude savonneuse S chez ensuite soigneusement 10 Accessoire pour faire mousser le lait d tachab...

Page 33: ...produit originel qui s appliquera La pr sente garantie ne s applique pas aux d fauts dus une mauvaise utilisation de la part de l acheteur ou de l utilisateur une n gligence au non respect des consign...

Page 34: ...rnet www KALORIK com ou appelez notre d partement Service Client le pour obtenir l adresse du service apr s vente KALORIK agr le plus proche Si vous envoyez le produit veuillez y joindre une lettre ex...

Page 35: ...35 USK MS 1 080211 All manuals and user guides at all guides com...

Page 36: ...Back cover page last page Assembly page 36 36 K080211 www KALORIK com All manuals and user guides at all guides com a l l g u i d e s c o m...

Reviews: