background image

For Your Safety

12.  The unit must be placed with the 

clearance of 100cm to the wall.

13.  The unit must be correctly installed 

according to the instructions. 

14.  The unit must be securely placed on a 

horizontal and flat surface.

15.  The unit is at high temperature during 

operation. It keeps hot for a period after 
shut down. Potential danger would occur 
when touching it during this period. 
Unplug the unit and wait till it cools 
before cleaning.

16.

 DON’T

 place the unit close to curtain 

and/or other flammable objects. 
Otherwise there will be a danger of 
catching fire.

17.

 DON’T

 cover the unit with anything 

during operation or a short time after it’s 
shut down.

18.

 DON’T

 wrap the power supply cord on 

the unit.  

19.  The unit must be handled with care, and 

avoid vibration or hitting.

20.  The unit must be securely grounded 

during operation.

21.  If the unit gets damaged, it must be 

repaired by professional electricians with 
relevant qualifications.

22.  When the power supply cord is 

damaged, it must be replaced by a 
qualified engineer to avoid danger.

23.

 DON’T

 use this unit in place where 

causticity or volatile air exists, i.e. dust, 
steam, gas, etc.

24.

 DON’T

 use this unit as a cloth drier 

or towel drier.

25.

 DON’T

 use this unit as a sauna heater.

26.

 DON’T

 use this unit as a room heater.

27.

 DON’T

 use this unit in place of animal 

propagating and raising.

28.

 DON’T

 immerse this unit into water 

for cleaning.

29.  The unit should be plugged in a socket, 

which is easily visible and reachable.

30.  One dark point may exist on the surface 

of the heating elements during the 
first few minutes after it is turned on. 
This is normal, and will not affect the 
performance of the unit.

31.

 DON’T

 use this heater with a 

programmer, timer or any other 
device that switches the heater on 
automatically, since a fire risk exists 
if the heater is covered or positioned 
incorrectly. 

32.  Children should be supervised to ensure 

that they do not play with the appliance.

33.  When assembling, keep clear from any 

board or flammable material.

34.  The unit is for household use only. It 

is not safe to use on a building site, 
greenhouse, barn or stable where there’s 
flammable dust.

35.  An apparatus with CLASS I construction 

shall be connected to a MAINS socket 
outlet with a protective earthing 
connection.

Summary of Contents for KLEH151-0500

Page 1: ...Y TIME PERSONS REQUIRED TerraceTableTop Electric Heater KLEH151 0500 Assembly Instructions IMPORTANT PLEASE KEEP THIS BOOKLET FOR FUTURE REFERENCE THIS IS IMPORTANT INFORMATION REGARDING THE USE AND C...

Page 2: ...ld this product Please do not use substitute parts Use only additional or replacement parts supplied by Kettler In the unlikely event that this product has missing or damaged parts please visit our we...

Page 3: ...ny obstructions such as branches or where the heater is near any objects that can be effected by heat such as furniture curtains or other inflammable objects minimum distance 1 metre 2 DO NOT use this...

Page 4: ...void danger 23 DON T use this unit in place where causticity or volatile air exists i e dust steam gas etc 24 DON T use this unit as a cloth drier or towel drier 25 DON T use this unit as a sauna heat...

Page 5: ...as where gasoline paint explosive and or flammable liquids are used or stored Keep unit away from heated surfaces and open flames 43 Avoid the use of an extension cord because the extension cord may o...

Page 6: ...ommendations below Connection to 220 240 Volts Power Supply It is important to ensure that the electricity supply is of adequate capacity for the electrical load required by the appliance being instal...

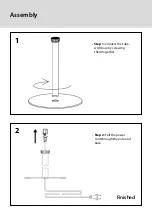
Page 7: ...Assembly 1 2 Finished Step 1 Connect the tube with base by screwing them together Step 2 Pull the power cord through the pole and base...

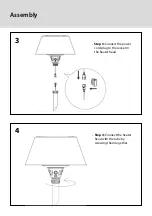
Page 8: ...Assembly 3 4 Step 3 Connect the power cord plug to the socket in the heater head Step 4 Connect the heater head with the tube by screwing them together...

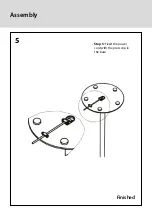
Page 9: ...Assembly Finished Step 5 Fixed the power cord with the press clip in the base 5...

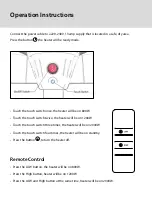
Page 10: ...00W Touch the touch switch twice the heater will be on 1200W Touch the touch switch three times the heater will be on 2000W Touch the touch switch four times the heater will be on standby Press the bu...

Page 11: ...ectricity to the main fuse is working Make certain the power switches are turned on If not choose a setting Technical specification Power supply 220 240V 50Hz Wattage max 2000W Insulation class I WEEE...

Page 12: ...ooklet 12Mth Warranty Unplug the unit and let it cool completely When disconnected from the electrical supply clean the outside of the patio heater with a damp cloth Never use corrosive or solvent cle...

Reviews: