


Safety instructions
Please read the following notes carefully because they include important safety information regarding this product.
1. Always plug in the power plug last and disconnect from the mains when the device is not in use or before cleaning.
2. Do not install and operate the device in rain or extreme heat, moisture or dusty environments.
3. This device is for indoor use only and in a dry environment.
4. If the device has been exposed to drastic temperature fluctuations, do not switch the unit on immediately but wait until it reaches
room temperature.
5. Do not shake the device and avoid brute force when installing or operating.
6. Do not use the device during thunderstorms. Disconnect the unit from the mains.
7. Do not use solvents or aggressive detergent to clean the device. Use a soft, clean cloth.
8. Do not modify the device or the connected power cord.
9. In the event of a serious operating problem, stop using the unit immediately. Never try to repair the unit by yourself. Repairs
carried out by unskilled people can lead to damage or malfunction. Please contact your Authorised Kam Retailer. Always use the
same type of spare parts.
10. Never connect the device to a dimmer pack.
11. Make sure the power cord is never crimped or damaged.
12. Never disconnect the power cord by pulling or tugging on the cord.
13. Never drink the smoke/haze fluid.
14.
IMPORTANT – the smoke aperture on the unit can get VERY HOT. Never touch this area whilst the unit is in operation
and always leave the unit to cool down before touching the area.
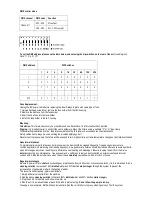
1. Smoke aperture
7. Output indicator LED
13. DMX address dipswitches
19. Low fluid indicator
2. Safety eyelet
8. Duration knob
14. DMX output (3 pin)
20. Wireless remote selection
3. Fluid tank cap
9. Smoke volume knob
15. DMX input (3 pin)
21. Fluid level
4. Timer active LED
10. Unit ready LED
16. IEC mains input
22. Hanging bracket
5. Timer interval knob
11. Output operating LED
17. Power On/Off switch
23. Remote LED indicator
6. Power indicator LED
12. Timer control section
18. Controller connection (optional)
24. Remote Fog button
Setup and operation
1. Unpack your unit.
2. Unscrew and remove the cap of the tank.
3. Fill the tank with smoke fluid (do not over fill the tank).
4. Screw on the cap securely.
5. Check that the pipe is fed down towards the bottom of the tank so that a consistent flow of fluid is supplied to the machine.
6. Connect the IEC mains cable to the rear of the unit and then to the mains power. Turn the unit on using the Power On button.
7. Heat up time is usually between 3-4 minutes. Please ensure no button is pressed during the heat up time.
8. When the machine is ready, the tank will illuminate.
9. Press the Fog button on the remote control for 5 seconds so the fluid has a chance to flow through the heater block.
10. It is recommended that the unit produces smoke with small pauses in between so that the temperature is maintained and the
thermostat doesn’t switch off.


