

INTRODUCTION
Thank you for purchasing the Kam LED Scanner 1. To optimise the performance of this product, prior to use, please read these
operating instructions carefully to familiarise yourself with the basic operations of this unit. The Kam LED Scanner 1 is a superb
lighting effect that will excite both you and your audiences alike. Please keep these instructions in a safe place for future
reference. This unit has been tested in the factory before being shipped to you. There is no assembly required.
WARNINGS
To prevent or reduce the risk of electrical shock or fire, do not expose this unit to high temperature, rain or moisture. There are
no serviceable parts in the unit, please have all servicing and adjustments made by a qualified service engineer. This appliance
is to used by qualified personnel only.
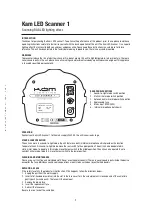
REAR PANEL FUNCTIONS
1. Sound-to-Light mode switch position
2. Static mirror mode switch position
3. Auto constant mirror mode switch position
4. Replaceable fuse
5. Mains input (220V/240V)
6. Internal microphone (not shown)
OPERATION
Connect your Kam LED Scanner 1 to the mains supply 240V AC, the unit is now ready to go.
STAND ALONE OPERATION
The unit can work in a sound-to-light mode, the unit features a built-in internal microphone which provides this function.
To operate the unit in sound-to-light mode, move the rear switch to the upper position. The unit can also be operated in
static mirror mode, to operate in this mode, move the rear switch to the middle position. The unit can also operate in auto
constant mirror mode, to do this, move the rear switch to the lower position.
CLEANING AND MAINTENANCE
Please use a soft lint-free and moistened cloth. Never use alcohol or solvents! There are no serviceable parts inside the device
except for the fuse. Maintenance and service operations are only to be carried out by authorized dealers.
REPLACING A FUSE
If the safety fuse fails, the product will not function. If this happens, follow the directions below.
1. Unplug the unit from the mains supply
2. Insert a flat-headed screwdriver into the slot in the fuse cover. Turn the screwdriver anti clockwise and at the same time
gently push (turn and push). The fuse will then come out.
3. Remove the blown fuse.
4. Insert the replacement fuse.
5. Reinsert the fuse cover.
Be sure to use a fuse of the same type.
Kam LED Scanner 1
Scanning RGB LED lighting effect
2
©
C
O
P
Y
R
I
G
H
T
L
A
M
B
A
p
l
c
2
0
0
8
.
E
&
O
E
.
POWER SUPPLY:
230v / 50Hz~
FUSE:
F2A / 250V
LAMP:
48 LEDs
SERIAL NO:
q
e
w
r
t


