6
PEGS
The Camper Pod awning comes complete with general purpose wire pegs. These will
be suitable for many sites but there will be some instances where different pegs will be
necessary. Your dealer will stock a range of pegs suitable for different types of
ground. For maximum effectiveness, pegs should be driven into the ground at a 45°
angle away from the pegging point. CAUTION: Pegs can be sharp. Do not allow chil-
dren to play around the awning and ensure that suitable protective footwear is worn.
GUY LINES
The Camper Pod comes with guy lines pre-attached. We recommend that these guy
lines are used at all times. Peg the guy lines so that the awning is under tension with-
out distorting the shape, they should run in line with the seams. The guy lines can be
adjusted using the runners. Guy lines should be secured using suitable pegs - see
above. DO NOT allow children to play around your awning. Guy lines are a trip haz-
ard.
ATTACHMENT TO VEHICLE
The Camper Pod has a tunnel at the rear that can be attached to a vehicle
—like the
side door of a camper van (VW style).
Pole & Clamp Fixing
The Camper Pod comes complete with a pole and clamp set. The pole is threaded
through the sleeve in the top of the tunnel. This is then dropped into the gutter on the
side of the camper and secured using the clamps provided.
Keder Beading
The tunnel also has Keder beading sewn to its top edge. The beading can be
threaded into
‘figure of 8’ extrusion (not supplied) and the figure of 8 clipped to the gut-
ter on the side of the camper. Figure of 8 extrusion is available from your supplying
dealer.
Guy Line/Rope
If you camper does not have a gutter it is possible to pull the tunnel to the vehicle by
attaching guy lines/ropes (not supplied) to the top corners of the tunnel, throwing these
over the vehicle and tying them to the wheels or pegging them down. Take care that
the guy lines/ ropes do not damage the vehicle.
The Camper Pod is a universal fit awning designed to fit camper vans up to 1.90 me-
tres high (maximum vehicle or rail height). The fit is universal and is not tailored to any
one vehicle. Therefore, you should be aware that this awning will fit some vehicles
better than others and Kampa do not guarantee a perfect fit.
3
SITING
Choose a site that is flat and, if possible, protected
from the wind. Try to set up your awning with the
doors facing away from the wind.
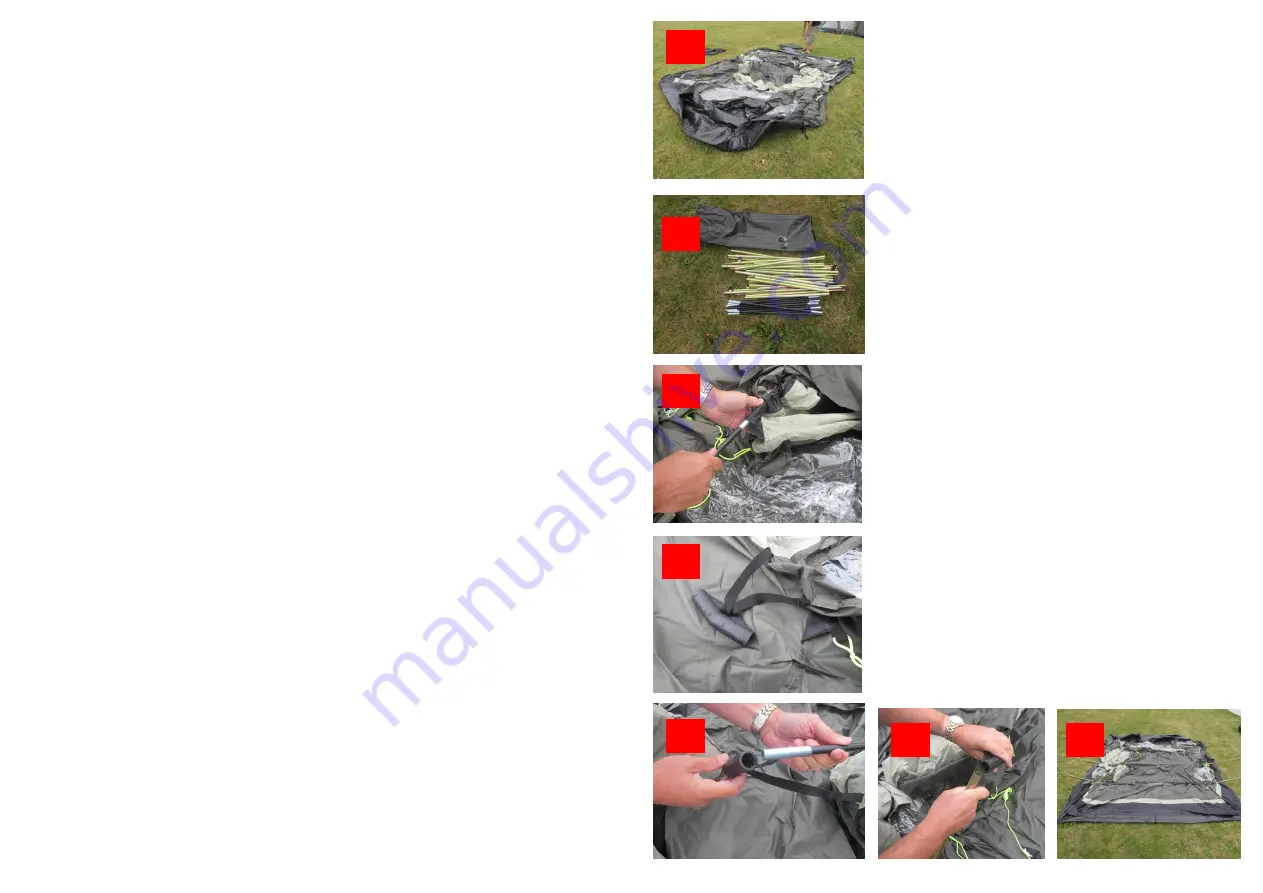
SET UP
To protect your awning from dirt and damage, it may
be beneficial to lay a groundsheet down before un-
packing. Unpack the awning, separate and identify
the different parts (1).
Assemble the three fibreglass poles (2), these are
linked together and just need slotting together ensur-
ing that each pole is fully inserted into the adjoining
pole.
Assemble the six steel legs (2). They are spring
linked and just need to be slotted together ensuring
that they poles are fully inserted into each other.
Assemble the three adjustable steel stretcher poles.
Feed each of the fibreglass poles through the pole
sleeves on the outside of the flysheet. Push the
poles
—do not pull (3).
There are six plastic angled brackets at the eaves of
the tent (4) just below the ends of the pole sleeves.
Each end of the bracket has a different diameter
opening
—one suitable for the fibreglass roof poles
and the other for the steel legs.
Attach all the fibreglass roof poles to the plastic
brackets(5).
Attach the bent end of each of the steel legs to a
bracket (6). Lay all the legs the same way on the
ground facing the front of the tent (7). Peg the two
rear corners.
1
3
4
6
7
2
5


