background image

Luftreiniger KA-520

Assembly instructions

5

3

Transport, storage and packaging

3.1

General transport instructions

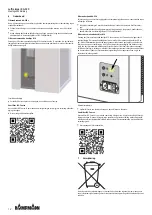
Check on delivery for completeness and transport damage.

Proceed as follows in the event of visible damage:

Do not accept delivery or only accept with reservations.
Record any transport damage on the transportation documents or on the transport company's
delivery note.
Submit a complaint to the freight forwarder.

IMPORTANT NOTE!

Warranty claims can only be made within the applicable period for complaints.
(More information is available in the 

T&Cs

 on the Kampmann website)

4

Installation and wiring

IMPORTANT NOTE!
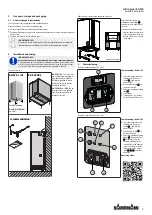
Ensure that the unit is horizontal and maintain minimum clearances!

Only position the unit on a horizontal, stable base surface with a minimum clear-
ance of 15 cm to the rear and to the wall at the side! Leave 50 cm clear in front
of the air inlet and outlet to guarantee optimum operation of the unit.

Position of the unit

Position standing

KA-520 L / XL

KA-520 XXL

Bond the felt glider
on site!

recommendation:

KA-520 L / XL:

 The air purifier

can be used standing upright or
lying horizontally. Attach the
felt gliders supplied to the un-
derside of the unit to prevent
damage to the floor!

KA-520 XL Pro / XXL:

 The ad-

justment feet or rolls supplied
must be screwed into the un-
derside of the unit!

Adhering floor castors to the underside of the unit

max.

1

Beispielbild Luftreiniger L

Attach floor castors pre-as-
sembled on metal plates 

1

(accessory) to the underside of
the unit.

Remove the protective film
from the adhesive strips and
press the plates onto the un-
derside of the unit as shown
in the figure.

5

Commissioning

Electrical connection area of KA-520 L

1

2

3

Commissioning the KA-520
L

Insert the connection cable
supplied into the mains
socket 

3

, then into the

power socket.
Use the main switch 

2

 to

switch on the unit.
Select the required operating
level 

1

:

I: low power
II: high power, e.g. for tem-
porary flushing of the room

Electrical connection area of KA-520 L

6

8

7

5

3

4

2

1

Commissioning the KA-520

Insert the connection cable
supplied into the mains
socket 

1

, then into the

power socket.
Use the main switch 

2

 to

switch on the unit.
Select the required operating
stage I 

4

 (low power) or II

3

 (high power, e.g. for

temporary flushing of the
room): Refer to the adhesive
label on the back for further
information on the status
lights 

5


6


7

 and timer

operation.

Operation video:

Summary of Contents for Luftreiniger KA-520

Page 1: ...kleinste Partikel z B Bakterien Viren Pollen etc mithilfe eines Schwebstofffilters Hepa Filter aus der Luft Zur bestimmungsgem en Verwendung geh rt auch die Einhaltung aller Angaben in dieser An leit...

Page 2: ...liegend ver wendet werden Auf die Unter seite m ssen die mitgelieferten Filzgleiter geklebt werden um Besch digungen am Boden zu vermeiden KA 520 XL Pro XXL In die Ger teunterseite m ssen die beiliege...

Page 3: ...ndschuhe Atem schutzmaske min Schutzklasse FFP2 Schutzbrille tragen Schwebstofffilter H14 Schwebstofffilter H14 mindestens alle 12 Monate wechseln Blinkt die Filterstatusleuchte ver bleibende Betriebs...

Page 4: ...The air purifier KA 520 uses air circulation to filter the smallest particles e g bacteria viruses pollen etc out of the air using a particulate filter Hepa filter Intended use of the unit also inclu...

Page 5: ...g horizontally Attach the felt gliders supplied to the un derside of the unit to prevent damage to the floor KA 520 XL Pro XXL The ad justment feet or rolls supplied must be screwed into the un dersid...

Page 6: ...lter can die off Wear full protective clothing long sleeves long trousers gloves respiratory mask min pro tective class FFP2 protective goggles H14 particulate filter Replace the H14 particulate filte...

Page 7: ...our particules en suspension filtre Hepa L utilisation conforme englobe galement le respect de toutes les indications figurant dans le pr sent manuel Toute utilisation allant au del des limites de l u...

Page 8: ...520 L XL Le purificateur d air peut tre utilis horizonta lement ou verticalement Des patins en feutre fournis doivent tre coll s sur le dessous pour viter d endommager le sol KA 520 XL Pro XXL Les pie...

Page 9: ...s manches longues pantalon gants masque de protection respiratoire de classe de protection FFP2 minimum lunettes de protection Filtre pour particules en suspension H14 Remplacer le filtre pour particu...

Page 10: ...ehulp van een filter voor zwevende deeltjes HEPA filter uit de lucht Tot het beoogde gebruik behoort ook het opvolgen van alle gegevens in deze handleiding Elk ander verdergaand of ander gebruik dan h...

Page 11: ...wor den gebruikt Aan de onderkant moeten de meegeleverde vilt glijders worden geplakt om be schadiging van de vloer te ver mijden KA 520 XL Pro XXL De meegeleverde stelpoten of rol len moeten in de o...

Page 12: ...roek handschoenen ademmasker min beschermingsklasse FFP2 veiligheidsbril Filter voor zwevende deeltjes H14 Vervang het filter voor zwevende deeltjes H14 ten minste om de 12 maanden Knippert het fil te...

Page 13: ...tki np bakterie wirusy py ki itd za pomoc wysokowydajnego filtra powietrza filtr Hepa U ycie zgodne z przeznaczeniem obejmuje tak e przestrzeganie wszelkich wskaz wek zamiesz czonych w tej instrukcji...

Page 14: ...u ywa w po zycji stoj cej lub le cej Na spodzie nale y przyklei do czone podk adki filcowe aby zapobiec uszkodzeniu pod ogi KA 520 XL Pro XXL W dol nej stronie urz dzenia trzeba wkr ci do czone n ki...

Page 15: ...a enie ochronne d ugie r kawy d ugie spodnie r kawi ce mask ochrony dr g oddechowych min klasy ochrony FFP2 gogle ochronne Wysokowydajny filtr powietrza H14 Wymienia filtr powietrza H14 co najmniej co...

Page 16: ...16...

Reviews: