background image

35

Ultra  

1.54

Comfortable indoor climate in high-end interiors

Installation and operating instructions

11.2  Commissioning

Proceed as follows after conducting the above checks:
•  Open the valves on the heating system.
•  Properly fill the pipes and heat exchanger, if they have been drained after 

installation.

•  Ensure that the entire system is vented.
•  Check that all pipes and valves are leak-tight.
•  Start up the Ultra by applying voltage to all electrical components.
•  Check the direction of rotation and all speed levels or the speed range 

(0-100  %).

11.3 Post-commissioning checks

Perform the following checks after commissioning the unit:

Are the fans switched off permanently by the thermal contact (the 

exception are the power module and stage switches 30773 and 

30774)?

To do so, disconnect a wire from terminal TK of the stage switch (Danger: 
230 V!). All the fans should switch off immediately. The operating readiness 
indicator must go out on the stage switch. Reconnect the wire to terminal 
TK. The fans should not start up again. Reset the stage switch and switch 
it on again. The fans should restart. Briefly disconnect the connecting wires 
of all thermal contacts individually to check that all thermal contacts are 
correctly wired.

If the fan switched off by the thermal contact (applies to the 


0 – 100 % variable power module)?

To do so, disconnect a wire from terminal TK of the motor of the Ultra to 
be checked (Danger: 230 V!). The fan should switch off immediately. The 
fault should be reported via the potential-free NCC contact and trigger that 
the fan switches off, depending on the control used. Reconnect the wire 
to terminal TK. Depending on the control used, the fan should start up 
again or may not start up again (in the event of the fan being switched off 
permanently) Perform this check for every single Ultra to monitor all units.

Are the fans in all units rotating in the correct direction at all 

switching stages?

The direction of rotation is indicated by the arrow. Make sure that the fan 
is drawing in air. Swap 2 phases on the stage switch if all three-phase fans 
are rotating in the wrong direction at all fan stages. Swap the auxiliary 
phase connections (Z1, Z2) if the ASC single-phase motors are rotating in 
the wrong direction. Check the wiring of the incorrectly rotating fans if 
individual fans are rotating in the wrong direction.

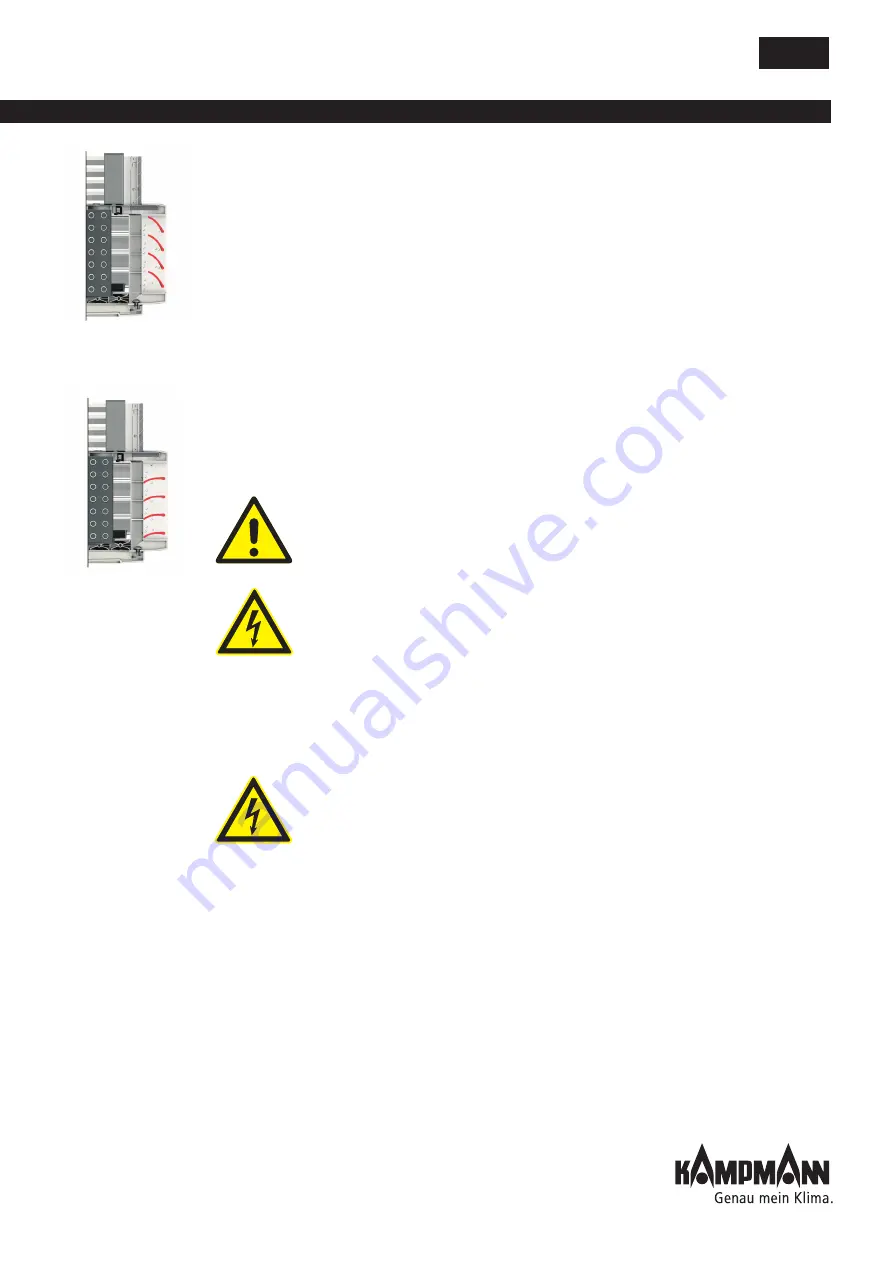
Heating mode:

position diagonally down  
(factory setting)

Cooling mode:

horizontal position

Summary of Contents for Ultra Series

Page 1: ...ting instructions Ultra 2 stage three phase motor 1 stage single phase motor EC single phase motor Installation and operating instructions Please retain carefully for future use Read carefully prior t...

Page 2: ...r optionally also for heating or cooling Ultra series 84 96 for cooling 1 Base cover removable after rotating by 6 2 Cu Al heat exchanger 3 Whisper quiet sickle blade axial fan 4 Whisper quiet sickle...

Page 3: ...condensation pump 8 2 Safety information 9 3 Scope of delivery 10 4 Transport and storage 11 5 Technical data 11 6 Installation 12 6 1 Installation of the Ultra 12 6 2 Filter assembly 14 6 3 Installa...

Page 4: ...hanger 37 13 3 Motor 37 13 4 Filter optional accessory 38 13 5 Maintenance of the Ultra for cooling 38 14 Operational faults 41 14 1 All unit heaters 41 14 2 AC single phase motor with motor junction...

Page 5: ...ve is deemed not to be correct and proper The operator of the unit is solely responsible for any damage arising as a result of this Correct and proper use is also deemed to include compliance with the...

Page 6: ...ax water temperature C 5 90 Min max air intake temperature C 20 to 40 Min max air humidity 15 75 Max operating pressure bar 16 Min max glycol percentage 25 50 Height when ceiling mounted max approx 4...

Page 7: ...hnical data To prevent impermissibly severe cooling down of the housing when the fan is at a standstill we would recommend the use of valves e g thermoelectric shut off valve with recirculating mode T...

Page 8: ...e Note the following limits of use of the condensation pump for the max permitted cooling conditions CHW 6 10 C at entering air temp 27 C 60 rel humidity Ultra series 85 max permitted delivery height...

Page 9: ...ed to be shorted before working on the electrics The terminals and connectors are still energised even when the unit is switched off Check whether the terminals and connectors are de energised with a...

Page 10: ...e ruled out despite care during manufacture The operator of the unit is responsible for the EMC conformity of the entire system in accordance with the local applicable standards Modifications to the u...

Page 11: ...in the position shown on the packaging 5 Technical data 1 Figures in brackets refer when the factory setting is changed to the max possible speed This is not suitable for cooling with dehumidificatio...

Page 12: ...ermits vibration free suspension consider the use of anti vibration rubber washers for decoupling purposes refer to the table below for the maximum mounting height Maximum mounting height Maximum moun...

Page 13: ...ew nuts as per the diagram Caution Never lift the unit by the louvres when transporting or installing it Lift the unit under the ceiling and attach it to the brackets by pushing the slots on the brack...

Page 14: ...ctly onto a solid ceiling and pipes are run under the ceiling the air intake crown cannot be fitted as intended In this case it can optionally either be omitted entirely or adapted on site for instanc...

Page 15: ...tion The use of flexible pipes such as braided pipe connections spiral or corrugated pipes are recommended in particular when installing the unit under a solid ceiling When used in conjunction with ap...

Page 16: ...wn in This is drawn off by the condensation pump and discharged along a hose connected on the pressure side Depending on conditions on site the water can be discharged into drainage lines possibly wit...

Page 17: ...alarm contact are factory wired on the Ultra In the event of an alarm message the KaControl system closes the valve and the fan is switched to stage 1 Ultra for cooling example shows axial fan Conden...

Page 18: ...he mains voltage Pour water into the condensation tray The pump should switch on automatically and switch itself off again Test the alarm switch add water until the alarm switch is triggered acoustic...

Page 19: ...cal Wiring Regulations stipulated by the regional energy supply companies Only connect the unit to fixed wiring The operator of the unit is responsible for the EMC conformity of the entire system in a...

Page 20: ...ver it impermissibly heats up combined with an appropriate protective switch The motor is thus protected against overload operation over and undervoltage unacceptably high ambient temperature and the...

Page 21: ...relay is energised Contact C NO closed In the event of a fault the relay becomes de energised Contact C NO open There is no fault signal contact in the fans in models 84 and 85 and therefore no fan fa...

Page 22: ...Ultra Make sure that the motor cable is not pushed through the guard close to the fan Continuously variable power module or KaControl module recirculation air Loosen do not remove the two screws that...

Page 23: ...left so that the KathermBoard can be removed to the front Electrically wire the unit Install the KathermBoard Position and fix the metal holding strip with the rail for this purpose Commission the un...

Page 24: ...Several Ultra units even of different sizes can be connected in parallel to a stage switch if the switching power of the stage switch is not exceeded The thermal contacts of all Ultra unit heaters hav...

Page 25: ...switching units Different switches from our range are available to switch and control the speed of the motors The table at the bottom of page 24 provides an overview of the switching units used their...

Page 26: ...in parallel to a single phase controller up to the maximum switching power of the single phase controller If several Ultra units are connected to a single phase controller we recommend the use of int...

Page 27: ...olling the fan motor either via a 0 100 K potentiometer a 0 10 V DC signal or a 0 5 V DC signal The type of control is pre set by a jumper pin To guarantee a reliable start up the fan is operated for...

Page 28: ...thers the jumper must be connected to 0 5 V on all power units The speed does not behave linear to the control voltage with this setting refer to Fig 3 Input resistance Ri 100 kOhm Fault signal output...

Page 29: ...e power module are displayed by the LEDs on the power PCB 10 3 2 3 KaControl recirculation air module type 16C1 The KaControl recirculation air module offers the option of controlling the fan motor an...

Page 30: ...f 100 V AC is factory set The maximum limit can be set as described in Chapter 10 3 2 2 via DIP switches on the power module or alternatively via the KaControl system Maximum permissible cable length...

Page 31: ...protect personnel when operating the unit with residual current protection devices as well as with frequency converters When power is applied to the unit pulse like capacitor load currents in the int...

Page 32: ...only for models 96 and 97 In fault mode the relay is energised Contact C NO closed In the event of a fault the relay becomes de energised Contact C NO open There is no fault signal contact in the fans...

Page 33: ...ns power supply by the master switch 0 10 V DC control signal The 0 10 V DC control signal at input terminals AI2 and GND Ri 20 kOhm on the KathermBoard is interpreted as per Table 9 with regard to sp...

Page 34: ...rm Board Refer to Table 10 for values Maximum on site fuse 16 A 11 Commissioning 11 1 Pre commissioning checks The base of the Ultra is covered with a transparent film to protect it from damage during...

Page 35: ...the connecting wires of all thermal contacts individually to check that all thermal contacts are correctly wired If the fan switched off by the thermal contact applies to the 0 100 variable power modu...

Page 36: ...g maintenance cleaning work 13 1 Housing The Ultra housing is maintenance free Dirt on the housing does not affect the operation of the unit Cleaning is only necessary for aesthetic reasons Opening th...

Page 37: ...stems assemblies equipment If the defect constitutes an acute danger then do not operate the unit system in its defective state Pay attention to all safety and operating guidelines EN 50 110 IEC 364 w...

Page 38: ...r and cleaned if necessary produce a maintenance schedule The G3 quality filter is made of plastic and can be beaten to clear off coarse dirt Replace it in the event of more serious dirt The following...

Page 39: ...e maintenance including cleaning the external pump sump and float switch can be performed without removing the housing cover Simply remove the discharge slats in the discharge field This makes the pum...

Page 40: ...tion lines if the condensation is seriously contaminated or draining away badly Refer in this respect to the instructions supplied for the condensation pump First loosen the plug in nut to clean to fl...

Page 41: ...for cooling serious condensation forming outside the condensation tray Fan is not working Room air humidity too high Close the cooling water valve Check the limits of use Fault Possible cause Remedy F...

Page 42: ...le and control signal 4 V DC Main fuse on the connecting PCB secondary fuse on the connecting PCB fuse on the power PCB and or fuse on the KathermBoard is faulty Check fuses Control voltage poles swit...

Page 43: ...with a fault signal contact in a group wire contact C NC Fault Possible cause Remedy Fan does not rotate when power is applied to the module and control signal 4 V DC Mechanical blockage Switch off d...

Page 44: ...Ebert Str 128 130 49811 Lingen Ems Germany T 49 591 7108 660 F 49 591 7108 173 E export kampmann de W Kampmann eu Kampmann UK Ltd Dial House Govett Avenue Shepperton Middlesex TW17 8AG Great Britain T...

Reviews: