background image

Horis User Manual

2.3

Space Behind the Panel

it can be pushed in and out for the system operation. Put the cap
back.

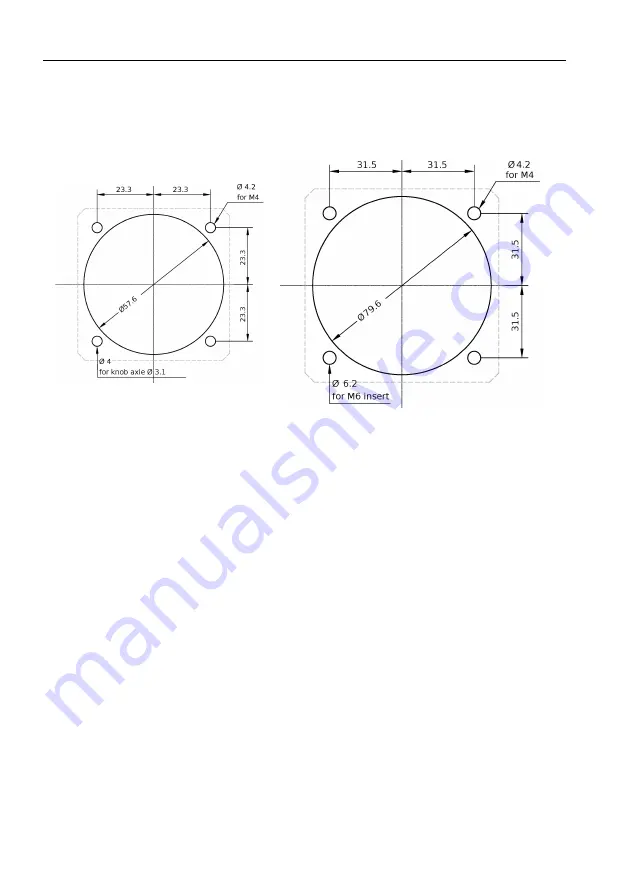
(a)

57 mm

(b)

80 mm

Figure 4:

Instrument panel cutout and mounting holes. Some toler-
ance has been incorporated. Warning: Figures are not in
scale.

2.3

Space Behind the Panel

Horis requires only minimal space behind the instrument panel. Depth
of housing is 48 mm, connectors require additional 19 mm and cables
and tubing require about 20 mm as shown on Figure 5.

2.4

Connections

Figure illustrates all connections at the back side of the instrument.

16

©

Kanardia

2021

Summary of Contents for Horis

Page 1: ...Horis Installation and User Manual Kanardia d o o August 2021 Manual Revision 1 16 Software Version 3 8...

Page 2: ......

Page 3: ...licence The license is available on creativecommons org licenses by sa 3 0 legalcode web page and a bit more human readable summary is given on http creativecomm org licenses by sa 3 0 In short the l...

Page 4: ...reely available on request under the license mentioned above and can be obtained by email Please send requests to info kanardia eu Revision History The following table shows the revision history of th...

Page 5: ...o of broken LCD 1 8 Sep 2018 Pinout description completed 1 9 Mar 2019 Initial brightness and GNSS info 1 10 Jul 2019 Roll pitch and yaw section was added 1 11 Dec 2019 Chrono screen was added 1 12 Ma...

Page 6: ...tenna GPS 20 2 4 6 Outside Air Temperature OAT 21 2 4 7 RS 232 Port NMEA Out 23 2 4 8 D sub 9 Port 24 2 5 Levelling AHRS 25 2 5 1 Yaw Misalignment 26 2 5 2 Procedure 27 2 6 Compass Calibration 27 2 7...

Page 7: ...etting the Neutral Pitch 44 4 5 Diminishing the Brightness 44 4 6 Settings 45 4 6 1 Units 45 4 6 2 Airspeed 46 4 6 3 Response Time 47 4 6 4 AHRS Level 48 4 6 5 Screens 49 4 6 6 Direction Indicator 50...

Page 8: ...ris User Manual CONTENTS 4 6 16 Security 57 4 6 17 About 57 5 Autopilot 58 5 1 Intended Use 59 5 2 Operation Limitations 59 6 Limited Conditions 60 6 1 Warranty 60 6 2 TSO Information 63 8 Kanardia 20...

Page 9: ...ent 1 1 Latest Manual Version The Horis manual changes with time Your printed manual may be out of date Please check our web site https www kanardia eu product horis for the latest manual version 1 2...

Page 10: ...ngles The module holds several sensors which readings are combined to gether using sophisticated algorithms Our implementation follows ideas of Extended Kalman filtering which combines mathematical mo...

Page 11: ...OAT 12 bit range 55 to 125 C 0 5 C accu racy Communication CAN bus 29 bit header 500 kbit Kanar dia protocol RS 232 NMEA out 9600 baud default Sensor processor 32 bit ARM Cortex M3 80 Mhz Display pro...

Page 12: ...wer consumption 3 2 W Current 270 mA at 12 V Panel hole 80 mm 2 25 inch diameter standard fit Display 320 x 240 pix diagonal 3 45 16 bit full colour super bright Table 3 Additional specifications for...

Page 13: ...red is 1 2 minutes while almost correct angles shall be established after 30 seconds 2 Installation Maintenance Horis requires a standard size 57 80 mm hole in the instrument panel Position of the hol...

Page 14: ...hen necessary 2 2 Mounting Procedure The mounting screw holes are located on a circle of 66 89 mm diam eter The instrument is mounted using three screws type M4 and one M6 insert1 To prevent internal...

Page 15: ...ver and loosen the screw Slide the knob from its axle Figure 3 shows an example of the knob with its cap removed Figure 3 Photo of the knob with its cap removed Some older Horis 80 have an additional...

Page 16: ...e toler ance has been incorporated Warning Figures are not in scale 2 3 Space Behind the Panel Horis requires only minimal space behind the instrument panel Depth of housing is 48 mm connectors requir...

Page 17: ...panel Figure shows 57 mm version but side dimensions for 80 mm Horis are even smaller 40 mm depth Figure 6 Back view of the instrument with connections 57 mm ver sion is shown Horis must be connected...

Page 18: ...llowed to enter the tubing We strongly recommend labelling each tube before connecting to Ho ris or any other instrument If you ever have to remove Horis from the instrument panel this will help a lot...

Page 19: ...und 8 GND ground Table 4 Description of pins for the CAN bus communication When connected to the bus Horis will transmit a large amount of information attitude altitude position temperature baro setti...

Page 20: ...or a similar circuit breaker shall be used on the positive lead 2 4 5 GPS Antenna GPS Please consider mounting GPS antenna as follows Find a good spot in a cabin where the antenna is able to see blue...

Page 21: ...ics shop Any 3 3 V active antenna with SMA male connector can be used The antenna is used as an additional stabilisation of artificial horizon and as a source for the tracking azimuth 2 4 6 Outside Ai...

Page 22: ...sources of heat engine heat and exhaust heat direct sunlight heated air exited from cabin We also do not recommend installing the probe in the heated cabin area since the elevated temperature in the c...

Page 23: ...d in the tip 2 4 7 RS 232 Port NMEA Out Important Instruments produced before 1 7 2016 may not have this port active Note Horis 57 model produced since Jan 2020 is using different connector See sectio...

Page 24: ...e stop bit a k a 9600 8N1 You can choose different baud rate but you can t change parity or stop bit Please note that max current output on RS 232 port is 50 mA at 12 V 0 6 W A larger current may dama...

Page 25: ...erved for future use do not connect Table 7 D sub 9 pin description Currently only transmit line can be used for GPS NMEA senstences Typically pin 5 GND and pin 7 TX 1 are connected to some receiveing...

Page 26: ...there is no yaw misalignment and the correction angle is zero This perfect situation is illustrated on figure 13 left Some instrument panels are rotated regarding the airplane x axis longitudinal axis...

Page 27: ...ion from the settings menu Set the Yaw misalign value first In most cases this value is zero Then select the Start leveling This will start the leveling procedure Wait for the progress bar to finish a...

Page 28: ...ttery Module The battery module inside Horis is complete system for battery charg ing protection and monitoring Backup battery module inside Horis has its characteristics and limitations listed in Tab...

Page 29: ...er density so the total run time is lower than in competition instruments Description Value Type LiFePO4 Capacity 850 mAh Weight 21 g Cell voltage 3 2 V Table 9 Internal backup battery cell specificat...

Page 30: ...nally 2 7 3 Status icon If Horis is equipped with internal battery the battery icon appears in the top right corner of the screen This icon is present on all pages It indicates current battery status...

Page 31: ...2 9 Repair Horis has no repairable parts inside In case of malfunction it must be sent to factory for repair 2 10 Horis Use in Gliders Experience shows that Horis can be successfully used also in glid...

Page 32: ...ot recover when voltage returns back to normal and hard reset power off on is necessary This problem can be avoided in several ways Most gliders use two main batteries When Horis is needed always fly...

Page 33: ...ed to Horis and AD AHRS module Figure 17 shows the Blu module Figure 17 A small CAN bus to Bluetooth bidirectional interface module Below are step by step instructions for the update Refer also to Blu...

Page 34: ...ll appear on the Horis screen during the update This is normal 8 Once the update has been completed and red crosses has dis appeared Kanja can be disconnected and Blu removed New firmware is installed...

Page 35: ...pdate file is probably corrupt Download the file again from our web site and try again Do not forget to use safe remove option after copy before the SD card is removed from PC 3 Horis Screens Horis ca...

Page 36: ...gray bars indicates loss of signal Note that GPS reception is not mandatory for AHRS AHRS will function properly without it Ground speed is shown left of the GPS status signal after the GPS fix was ob...

Page 37: ...itude value and altitude tape moving in the background 6 Rate of climb a k a vario Small bar shows climb or descent and a value on the bottom expresses it in numbers 7 Baro correction a k a QNH 8 Outs...

Page 38: ...Below Relative wind indication arrow wind speed and di rection This is shown only when Magu electronic magnitic compass is connected to CAN bus Some elements of the AD AHRS screen are configurable Pl...

Page 39: ...rn the knob to move the reference marker When Horis is coupled with an autopilot the bug is in sync with autpilot direction setting When autipilot direction reference is changed the bug will be automa...

Page 40: ...G Meter screen with markings Figure 20 shows the screen with several important points marked 1 Scale neutral point is at 1 G and it is located exactly at 9 o clock Scale has green range low and high...

Page 41: ...rent G load are also presented in numeric form Knob rotation will reset min and max markers and values 3 4 Chrono The Chrono screen is optional and it may not be enabled by default When not visible it...

Page 42: ...rn either left or right to stop for lap Turn left to reset or right to continue You can switch the pages even when the stopwatch is running In this case a stopwatch symbol appears on the top right par...

Page 43: ...re are only three flight operations adjusting the QNH value setting the neutral pitch and changing the brightness There are more settings but they are not accessed frequently Figure 22 Illustration of...

Page 44: ...indication line changes with the aeroplane gross weight and flight regime Horis allows resetting neutral pitch for the current flight regime Open the main menu by pushing the knob for a few seconds Th...

Page 45: ...pecified in settings See section 4 6 14 for more details 4 6 Settings Horis can be configured with several options described next The settings screen is accessed via the main menu Figure 23 illustrate...

Page 46: ...eed This option is used to define the speed tape colours of the airspeed indicator Figure 26 illustrates the window and figure 25 defines meanings of individual values on the speed tape The following...

Page 47: ...ends and the red range begins The red range never ends Yellow upper range is defined auto matically between Green end and VNE You can also mark valid extended flap position region on the speed tape In...

Page 48: ...se Slow slow response Normal normal response default Vivid vivid response Wild very fast response Figure 27 Illustration of the response time options window 4 6 4 AHRS Level After the installation of...

Page 49: ...for more details 4 6 5 Screens Horis may show up to four different screens For each screen you can define its content See figure 28 It can be one of the following options AD AHRS Screen Direction Ind...

Page 50: ...data source mag netic compassed is disabled This option can be useful when MAGU is connected to the CAN bus but its calibration is poor or one of its sensor is defective 4 6 7 G Meter The G Meter scre...

Page 51: ...c Offset Modern digital sensors used for IAS and altitude measurements may drift a little bit over time especially after being exposed to a pro longed period of severe cold Selecting the Pitostatic Of...

Page 52: ...altitude offset you need a reference altimeter Set the QNH on Horis and reference altimeter to the same value say 1013 hPa Use the knob to select the altitude offset frame This is already selected wh...

Page 53: ...ocal time offset Positive values are used for countries with Eastern longitudes while Western latitudes have negative values The time zone is defined combining two values The first one takes whole hou...

Page 54: ...CAN bus Please refer to the Magu manual for the details 4 6 13 NMEA Out Here you can select the baudrate for the RS232 output port and the output format 9600 bauds and Standard are default values see...

Page 55: ...S constallation where GPS and Glonass satellites are visible Distribution is poor North ern latitudes are not present The window shows positions of the satellites on the sky GPS con stellation is repr...

Page 56: ...cceptable for route navigation 5 10 Moderate Position is useful but it should be improved 10 20 Fair Measurements indicate a very rough location 20 Poor Inaccurate measurements Table 12 How to interpr...

Page 57: ...t the PIN enter 75213 and you will get access to the Settings menu You can also set an empty PIN In this case Horis does not ask for password Figure 34 You can specify your own PIN to limit access to...

Page 58: ...y form a very neat autopilot system This means that the following devices are required for an autopilot system All these devices are connected via CAN bus 1 Horis 80 or 57 mm It must be a master Horis...

Page 59: ...autopilot shall be only used in VFR Visual Flying Rules conditions Information from the Aircraft Operating Handbook always su persedes information given in this manual The autopilot is designed to be...

Page 60: ...fication when under normal use for a period of twenty four months 24 from the date of retail pur chase by the original end user purchaser Warranty Period If a hardware defect arises and a valid claim...

Page 61: ...to its use This warranty does not apply a to damage caused by use with non Kanardia products b to damage caused by accident abuse misuse flood fire earthquake or other external causes c to damage caus...

Page 62: ...esponsi ble for indirect special incidental or consequential damages resulting from any breach of warranty or condition or under any other legal theory including but not limited to loss of use loss of...

Page 63: ...Information Limited Operation This product is not TSO approved as a flight instrument Therefore the manufacturer will not be held responsible for any damage caused by its use The Kanardia is not resp...

Reviews: